News
Size 24 (5/8 inch / 15 mm) Self Cover Buttons by ILikeBigButtons.com February 26 2020

We love our Cover Buttons! Easy to make and versatile they are one of my favorite go-to craft supplies.
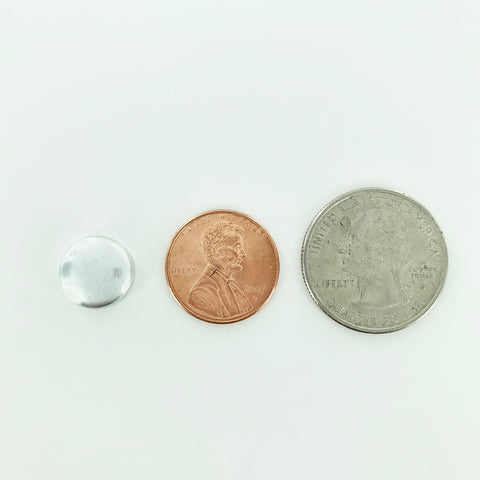
We carry them in 7 great sizes. The second smallest, Size 24 (5/8"), is just slightly larger in diameter than a Skittle or M&M and available in both Wire Back (sewable) and Flat Back (glueable).
Size 24 (5/8 inch / 15 mm)

Size Reference

I Like Big Buttons! 💘 Cover Button Love Sale 💘
Cover Button Sets and Cover Button DIY Kits are 10% OFF | No Coupon Necessary
Size 24 Cover Buttons are great for smaller projects:
Lace & Fabric Cover Button Earrings

Fabric Cover Button Mini Clothespins

Fabric Cover Button Bobby Pins

Fabric Cover Buttons for your favorite outfit


To see other great Fabric Cover Button ideas, visit our DIY Project section here.
Size 20 (1/2 inch / 12 mm) Self Cover Buttons by ILikeBigButtons.com February 20 2020
We love our Cover Buttons! Easy to make and versatile they are one of my favorite go-to craft supplies.
We carry them in 7 great sizes. The smallest, Size 20 (1/2"), is about the size of your pinky nail in both Wire Back (sewable) and Flat Back (glueable).
Size 20 (1/2 inch / 12 mm)

Size Reference
I Like Big Buttons! 💘 Cover Button Love Sale 💘
Cover Button Sets and Cover Button DIY Kits are 10% OFF | No Coupon Necessary
Size 20 Cover Buttons are great for small projects:
Stud-sized Fabric Cover Button Earrings


Fabric Cover Button Bobby Pins
Fabric Cover Buttons for your favorite outfit
To see other great Fabric Cover Button ideas, visit our DIY Project section here.
Fabric Cover Buttons - Easy To Make, Great Impact! @ ILikeBigButtons.com February 06 2020
These aren't your grandma's Cover Buttons!!! Well, actually they are ;) only better, with so many many great uses for them.
Flat Backs are used for crafts where you would like to glue a cover button: jewelry, bracelets, rings, earrings, necklaces, bobby pins and barrettes, scrapbooking, and much more.
Wire Backs are used for fabric cover buttons in sewing, shoes, clothing, ponytail holders and much, much more.
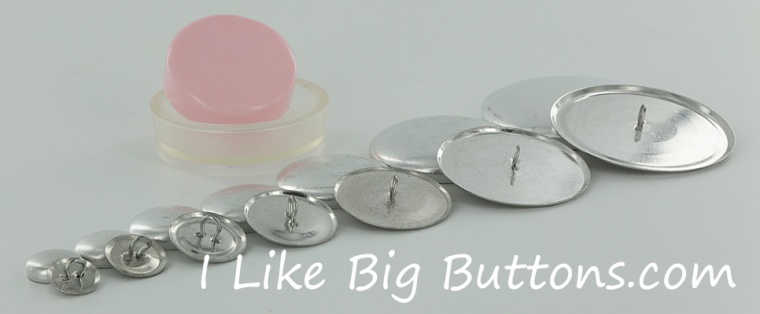
Here are the 7 sizes we carry. From 1/2", which is about as small as your pinky nail, all the way up to 1 7/8" in diameter, about the size of the round side of a kiwi fruit. We carry them in both flat back (glueable) and wire back (sewable).
- Size 20 (1/2 inch / 12 mm)
- Size 24 (5/8 inch / 15 mm)
- Size 30 (3/4 inch / 19 mm)
- Size 36 (7/8 inch / 23 mm)
- Size 45 (1 1/8 inch / 28 mm)
- Size 60 (1 1/2 inch / 38 mm)
- Size 75 (1 7/8 inch / 48 mm)
Assembling fabric Cover Buttons is fast and simple. In just seconds, you will have a button ready for your latest craft project.
Our I Like Big Buttons! 💘 Cover Button Love Sale 💘
Cover Button Sets and Cover Button DIY Kits are 10% OFF
No Coupon Necessary | Good Through February 29, 2020.
See our pictorial below:

How to Make Fabric Cover Buttons:
Cover Buttons are easy to assemble:
- Cut your fabric scrap. You will want a circle that is about twice the diameter of your button blank.
- Put your fabric piece in the larger assembly tool piece (RIGHT SIDE DOWN). When you look into the tool you want to see the back of the fabric.
- Place the button front (the domed piece) on top of the fabric. Leave the fabric edges hanging out.
- Press the cover button edges down into the tool.
- Place the back cover button piece on top of your fabric and button front. If the cover button will be subject to repeated tugging from the back, you may want to add a little e6000 adhesive before attaching the back.
- Take the smaller piece of the assembly tool and with the open side down place it on the button back.
- Press down. You may hear a pop when the last bit of the button back slips into place. If you take the tool out and the button is not completely secured, just put it back in and press down again.
- When you take the small assembly tool piece off, the fabric edges will be secured underneath the button back.
- Remove the button from the larger assembly tool piece.
- Tada!
To see other great Fabric Cover Button ideas, visit our DIY Project section here.
How to make a Ribbon and Cotton Webbing Key Fob Hardware Wristlet by ILikeBigButtons.com March 18 2019

Supplies:
- 11"x1.25" Fabric strip (of your choosing)
- Ribbon (make sure it's narrower than the Cotton Webbing)
- Heat N Bond or Fusible Tape
- 1" or 1.25" Key Fob Hardware set
- Key Fob Hardware Pliers
- Sewing Machine
- Iron


1. Cut a 11" section of Cotton Webbing and Ribbon of your choosing.

2. Iron Heat N Bond (11" by thinner than ribbon) to Cotton Webbing making sure to center it, this is not a necessary step but it makes it easier to sew the Ribbon on especially with embroidered ribbon.

3. Iron the Ribbon to the Cotton Webbing.

4. Now sew up one side of the Ribbon and down the other. The Ribbon is attached securely to the Cotton Webbing now. Trim the edges so that they are even.

5. Fold the Cotton Webbing in half, right sides facing out and match up the ends. Stitch the ends together with a 1/4" seam allowance. Trim any loose threads.

6. Tuck the sewn seam ends into the Key Fob Hardware, making sure that the Cotton Webbing is in there evenly and not hanging out one end or the other.

7. Using your Pliers wrapped in duct tape or a scrap of fabric to protect the metal from getting scratched, squeeze the Key Fob Hardware closed a little at a time. I like to go back and forth a couple of times so that I don't over crimp one side too much.
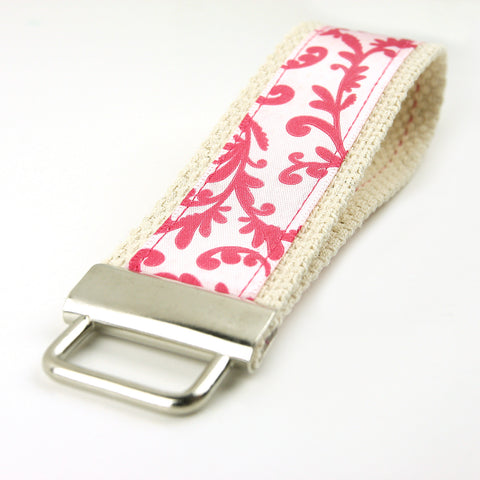

8. Add the Key Ring and Yay!!! You are done. Good Job!!!
To see all our Key Fob Hardware Tutorials, visit our Projects section here.
"No Sew" Valentine's Day Craft Ideas from ILikeBigButtons.com February 13 2019
 |
 |
 |
 |
 |
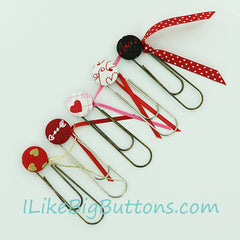 |
I can't believe Valentine's Day snuck up on us so fast, let's look at some fun and easy "No Sew" Cover Button crafts we can make for those we love!
Don't forget our DIY Kits are on sale on our website through 2/15/19, no coupon necessary.
Valentine's Day Fabric Cover Button Barrettes
Wear these adorable Snap Barrettes to match or accent your favorite outfit for Valentine's Day or dress up your favorite t-shirt and jeans for an afternoon outing. Enjoy!
Supplies:
- 1-2 Completed Flat Back Fabric Cover Button (Choose your size, Size 20 through Size 36 all work great, size depends on the statement you want to make)
- 2 Snap Barrettes
- E6000 or comparable adhesive ... See More

Valentine's Day Fabric Cover Button Jumbo Paper Clip Bookmarks
Use these adorable Paper Clip Bookmarks to accent a Valentine for your special loved one or hold your place in your favorite book or cookbook Enjoy!
Supplies:
- 1 Completed Flat Back Fabric Cover Button (Attach size 36 (7/8" - 23 mm), size 45 (1 1/8" - 28 mm), or size 60 (1 1/2" - 38 mm) flat back cover buttons.)
- 1 Jumbo Paper Clip
- 1 6" Piece of Ribbon
- E6000 or comparable adhesive
- Sand Paper ... See More

Valentine's Day Fabric Cover Button Badge Reels
Use these adorable Valentine's Day Badge Reels to hold your ID for work, school, or play. Enjoy!
Supplies:
- 1 Completed Flat Back Fabric Cover Button (Size 45 sits on top of Badge Reel, Size 60 rest over Badge Reel)
- 1 Badge Reel
- E6000 or comparable adhesive
- Sand Paper ... See More

Lace & Fabric Cover Button Earrings
Give these cute Lace & Fabric Cover Button Earrings as Valentine gift for your best friend or loved ones. Enjoy!
Supplies:
- Flat Back Cover Buttons (I used Size 24, Size 30, and Size 36 Cover Buttons)
- Cover Button Assembly Tools
- Cover Button Templates
- Fabric Scraps
- Lace Scraps
- E6000 Adhesive or Hot Glue
- Sharpie Permanent Marker
- Surgical Stainless Steel Earring Posts and Backs ... See More

Fabric Cover Button Bracelet Tutorial
Give this charming Cover Button Bracelet as Valentine gift for your best friend or loved ones. Enjoy!
Supplies:
- 11 to 13 - Completed Size 20 Flat Back Fabric Cover Buttons
- 1 Disk and Loop Bracelet (We have two sizes available 7.2" or 8.25")
- 11 to 13 - 1/2" x 1/2" Felt squares
- E6000 or comparable adhesive ... See More

Give these adorable Cover Button Bobby Pins as Valentine gifts for your best friend or loved ones. Enjoy!
Supplies:
- 1 Completed Flat Back Fabric Cover Button (Choose your size, Size 20 through Size 45 all work great, size depends on the statement you want to make)
- 1 Bobby Pin
- E6000 or comparable adhesive ... See More

NEW! DIY Starter Kits @ ILikeBigButtons.com February 11 2019
![]()
We have had a lot of requests for DIY Starter Kits for our most popular supplies. We have compiled our customers' favorite craft findings and supplies into great Starter Kits. Check them out!
--> 10% off all our DIY Kits through Friday (2/15/2019) no coupon necessary. <--

Cover Buttons Starter Kits:
We have assembled several Cover Button kits with our customer's favorite supplies. Jumbo Paper Clips, Pendant Bezels, Thumb Tacks, Jewelry Supplies, Bobby Pins, Snap Barrettes, and Badge Reels. Choose from 3 Cover Button sizes and a variety of finishes/colors. Everything that you need to get started (fabric and glue not included *).

Key Fob Hardware Starter Kits:
We have also put together ready-to-go Key Fob Starter Kits with Pliers in a mix of sizes, finishes, or both. Everything that you need to get started (fabric not included *).

To see other great DIY STARTER KIT options, visit our DIY KITS section here.
How To Make A KAM Plastic Snap Cord Keeper/Organizer by ILikeBigButtons.com February 05 2019
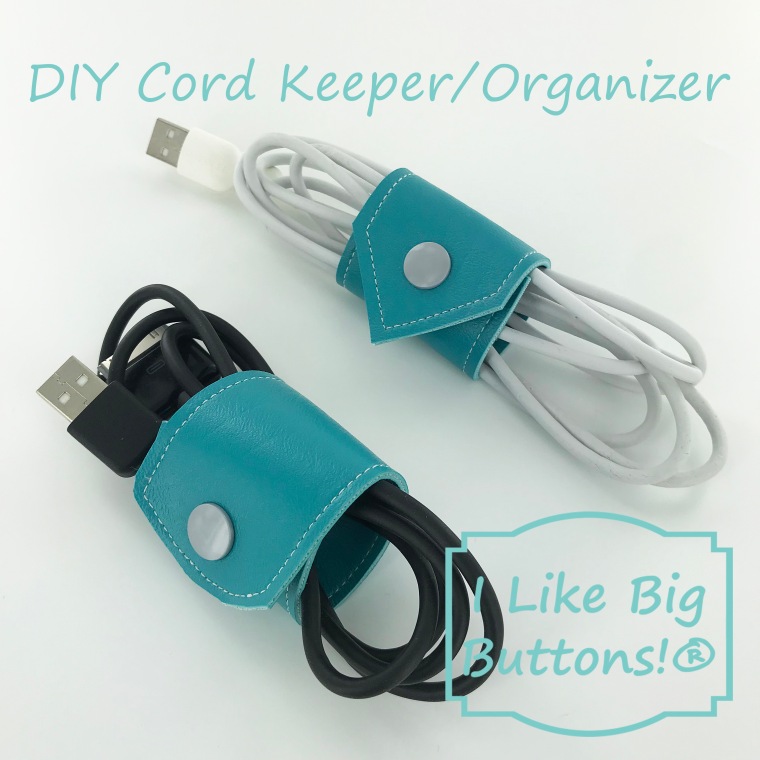
Cords, cords, cords!!! Despite my husband's best efforts to make our house wireless, there are cords everywhere. Part of the joy of being a mom of many, I suppose. 😜 Everyone has one or more somethings that need to be charged and my husband makes sure there are enough cords so that no one is left crying. Have I mentioned he is my resident computer wiz? A job he proudly takes on.
So with cords abounding in my life and house, I decided we needed a better way to manage them all. Here are the results of my efforts. Cord keepers/organizers to simplify my life and corral the cords we can't live without. 🤪
Supplies:
- Approximately 5.25" x 2" Marine Vinyl or material of your choice
- KAM Plastic Snaps (I used Long Prong KAM Plastic Snaps because I was working with 2 layers of Marine Vinyl)
- KAM Plastic Snap Pliers and Awl
- Sewing Clips
- Standard Sewing Machine
- Scissors
- Rotary Cutter

Instructions:
1. Cut out your material of choice, I used Marine Vinyl I had left over from a summer project. I cut each piece approximately 5.25" x 2" and gave them two different styles of finished ends. One is a pointed end, I used my quilting square to accomplish this, and the other has a rounded end, I used a small drinking cup to create the rounded tip. *The cords I was making these for were 6' cords, you may need to adjust the length of your cord keeper to accommodate a larger or smaller cord.


2. Place the two pieces of Marine Vinyl with wrong sides together and pin with Sewing Clips, if desired. Straight stitch with a 1/4" seam around the whole piece using a back stitch at the beginning and end to set the stitch.
3. Trim the edges down to 1/8" to remove the excess vinyl and any uneven edges. The Marine Vinyl can slip a little bit when you are sewing and I found this was the easiest way to get a clean edge.
4. Measure to the center at the top and bottom of each cord keeper/organizer and place a mark where you want your KAM Plastic Snap to sit. I don't like to eye it as I often find them off-center when I wing it.
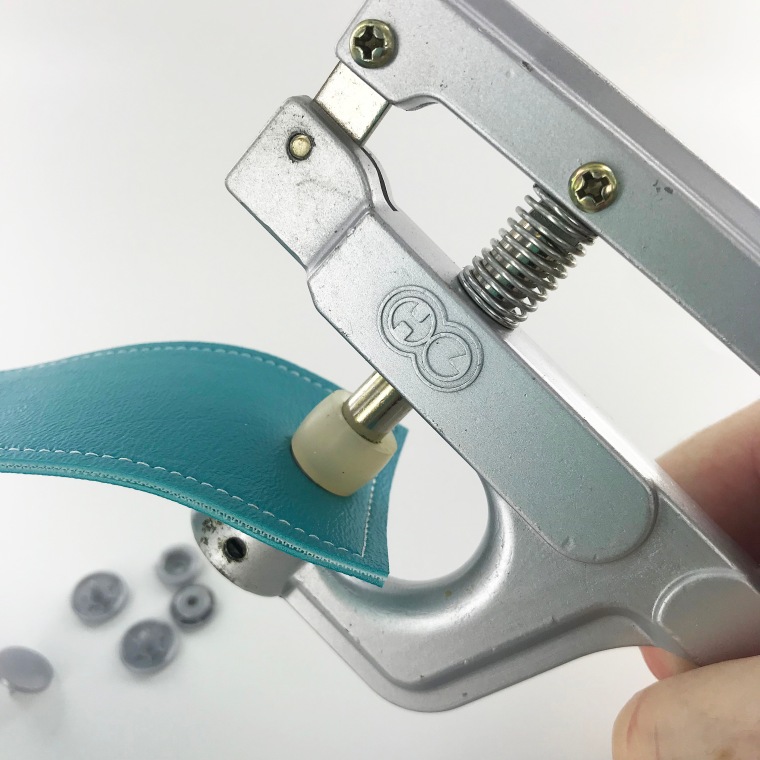
5. Poke a hole through the centered mark with your KAM Awl and insert the KAM Plastic Snap Cap prong through the hole. You will want the cap on the top side (the side that was up when sewing) of your cord keeper and the socket or stud on the bottom side.
6. Flip the cord keeper over and add the socket. Install the KAM Plastic Snap Cap and Socket on the edge that is rounded or pointed and a Cap and Stud on the square edge as pictured below.

7. Remember to install the snaps so that one half (Cap and Stud) are face up and one (Cap and Socket) are face down so that when you fold the cord keeper around the cord, the socket and stud meet.
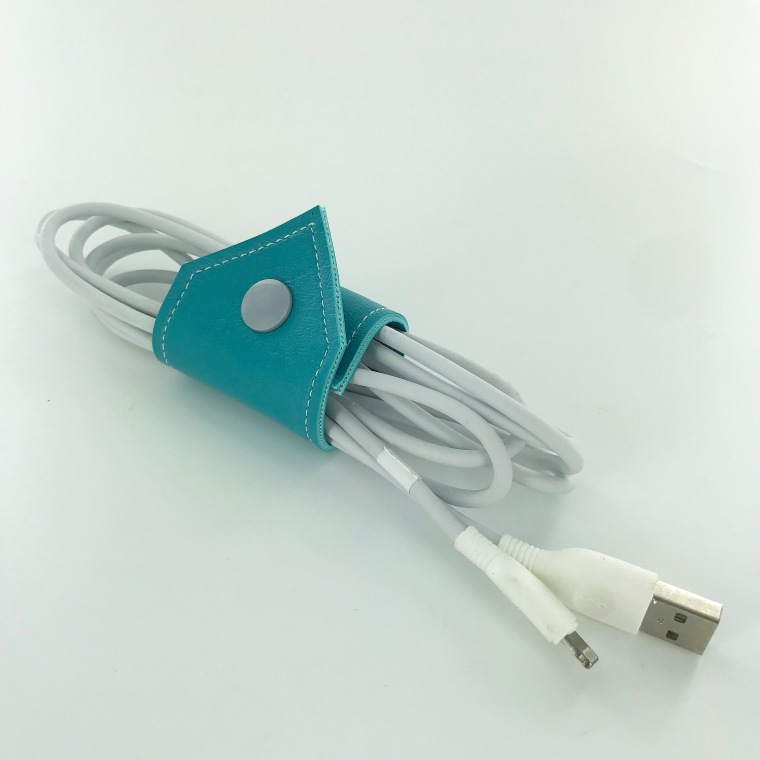

8. Tada! These cord keepers/organizers take only minutes to make with scraps of vinyl/fabric, a few KAM Plastic Snaps, and are already making my life feel less crazy. At least until they all get home from school. 😜
To see other great KAM Plastic Snap ideas, visit our DIY Project section here.
How To Wrap Cover Buttons With Paper by ILikeBigButtons.com January 31 2019

I recently had a customer, Annie, ask if Cover Buttons could be wrapped in paper. I knew of a few customers who had success doing so but had never attempted it myself. Here is a tutorial on how to make Paper Wrapped Cover Buttons and some tips that Annie and I discovered and used.
I love how they turned out. Being an avid reader, I think they are the perfect touch for that special bookworm in your life.


How to Make Paper Wrapped Cover Buttons:
Cover Buttons are easy to assemble:
1. Cut your paper scrap. You will want a circle that is about twice the diameter of your button blank. We used book pages, children's books, and scrapbook paper and they all worked great. You may need to experiment and find what works best for you.
2. Cut a square of wax paper or piece of parchment paper slightly larger than your paper circle. You should be able to reuse it a number of times. I found that the parchment paper held up best.
3. Mist your paper circle on both sides and blot dry. This will help the paper to mold more smoothly to the rounded surface of the cover button front.

4. Layer the wax/parchment paper, then your paper circle on the larger assembly tool mold piece (RIGHT SIDE DOWN). When you look into the underside of the tool you want to see the back of the fabric.
5. Place the button front (the domed piece) on top of the paper and press into the mold. This will require firm pressure. Leave the paper edges hanging out.
6. Press the paper edges down into the backside of the button front.

7. Place the back cover button piece on top of your paper and button front. If the cover button will be subject to repeated tugging from the back, you may want to add a little e6000 adhesive before attaching the back.
8. Take the smaller piece of the assembly tool and with the open side down place it on the button back.
9. Press down firmly. You may hear a pop when the last bit of the button back slips into place. If you take the tool out and the button is not completely secured, just put it back in and press down again.
10. When you take the small assembly tool piece off, the paper edges will be secured underneath the button back.

11. Remove the button from the larger assembly tool piece carefully using the wax/parchment paper to ease the button free.


12. If desired, you can clear coat the completed button with Modge Podge or some equivalent sealer. It will extend the life of the Paper Wrapped Cover Button and give it a glossy finish.


13. Tada! I am particularly in love with the Word Cover Buttons, it was fun picking the words I wanted centered and highlighted.
To see other great Cover Button ideas, visit our DIY Project section here.
Key Fob Lip Balm Holder by ILikeBigButtons.com December 10 2018

I have been admiring these Lip Balm Holders for some time and decided to today to make a few for my littles' Lip Balm and my Blistex. I love how they turned out!
Supplies:
- 15.5" x 2.25" of Cotton Fabric
- 15.5" x 2.25" piece of Fusible Interfacing
- 1.25" Key Fob Hardware with Split Rings
- Key Fob Pliers
- Sewing Clips
- Standard Sewing Machine
- Iron and Ironing Board
- Scissors

1. Cut a 15.5" x 2.25" piece of Cotton Fabric and Fusible Interfacing. These measurements will work for standard Lip Balm Tube and the standard Blistex Tube. You may need to adjust measures for your favorite lip product.

2. Iron the Fusible Interfacing to the wrong side of your fabric.

3. Fold right sides together width-wise and sew both long sides with a 1/4" seam. Do not sew short sides.

4. Turn tube right side out through the open side, iron flat, and sew the open short side closed with a zig-zag stitch.

5. Fold zig-zag side back on itself 1 1/4". Sew straight stitch 1/2" from the top, and again at 5/8" from the top. This is what it will look like from the back.

6. Here is how the front turned out. This will be the front of the pocket on the Lip Balm Holder.

7. Fold the tab that will be the front of the pocket at 2 3/4". Make sure the zig-zag stitch is hidden. Use Sewing Clips to hold front pocket in place while sewing. Stitch at 1/4" seam around the whole holder. And again at 1/8". Start and finish at the top edge so that your start and finish stitches will be hidden.

8. Center the 1.25" Key Fob Hardware on the top edge of the Lip Balm Holder.
9. Using Key Fob Hardware Pliers squeeze the Key Fob Hardware closed with gentle pressure. Sometimes, I go back and forth from left to right added a little bit of pressure to each side until it eases together. Our Key Fob Hardware Pliers make this easy to do. Make sure the teeth in the Key Fob Hardware are sunk securely into the fabric.

10. Tada! These little Lip Balm Holders were easy to make and are great as a quick thoughtful gift for a loved one who hates chapped lips.

11. Hang them on your keychain, the outside of your purse, or anywhere you need for quick access.
To see all our Key Fob Hardware Tutorials, visit our Projects section here.
KAM Snap Upcycled Jean Christmas Ornaments by ILikeBigButtons.com December 05 2018

Today I decided a need a few Upcycled Jean Christmas Trees. As I have mentioned in the past, finding jeans destine for the scrap pile is no problem with a house full of rambunctious kiddos. These cute trees also remind me of some that my parents had when we were growing up.
Supplies:
- A set of holey Jeans
- Star KAM Snaps
- KAM Snap Pliers and Awl
- Fabric of your choice (I picked Christmasy colored cotton fabric)
- Ribbon
- Quilt Batting or Pillow Stuffing
- Fabric Adhesive
- Standard Sewing Machine
- Scissors

1. Make a simple Christmas Tree template and trace on your jean fabric with a permanent marker.

2. Make pairs of each tree so that you have a front and back for each tree. You could also use felt or fabric on the back to extend the impact of your jean fabric.

3. Cut the Christmas Tree template down. I took about a 1/2" on each side/angle. Make a Fabric Christmas Tree silhouette for each Jean Christmas Tree.


4. Use a Fabric Adhesive to adhere the Christmas Tree silhouettes to the fronts sides of the Jean Christmas Trees.

5. Use a decorative stitch to outline the Upcycled Jean Christmas Trees on two sides. Then fill with quilt batting or pillow filling.
6. Finish stitching along the bottom swoop of the Christmas Tree. Add a loop of decorative ribbon and a Star KAM Plastic Snap to the top of the Christmas Tree.
Additional Crafty Ideas:
- You could add multiple cuts along the edges of the trees to add more character.
- Or you could fray the edges of the trees.
- You could give the trees finished edges, but that wasn't the look I was personally going for.
- You could add KAM Snaps; both Star, Heart, and Round shaped into the body of the tree to represent ornaments or twinkling lights.


7. Tada! I think they turned out great and add a great pop of color to our Christmas Tree.
I Like Big Buttons! Upcycled Messenger Bag/Purse Tutorial November 09 2018

We are a cat loving family here at I Like Big Buttons. As such, we have a few fluffy friends scurrying around. Recently, my husband picked up a few bags of cat food that not only were made of a more durable material than the paper bags ones but also had cute kitty images on them. I couldn't resist turning them into some cute messenger bags for a couple of my little cat lovers. :)
How to make an Upcycled/Recycled Messenger Bag/Purse with KAM Snaps and Pet Food Bag
Supplies:
- Pet Food Bag of your choice (Look for the ones made of woven plastic)
- Marine Vinyl or a material of your choice
- 2 KAM Snap Sets (Depending on the thickness of the material you may want Long Prong)
- KAM Snap Pliers and Awl
- 1″ Cotton Webbing
- Scissors/Rotary Blade
- Standard Sewing Machine

1. Cut the bag along the seams. I plan on making 2 bags with it. For this project, I am focusing on making each bag with a kitty image front and center. Use a damp cloth to wipe the leftover cat food crumbs from the interior of the bags and let air dry. This doesn't take more than a few minutes.

2. Decide on your shape. I like to craft off the cuff. This lid of a storage container was just the right size and shape to showcase the kitty image. Trace around it with a marker.

3. I picked the height based on the image. I left a 1" above each kitty image. *If I did it again, I might do 2" or 3" instead. As you will see later, the flap of the bag covers some of the image. If I had dropped it another inch I think it would have looked slightly better when snapped closed.

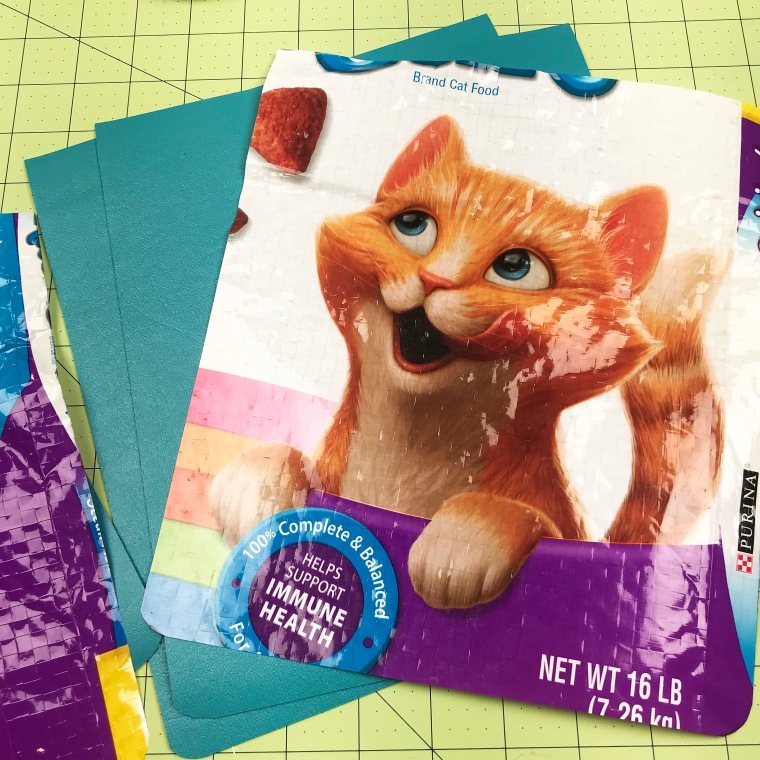
4. Cut 2 pieces of Marine Vinyl or material of your choice the same size at the kitty images. I had some vinyl left over from a summer chair reupholstering product. I love it because the color goes nicely with the kitty image and it is durable.

5. Cut two flaps for the messenger bags. I cut them the same width as the bags and longer than I thought I would need so I could adjust on the fly.

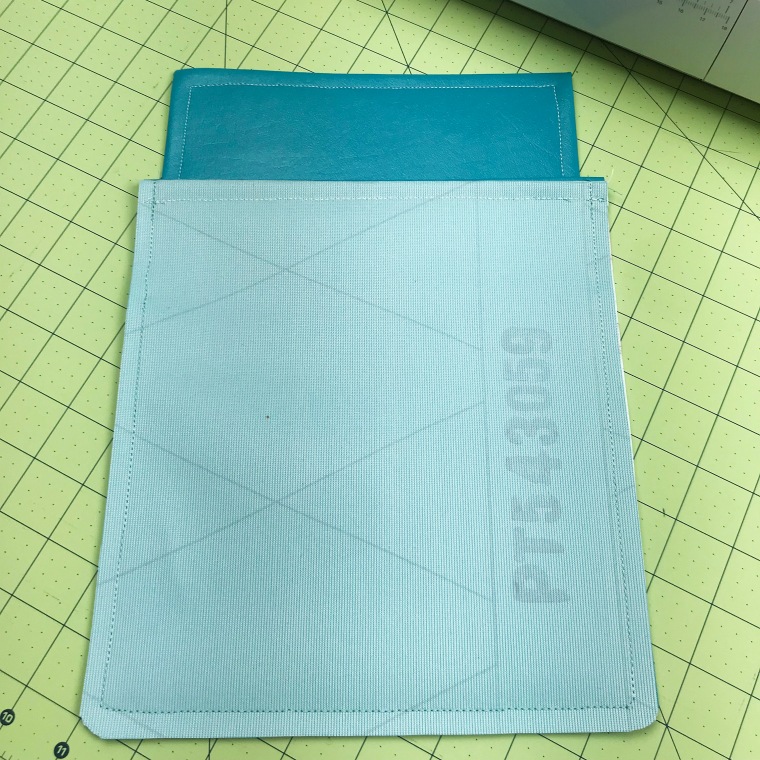
6. Using a 1/2" seam sew the kitty image to the front piece of Marine Vinyl, right sides together. I chose to put the Marine Vinyl front to the front so that the interior of the bag was uniform, but you could turn the right side of the Marine Vinyl inward so that it was to the inside of the bag. Sewer's choice. :)

7. Fold the sewed seam flat and smooth. Then, fold it until the kitty image is right side out. Smooth the sewed seam and Marine Vinyl.


8. Sew 1/4" seam along the top of the finished edge.
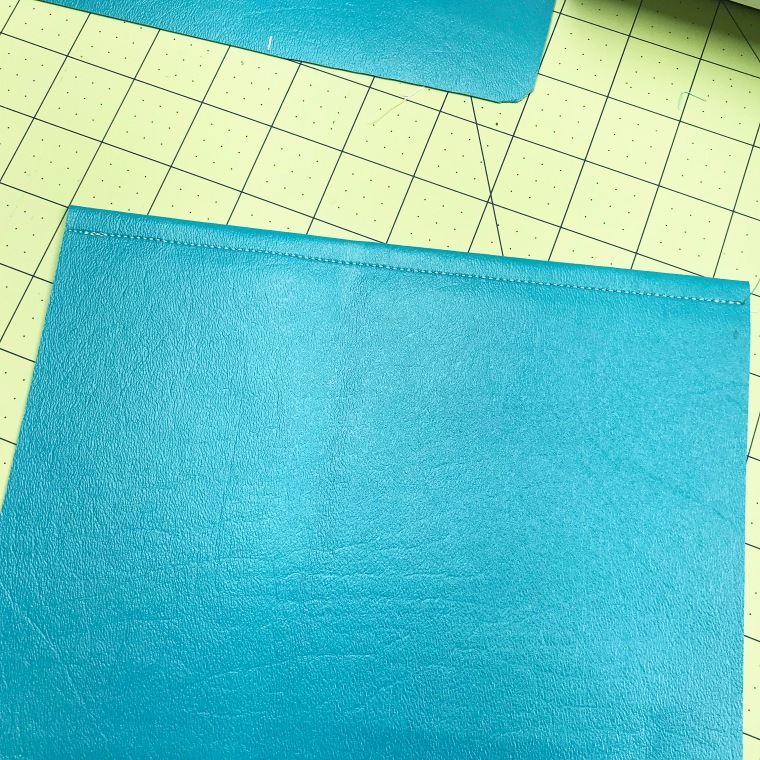
9. Fold the top edge of the back piece of the bag over a 1/2". Sew 1/4" seam along the edge, creating a finished edge.

10. For the top flap, I created a simple square with three finished edges. Marine Vinyl is durable and the raw edges hold up nicely. If using another material, you will have to give consideration to the material you are using and adjust accordingly. The messenger bag/purse will be about 8" wide when finished so I made the flaps slightly smaller at 7.75". *If I did it again, I might have shaved off a little bit more to give the shoulder strap more room to fill.

11. I, then, cut the height of the flap down to 3" because I wanted to see as much of the kitty image as I could after the KAM plastic snap was installed.


12. Align and use a zigzag stitch to attach the flap to the back piece of the purse. Make sure to center it.

13. Put right sides together and sew the 2 sides and bottom of the purse with a 3/8" to 1/2" seam. Make sure to use a Stay Stitch the beginning and end of your sewing so that the stitches stay put.


14. Turn the bags right side out and square the corners as much as possible. I used the backside of a Sharpie marker to help square the corners. Remember I slightly rounded them so they won't be perfectly square. Smooth bags flat.

15. Measure the center of the flap and use a KAM awl to poke a hole for the KAM plastic snap that you will adding. I am only going through 1 layer of Marine Vinyl so a Standard Prong snap will work. If you are using thicker material or multiple layers, I would recommend our Long Prong KAM plastic snaps.

16. Install KAM plastic snap (Cap and Socket).

17. Repeat in front of the bag, where KAM plastic snap lines up. I poked the hole through both layers at once so that I had a point of reference. Then I widened the hole after double-checking the placement of the internal hole. Install KAM plastic snap (Cap and Stud).


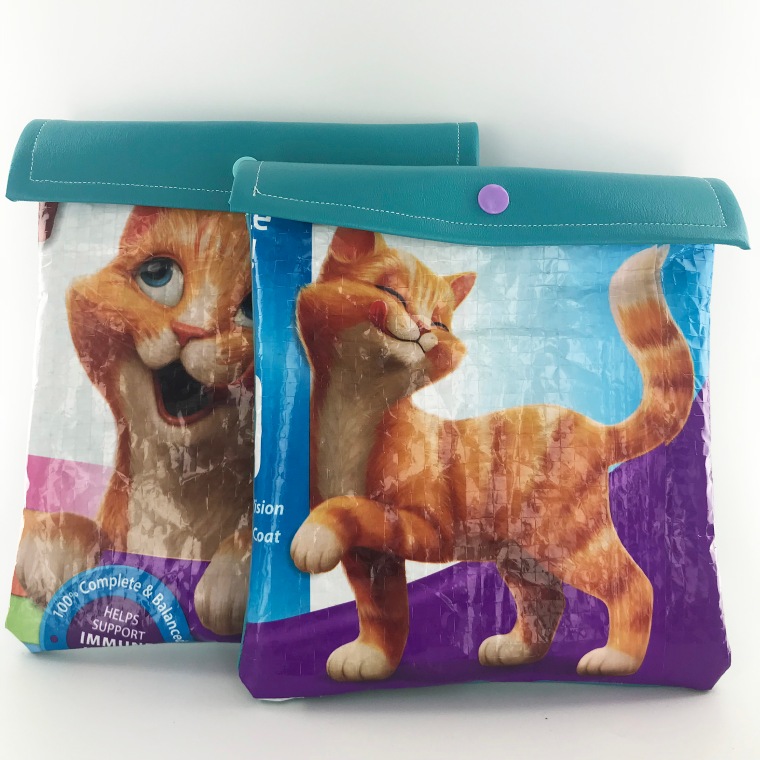
18. I think they turned out super cute! Now to add shoulder straps.

19. For the sake of time and my sanity, I simply attached the shoulder straps with a half of a KAM snap set (Cap and Socket). I used the snap like a rivet. I also used Long Prong KAM plastic snaps for this piece because I was working with the thickness of the Marine Vinyl and Cotton Webbing. *I doubled the edge of the Cotton Webbing over on itself and sewed a straight line back and forth across it a half dozen times so it doesn't unravel. With Polyester Webbing, you could melt the edge to secure it.


20. Tada!!! I think they turned out great, it took less than 2 hours to make both of them, and my little cat lovers are ecstatic. They have a new place to store their treasures.
😻 😻 😻
I Like Big Buttons! Unpaper Towel Tutorials October 17 2018
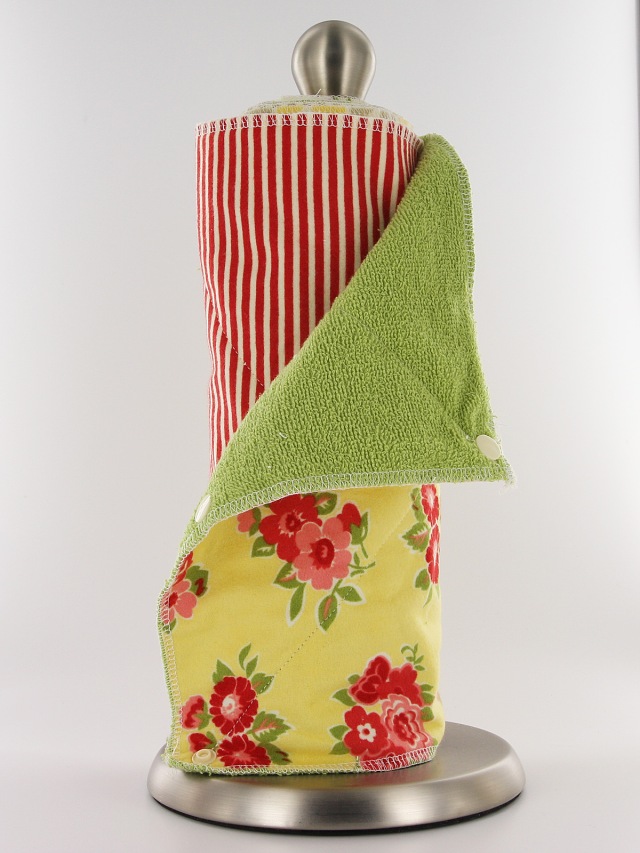
Unpaper towels make a great, attractive, and functional that you can make for you and your loved ones. We have 3 easy tutorials that show you how to make them. Standard Sewing Machine, Serger, or "No Sew" just pick your skill level and you can have these decorative and functional unpaper towels in your kitchen.
Unpaper Towels with a Sewing Machine


"No Sew" Unpaper Towels with KAM Snaps

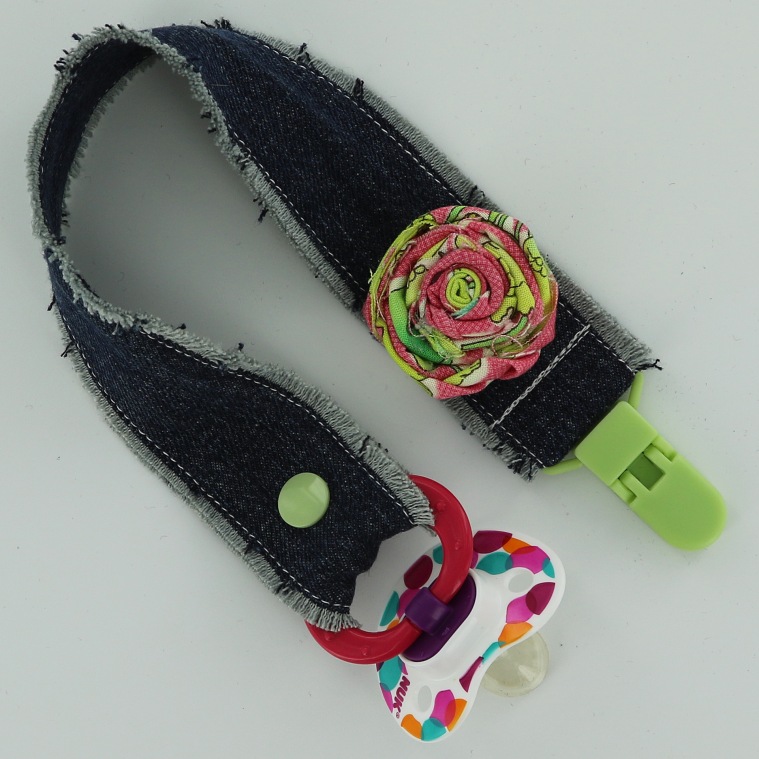
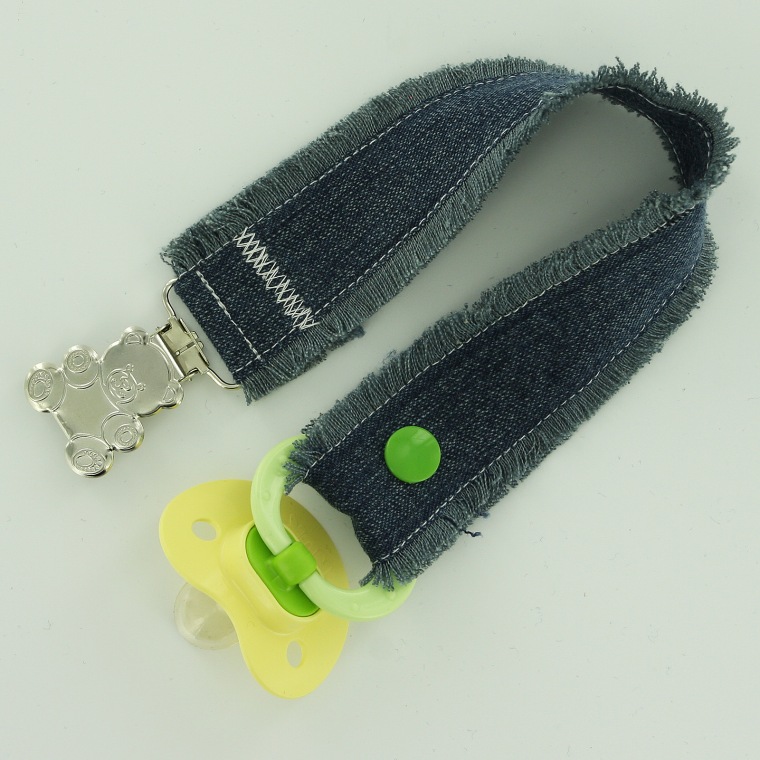
I Like Big Buttons! A Collection of Pacifier Clip Tutorials October 11 2018

Pacifier Clips are easy to make, fun to embellish, and a great useful gift for a new mom and baby.
Supplies:
- Pacifier with Button Style Grip
- 14" x 3 1/2" Piece of Fabric
- 1 Pacifier Clip per Clip
- 2 KAM Snap Sets per Clip
- KAM Snap Pliers and Awl
- MAM Ring and O-Ring Button Style Adapters
- Standard Sewing Machine and Iron
Instructions:
- Choose a piece of Fabric, cut it to the dimensions: 14" x 3 1/2", the finished product once ironed, folded and sewn will be approximately 7/8" wide x 12" long. [...]
Here are our top 5 Pacifier Clip Tutorials:

#2 - Jean Pacifier Clip with Rosette using KAM Plastic Snaps and Clip


#5 - Recycling Jeans into a Pacifier Clip using KAM Snaps and a Pacifier Clip
I Like Big Buttons! - Fabric Cover Buttons - Easy To Make, Great Impact! October 09 2018
These aren't your grandma's Cover Buttons!!! Well, actually they are ;) only better, with so many many great uses for them.
Flat Backs are used for crafts where you would like to glue a cover button: jewelry, bracelets, rings, earrings, necklaces, bobby pins and barrettes, scrapbooking, and much more.
Wire Backs are used for fabric cover buttons in sewing, shoes, clothing, ponytail holders and much, much more.
Here are the 7 sizes we carry. From 1/2", which is about as small as your pinky nail, all the way up to 1 7/8" in diameter, about the size of the round side of a kiwi fruit. We carry them in both flat back (glueable) and wire back (sewable).
- Size 20 (1/2 inch / 12 mm)
- Size 24 (5/8 inch / 15 mm)
- Size 30 (3/4 inch / 19 mm)
- Size 36 (7/8 inch / 23 mm)
- Size 45 (1 1/8 inch / 28 mm)
- Size 60 (1 1/2 inch / 38 mm)
- Size 75 (1 7/8 inch / 48 mm)
Assembling fabric Cover Buttons is fast and simple. In just seconds, you will have a button ready for your latest craft project.
See our pictorial below:
How to Make Fabric Cover Buttons:
Cover Buttons are easy to assemble:
- Cut your fabric scrap. You will want a circle that is about twice the diameter of your button blank.
- Put your fabric piece in the larger assembly tool piece (RIGHT SIDE DOWN). When you look into the tool you want to see the back of the fabric.
- Place the button front (the domed piece) on top of the fabric. Leave the fabric edges hanging out.
- Press the cover button edges down into the tool.
- Place the back cover button piece on top of your fabric and button front. If the cover button will be subject to repeated tugging from the back, you may want to add a little e6000 adhesive before attaching the back.
- Take the smaller piece of the assembly tool and with the open side down place it on the button back.
- Press down. You may hear a pop when the last bit of the button back slips into place. If you take the tool out and the button is not completely secured, just put it back in and press down again.
- When you take the small assembly tool piece off, the fabric edges will be secured underneath the button back.
- Remove the button from the larger assembly tool piece.
- Tada!
To see other great Fabric Cover Button ideas, visit our DIY Project section here.
I Like Big Buttons! LEGO Earrings and Cover Button Bracelet September 24 2018

Today I worked alongside my daughter to make her dear friend a special and one of a kind birthday gift. I think they turned out great and it was wonderful to get to work with one of my kiddos. :)
LEGO Earring Supplies:
- 2x LEGO Bricks of your choosing (We used 2x2's)
- E6000 Adhesive or Hot Glue
- Surgical Stainless Steel Earring Posts and Backs
LEGO Bracelet Supplies:
- 11-13 x LEGO Bricks of your choosing (We used 2x2's and LEGO Dots)
- 1 Disk and Loop Bracelet (We have two sizes available 7.2" or 8.25")
- E6000 or comparable adhesive

This project would also work great with Cufflinks, Barrettes, Bobby Pins, or Badge Reels.

Check out our other great jewelry Tutorials, by visiting our DIY Project section here.
How to Make Fabric Cover Button Cuff Links May 31 2018
Supplies:- 2 Completed Flat Back Fabric Cover Button (Choose your size, size depends on the statement you want to make)
- 1 set of Cuff Links
- E6000 or comparable adhesive
1. Follow these instructions to make Flat Back Fabric Covered Buttons.

2. Apply E6000 to back of Cover Button.

3. Center and press Cuff Link into place and remove any extra Adhesive.

4. Let dry and enjoy.

5. Tada!
You are done! Wear these adorable Cuff Links to match or accent your favorite button-up outfit for an afternoon outing. Enjoy!
Have you seen our KAM Plastic Snap Professional Press at work? May 10 2018
It makes installing KAM Plastic Snaps a breeze! I am in love with our KAM Professional Press and we carry them in pretty Coral.
We are giving a KAM Plastic Snap Professional Press and Long Prong KAM Plastic Snap Starter Pack away right now on our Business Facebook Page in celebration of Mother's Day. (Giveaway good until Monday 05/14/2018)
If you can’t wait, we have our Coral Presses for sale for 10% off on our website right now. Also, take an additional 10% any of our snap related products with coupon code: SNAPLOVE
#ilikebigbuttons #kamsnaps #plasticsnaps #snappress #shopilikebigbuttons

An I Like Big Buttons Christmas! Idea #25: Making "No Sew" Pom Pom Flower Shoe Clips (3 Great Tutorials!) December 22 2017

Gift Idea #25:
We made it 25 great Christmas gift tutorials just in time for Christmas! This one is perfect for that last minute accent on your loved one's shoes for Christmas service.
Making "No Sew" Pom Pom Organza/Chiffon Flower Shoe Clips
Supplies:
- Organza/Chiffon of your choosing
- 1" - 1 1/2" circle of White Felt
- Pair of Shoe Clips
- Scissors or Accucut Die Machine
- Hot Glue Gun/Glue or E6000 See More

Making "No Sew" Pom Pom Felt Flower Shoe Clips
Supplies:
- Sheet of Colored Felt and Sheet of White Felt
- Pair of Shoe Clips
- Scissors or Accucut Die Machine
- Hot Glue Gun/Glue or E6000 See More

Making "No Sew" Pom Pom Fabric Flower Shoe Clips
Supplies:
- Fabric of your choosing
- 1" - 1 1/2" circle of White Felt
- Pair of Shoe Clips
- Scissors or Accucut Die Machine
- Hot Glue Gun/Glue or E6000 See More
#ilikebigbuttons #shopilikebigbuttons #nosew #pompomflowers #shoeclips #pompomshoeclips #shoeaccents #christmasidea #gift #christmasgift
An I Like Big Buttons Christmas! Idea #24: Making a Felt Coin Purse with KAM Snaps and PDF Pattern December 22 2017
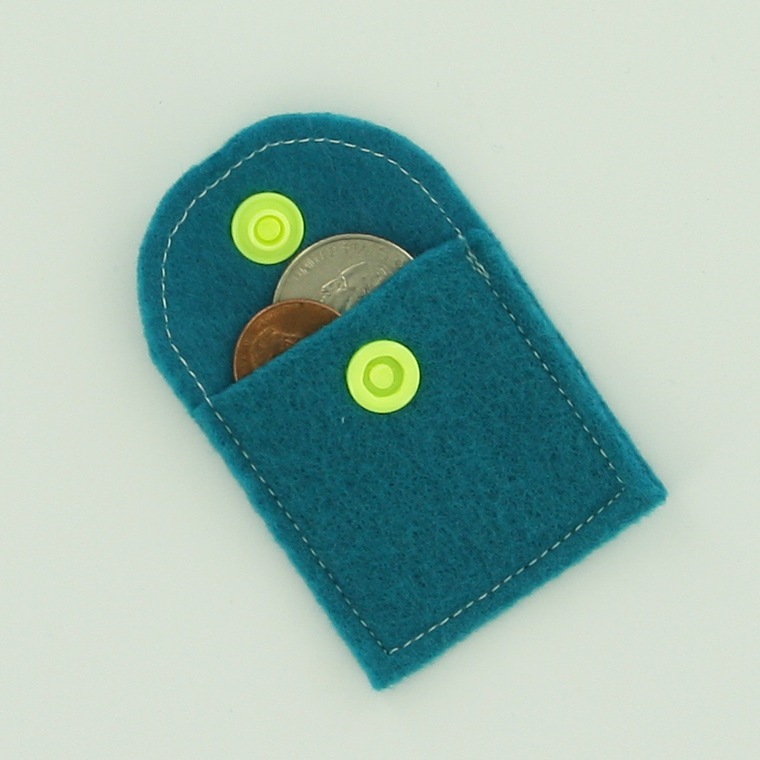
Gift Idea #24:
As the hours draw to a close before Christmas day. A felt coin purse is a great last minute gift that takes only minutes to make.
Making a Felt Coin Purse with KAM Snaps and PDF Pattern
Supplies:
- Sheet of Felt
- 1 KAM Snap Set
- KAM Snap Pliers and Awl
- Coin Purse PDF Pattern
- Standard Sewing Machine See More

#ilikebigbuttons #shopilikebigbuttons #kamsnaps #plasticsnaps #snapping #itsasnap #coinpurse #kamsnapcoinpurse #pdfpattern #christmasidea #gift #christmasgift
An I Like Big Buttons Christmas! Idea #23: Fabric Cover Button Pendant Necklace December 21 2017

Gift Idea #23:
Fabric Cover Button Pendants are simple to make and add a stylish twist to any outfit. My oldest and I made some simple Cover Button Pendants for her to share with her dearest friends.
Supplies:
- Pendant Bezel Trays in 23 mm (Size 36) or 38 mm (Size 60)
- 1 Completed Flat Back Fabric Cover Button (Attach size 36 (7/8" - 23 mm) or size 60 (1 1/2" - 38 mm) flat back cover buttons.)
- E6000 or comparable adhesive
- Necklace or Cord See More

#ilikebigbuttons #shopilikebigbuttons #coverbuttons #fabriccoverbuttons #coverbuttonpendant #pendants #bezelpendants #stylishgifts #christmasidea #gift #christmasgift
An I Like Big Buttons Christmas! Idea #22: How to make a Reversible Frayed or Finished Edge Coffee Cozy with KAM Snaps and Free PDF Pattern December 21 2017

Gift Idea #22:
I am made a couple cute Coffee Cozys for my cousin a few years back. She had called me a few weeks before super excited about the idea to make Coffee Cozy with KAM Snaps :). This gift is perfect for the coffee lover in your life.
How to make a Reversible Frayed Edge Coffee Cozy with KAM Snaps and Free PDF Pattern
Supplies:
- Fabric of your choosing
- Felt or other insulation/batting layer
- 2 KAM Snap Sets
- KAM Snap Pliers and Awl
- Standard Sewing Machine See More

How to make a Reversible Coffee Cozy with KAM Snaps and Free PDF Pattern
Supplies:
- Fabric of your choosing
- Insulation/batting layer
- 2 KAM Snap Sets
- KAM Snap Pliers and Awl
- Standard Sewing Machine

#ilikebigbuttons #shopilikebigbuttons #kamsnaps #plasticsnaps #snapping #itsasnap #coffeelover #coffeelovergifts #coffeecozy #drinkcozy #coffeecuff #coffeelove #christmasidea #gift #christmasgift
An I Like Big Buttons Christmas! Idea #21: How To Make Baby Bibs (3 Great Patterns!) December 20 2017
Gift Idea #21:
Three great bib patterns for the new blessings in your life. A wonderful gift any time of the year!

See Full Tutorial: The Ultimate Catch-All Bib by Peek-A-Boo Pattern Shop

See Full Tutorial: Reversible Catch-All Bib by The Crazy Tailor
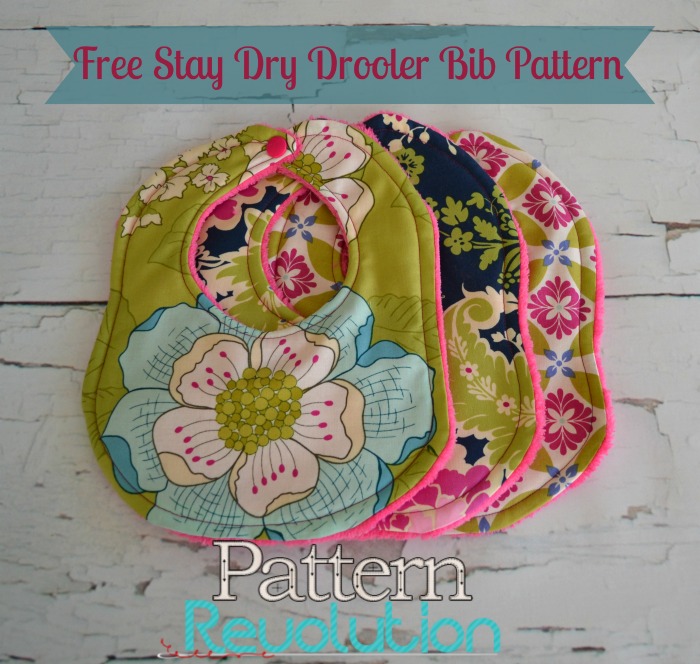
See Full Tutorial: Stay Dry Drooler Bib by Pattern Revolution
#ilikebigbuttons #shopilikebigbuttons #kamsnaps #plasticsnaps #snapping #itsasnap #babybib #babybibpattern #droolerbibpattern #droolerbib #bibs #bibpattern #babygifts #babylove #christmasidea #gift #christmasgift
An I Like Big Buttons Christmas! Idea #20: Making a Crayon Roll with KAM Snaps December 19 2017
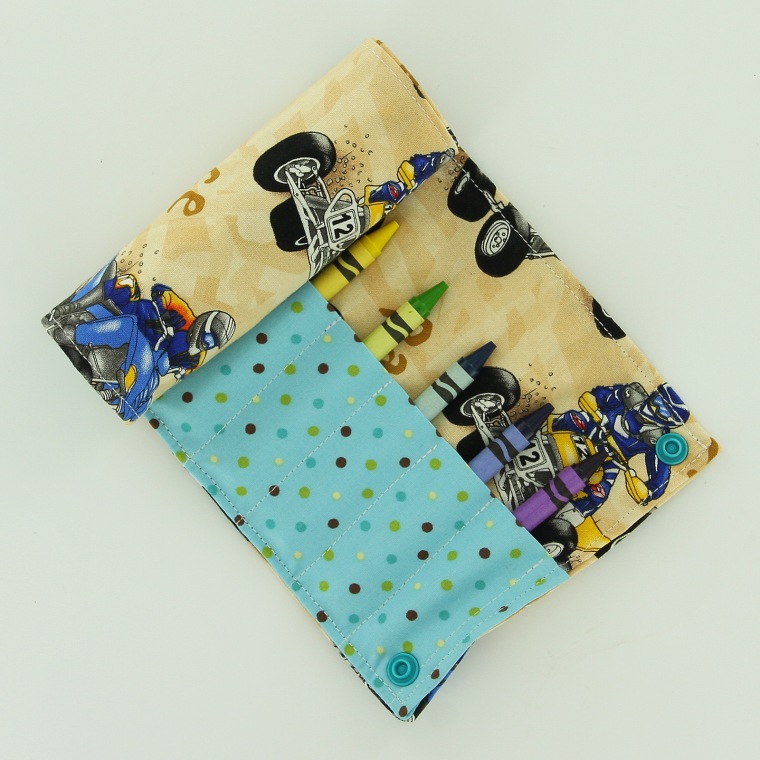
Gift Idea #20:
Make a Crayon Roll for the crafty child in your life. Perfect for on the go coloring!
Making a Crayon Roll with KAM Snaps
Supplies:
- 3 12"x6" Pieces of Fabric
- 1 12"x6" Piece of Interfacing
- 2 KAM Snap Sets
- KAM Snap Pliers and Awl
- Standard Sewing Machine See More

#ilikebigbuttons #shopilikebigbuttons #kamsnaps #plasticsnaps #snapping #itsasnap #crayonholder #christmasidea #crayonroll #gift #christmasgift
An I Like Big Buttons Christmas! Idea #19: Making a Snow Queen Inspired Costume with KAM Snaps December 19 2017

Gift Idea #19:
If you have little girls in your life who are obsessed with Frozen and Elsa as my little ones are this may be the gift for you. :)
Supplies:
- 1 Yard of Snow Queen Snowflake Organza
- 1 Yard of White Fabric
- 1 Yard of Tulle (White)
- 4 Sheets of Felt (White)
- Silver Sequined Ribbon
- Teal thread
- 4 KAM Snap Sets
- KAM Snap Pliers and Awl
- Serger Sewing Machine
- Standard Sewing Machine
- Long Sleeve T-Shirt (we went with White) See More

#ilikebigbuttons #shopilikebigbuttons #kamsnaps #plasticsnaps #snapping #itsasnap #everythingtinyiscuter #christmasidea #snowqueen #elsadress #frozen #elsa #anna #gift #christmasgift
An I Like Big Buttons Christmas! Idea #18: How to make a Mini Hobo Purse with KAM Snaps and a PDF Pattern December 18 2017

Gift Idea #18:
I am making a Mini Hobo Purse with KAM Snaps for my mini fashionista :P. There is sure something about miniaturizing any project that makes it even cuter! I hope you like it as much as I do.
Making a Mini Hobo Purse with KAM Snaps and PDF Pattern
Supplies:
- Fabric or Fabrics of your choice
- Interfacing
- 1 KAM Snap Set
- KAM Snap Pliers and Awl
- Mini Hobo Purse PDF Pattern
- Standard Sewing Machine and Iron See More

#ilikebigbuttons #shopilikebigbuttons #kamsnaps #plasticsnaps #snapping #itsasnap #minihobopurse #freepdf #hobopurse #everythingtinyiscuter #christmasidea #gift #christmasgift
An I Like Big Buttons Christmas! Idea #17: How To Make A Fabric Cover Button Magnet December 18 2017

Gift Idea #17:
A handy kitchen or home accessory: Fabric Cover Button Magnets. You will love the splash of color they add to your loved one's fridge or magnet board and their usefulness.
Supplies:
- 1 Completed Flat Back Fabric Cover Button (Attach either a Size 36 (7/8 inch / 23 mm), Size 45 (1 1/8 inch / 28 mm), Size 60 (1 1/2 inch / 38 mm) flat back cover buttons.)
- 1x 1" Standard Round Magnet (Approximately 3/4" Round)
- E6000, Hot Glue, or comparable adhesive See More
#ilikebigbuttons #shopilikebigbuttons #coverbuttons #fabriccoverbuttons #coverbuttonmagnet #magnets #fridgemagnets #homeaccents #kitchendecor #christmasidea #gift #christmasgift
An I Like Big Buttons Christmas! Idea #16: How To Make A Magnetic Pin Cushion/Needle Holder December 17 2017

Gift Idea #16:
A handy sewing accessory: Fabric Cover Button Pin Cushion/Needle Holder. You will love the splash of color they add to your loved one's sewing station and their usefulness!
Supplies:
- 1 Completed Size 75 (1 7/8 inch / 48 mm) Fabric Cover Button
- Fabric Of Your Choice
- 1x Standard Round Magnet (Approximately 3/4" Round)
- E6000, Hot Glue, or comparable adhesive See More
#ilikebigbuttons #shopilikebigbuttons #coverbuttons #fabriccoverbuttons #coverbuttonpincushion #pincushion #needleholder #sewingroomaccents #sewingdecor #christmasidea #gift #christmasgift
An I Like Big Buttons Christmas! Idea #15: KAM Snap Felt Christmas Ornaments December 15 2017

Gift Idea #15:
Today I am making some child-proof Christmas ornaments with KAM Snaps. With lots of little helping hands in my house, our Christmas tree needs some durable and cute ornaments. These ornaments remind me of ones my mom and dad had on our tree in our curious stages :). KAM Snap Felt Christmas Ornaments to the rescue!!!
Supplies:
- A couple Sheets of Colored Felt
- KAM Snap Caps and Sockets or Studs
- KAM Snap Pliers and Awl
- Standard Sewing Machine
- Scissors See More


#ilikebigbuttons #shopilikebigbuttons #kamsnaps #plasticsnaps #kamsnapornaments #homeaccents #homedecor #christmasidea #gift #christmasgift
An I Like Big Buttons Christmas! Idea #14: How To Make Fabric Cover Button Push Pins December 14 2017

Gift Idea #14:
These Fabric Cover Button Push Pins make charming home accents for your cork or inspiration board. I am absolutely in love with their bright colors and functionality! These embellished Fabric Push Pins will jazz up your loved one's organization. :) I use mine to get more organized with my kiddos paperwork, schedules, and notes that I need to keep track of.
Supplies:
- 1 Completed Flat Back Fabric Cover Button (Attach Size 20 (1/2 inch / 12 mm), Size 24 (5/8 inch / 15 mm), Size 30 (3/4 inch / 19 mm) flat back cover buttons.)
- 1x Thumb Tack
- E6000, Hot Glue, or comparable adhesive See More

#ilikebigbuttons #shopilikebigbuttons #coverbuttons #fabriccoverbuttons #pushpins #thumbtack #coverbuttonpushpins #homeaccents #homedecor #christmasidea #gift #christmasgift
An I Like Big Buttons Christmas! Idea #13: How To Make A Fabric Cover Button Clothespins December 13 2017

Gift Idea #13:
These Fabric Cover Button Clothespins make adorable office and home accents. I am absolutely in love with their bright colors and functionality!
How To Make A Fabric Cover Button Mini Clothespin
Supplies:
- 1 Completed Flat Back Fabric Cover Button (Attach size 20 (1/2" / 12 mm), size 24 (5/8" / 15 mm), or size 30 (3/4" / 19 mm) flat back cover buttons.)
- 1x Mini Wooden Clothespin (Approximately 1 3/8" x 1/4" in size)
- 1x Small Plain Button
- E6000, Hot Glue, or comparable adhesive See More
I Like Big Buttons! - How To Make Fabric Cover Button Mini Clothespins Video
How To Make A Fabric Cover Button Full-Size Clothespin
Supplies:
- 1 Completed Flat Back Fabric Cover Button (Attach Size 30 (3/4 inch / 19 mm), Size 36 (7/8 inch / 23 mm), or Size 45 (1 1/8 inch / 28 mm) flat back cover buttons.)
- 1x Full-Size Wooden Clothespin
- 1x Medium Plain Button
- E6000, Hot Glue, or comparable adhesive See More

#ilikebigbuttons #shopilikebigbuttons #coverbuttons #fabriccoverbuttons #clothpins #coverbuttonclothpins #homeaccents #homedecor #christmasidea #gift #christmasgift
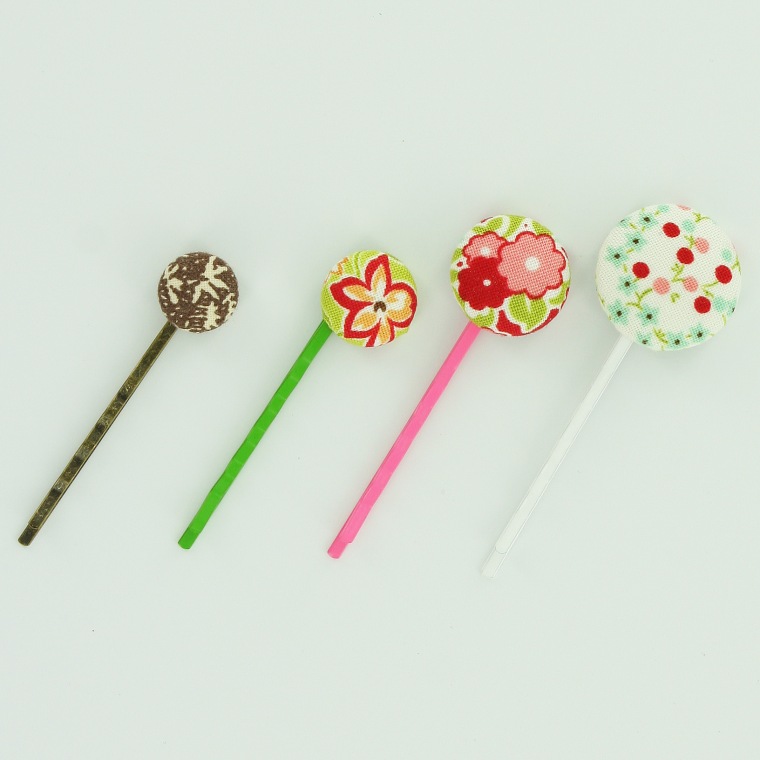
An I Like Big Buttons Christmas! Idea #12: How to Make Fabric Cover Button Barrettes and Bobby Pins December 12 2017
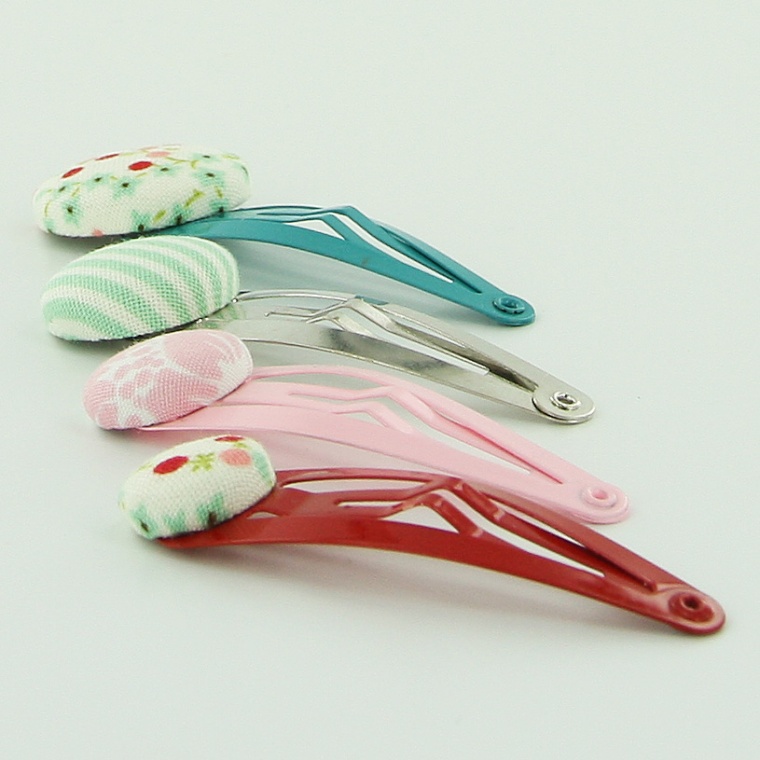
Gift Idea #12:
For the girls in your life, Fabric Cover Button Barrettes and Bobby Pins are simple to make with lots of impact.
Fabric Cover Button Barrettes
Supplies:
- 2 Completed Flat Back Fabric Cover Button (Choose your size, Size 20 through Size 36 all work great, size depends on the statement you want to make)
- 2 Snap Barrettes
- E6000 or comparable adhesive See More

Fabric Cover Button Bobby Pins
Supplies:
- 1 Completed Flat Back Fabric Cover Button (Choose your size, Size 20 through Size 45 all work great, size depends on the statement you want to make)
- 1 Bobby Pin
- E6000 or comparable adhesive See More
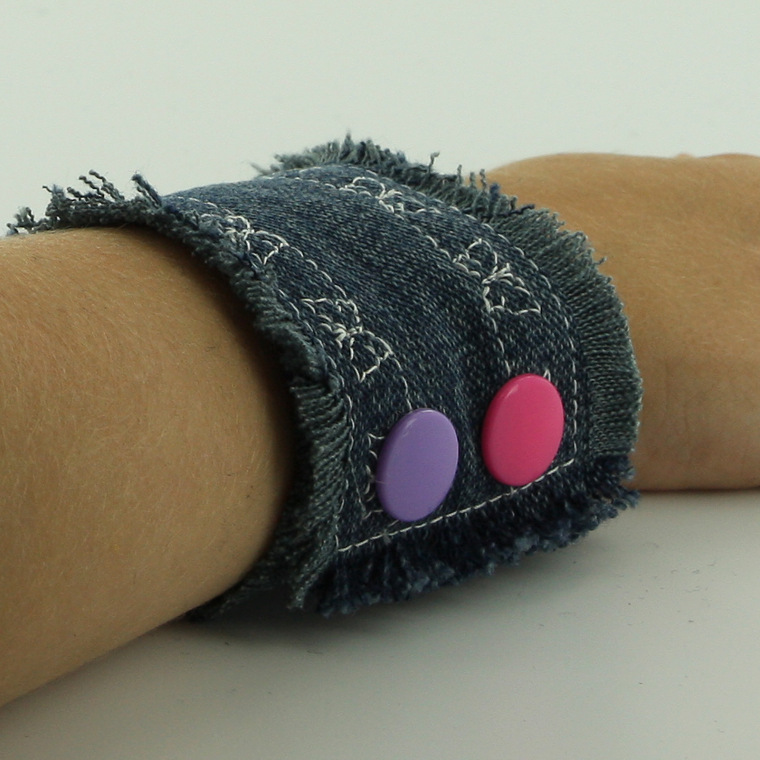
An I Like Big Buttons Christmas! Idea #11: How To Make A Cuff Bracelet with Upcycled Jeans and KAM Snaps December 11 2017
Gift Idea #11:
A great gift from unsalvageable jeans is a cute Upcycled Cuff Bracelet. If you are like us, you have a ready stack of holey jeans that are waiting for a new purpose.
Upcycled Jean Cuff Bracelet with KAM Snaps
Supplies for an Upcycled Jean Cuff Bracelet:
- 1 Pair of Holey Jeans
- 2 KAM Snap Sets
- KAM Snap Pliers and Awl
- Standard Sewing Machine ... See Full Tutorial

Upcycled Jean Cuff Bracelet with Embroidery and KAM Snaps
Supplies for an Upcycled Jean Embroidered Cuff Bracelet:
- 1 Pair of Holey Jeans
- 2 KAM Snap Sets
- KAM Snap Pliers and Awl
- Standard Sewing Machine ... See Full Tutorial
#ilikebigbuttons #shopilikebigbuttons #kamsnaps #plasticsnaps #snapping #itsasnap #christmasidea #gift #christmasgift
An I Like Big Buttons Christmas! Idea #10: How to Make a Hanging Kitchen Towel with KAM Snaps December 08 2017

Gift Idea #10:
Hanging Kitchen Towels are easy to make, functional, and add a nice punch of color to any kitchen.
Supplies:
- 1 Tea or Kitchen Towel
- 4 KAM Snap Sets
- KAM Snap Pliers and Awl
Instructions:
1. My towel is 12" wide so I decided to do 4 sets of KAM Snaps to make sure the towel doesn't sag. With a ruler and a marker, I marked 1/4" down x 1" in on each corner and then 3" over from each corner mark. See More
Pin for Later: https://www.pinterest.com/pin/201184308328848275/
#ilikebigbuttons #shopilikebigbuttons #kamsnaps #plasticsnaps #kitchengear #kitchenideas #snapping #itsasnap #christmasidea #gift #christmasgift

An I Like Big Buttons Christmas! Idea #9: How To Make Pacifier Clips December 07 2017

Gift Idea #9:
Pacifier Clips are easy to make, fun to embellish, and a great useful gift for a new mom and baby.
Supplies:
- Pacifier with Button Style Grip
- 14" x 3 1/2" Piece of Fabric
- 1 Pacifier Clip per Clip
- 2 KAM Snap Sets per Clip
- KAM Snap Pliers and Awl
- MAM Ring and O-Ring Button Style Adapters
- Standard Sewing Machine and Iron
Instructions:
- Choose a piece of Fabric, cut it to the dimensions: 14" x 3 1/2", the finished product once ironed, folded and sewn will be approximately 7/8" wide x 12" long. [...]
#ilikebigbuttons #shopilikebigbuttons #kamsnaps #plasticsnaps #pacifiersupplies #pacifierclips #nosew #buttonstylepacifiers #craftsupplies #babygifts #christmasgifts #christmasideas #babysfirstchristmas
Here are our top 5 Pacifier Clip Tutorials:

#2 - Jean Pacifier Clip with Rosette using KAM Plastic Snaps and Clip


#5 - Recycling Jeans into a Pacifier Clip using KAM Snaps and a Pacifier Clip

An I Like Big Buttons Christmas! Idea #8: How To Make Fabric Cover Button Jumbo Paper Clip Bookmarks December 06 2017

Gift Idea #8:
Use these adorable Paper Clip Bookmarks as a Christmas gift for your special loved one to hold their place in their favorite book or cookbook. Enjoy!
Supplies:
- 1 Completed Flat Back Fabric Cover Button (Attach size 36 (7/8" - 23 mm), size 45 (1 1/8" - 28 mm), or size 60 (1 1/2" - 38 mm) flat back cover buttons.)
- 1 Jumbo Paper Clip
- 1 6" Piece of Ribbon
- E6000 or comparable adhesive
Instructions:
1. Follow these instructions to make Flat Back Fabric Covered Buttons. See More
Pin for Later: https://www.pinterest.com/pin/201184308334558670/
#ilikebigbuttons #paperclips #jumboclips #bookmarks #bookmarker #coverbuttons #fabriccoverbuttons #tutorial #shopilikebigbuttons

An I Like Big Buttons Christmas! Idea #7: How to make a Bandana Bib with KAM Snaps and a PDF Pattern December 05 2017

Gift idea #7: One of our most popular tutorials, Bandana Bibs are a great gift for those little droolers and mess makers in your life or as an outfit accessory. So cute! I, also, used our Heart Shaped KAM Snaps for added pizazz, check it out!
Supplies:
- Fabrics of your choice
- 1 Heart Shaped KAM Snap Set
- KAM Snap Pliers and Awl
- Bandana Bib PDF Pattern (may need to adjust for your child's size or add more KAM Snaps settings)
- Standard Sewing Machine
Instructions:
- Download the Bandana Bib PDF Pattern. Print out the pattern making sure the 1″ square in the corner measures 1″ square when printed that will indicate the pattern is the right size. ... See More
Pin it for later: http://www.pinterest.com/pin/201184308328918372/
#ilikebigbuttons #kamsnaps #plasticsnaps #bandanabib #droolbib #tutorial #pdfpattern #shopilikebigbuttons
Snapping is so easy! You can do it!
