News
So, you've got a knack for crafting and a keen eye for style? June 19 2025

Well, have you ever considered diving into the world of key fob wristlets? These nifty little accessories are not only easy to make, but they're also a hot commodity at craft fairs. Let's dive into why creating key fob wristlets could be your ticket to craft fair success!
What is a key fob wristlet?
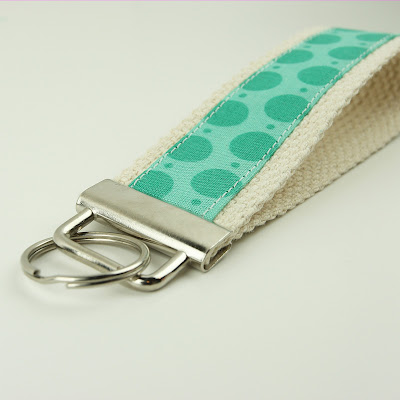
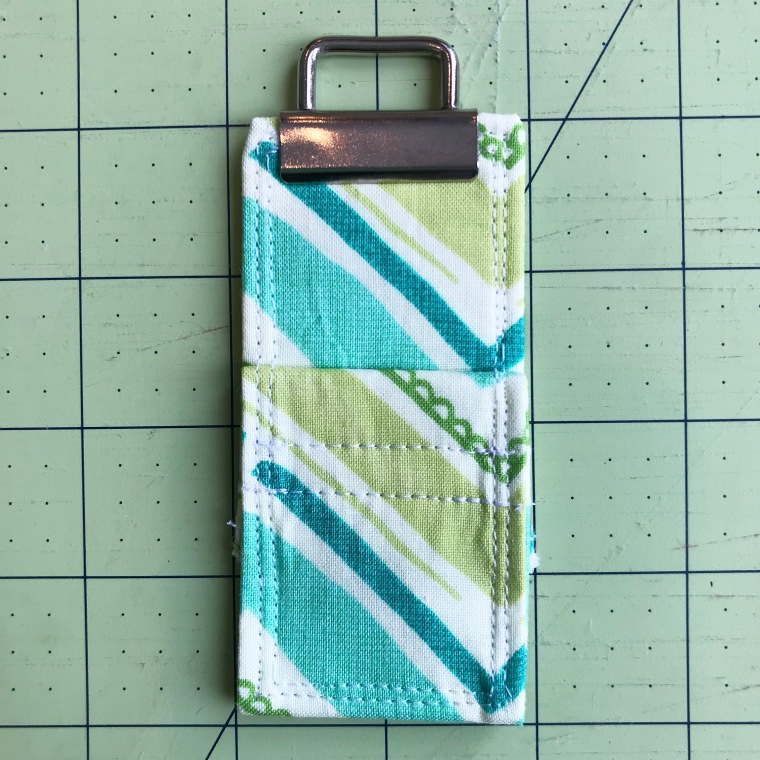
Before we get ahead of ourselves, let's break it down for the newbies. A key fob wristlet is essentially a mini keychain that you can wear around your wrist. It's like a stylish bracelet for your keys - practical and fashionable, all in one!

Why are key fob wristlets a craft fair hit?
Picture this: you're strolling through a craft fair, and what catches your eye? A rainbow of key fob wristlets, each one unique and eye-catching. People love to add a pop of personality to their everyday items, and key fob wristlets are the perfect way to do just that!
How can you make your own key fob wristlets?
Now, onto the fun part - making your own key fob wristlets! All you need are some cute fabric scraps, key fob hardware, and a sewing machine (or a needle and thread if you're feeling extra crafty). There are plenty of tutorials online to guide you through the process, so don't be afraid to give it a go!

But can you actually make money from them?
Absolutely! Craft fair-goers are always on the lookout for unique, handmade items, and key fob wristlets fit the bill perfectly. Plus, they're small and lightweight, making them an easy sell for customers looking for a little treat for themselves or a thoughtful gift for a friend.
Final thoughts: Get crafting!
So, there you have it - key fob wristlets are not only a breeze to make, but they're also a fantastic way to make some extra cash at craft fairs. So grab your fabric, fire up that sewing machine, and get ready to wow the crowds with your stylish creations. Who knows, you might just become the key fob wristlet queen (or king) of the craft fair circuit!

Are you ready to take your key ring to the next level? March 20 2025

Look no further than I Like Big Buttons!® Key Fob Hardware! These craft supplies are a game-changer for anyone looking to add a touch of personality to their keychains, lanyards, and more. But what exactly makes these key fob hardware pieces so special? Let's dive in and find out!

What's the Big Deal About I Like Big Buttons!® Key Fob Hardware?
Well, for starters, the name says it all - who doesn't like I Like Big Buttons!®, am I right? These key fob hardware pieces are not your average crafting supplies. They are sturdy and durable and come in a variety of sizes and finishes to suit your every crafting need. Plus, they are so easy to use that even a crafting newbie can become a pro in no time!

How Can You Use I Like Big Buttons!® Key Fob Hardware?
The possibilities are endless! You can use these key fob hardware pieces to create personalized keychains for yourself or as gifts for friends and family. Add a pop of color with vibrant fabric or keep it classy with a sleek leather design. The choice is yours! You can even use them to jazz up your backpack, purse, or zipper pulls. Get creative and let your imagination run wild!

Why Should You Choose I Like Big Buttons!® Key Fob Hardware?
Aside from the fact that they are just plain fun to work with, I Like Big Buttons!® Key Fob Hardware is top-notch quality. You won't have to worry about your creations falling apart after a few uses. These hardware pieces are built to last, so you can show off your crafting skills for years to come. Plus, with so many options to choose from, you'll never run out of ideas for your next project!
So, what are you waiting for? Dive into the world of I Like Big Buttons!® Key Fob Hardware and let your creativity shine. Whether you're a seasoned crafter or just starting out, these craft supplies are sure to add a touch of flair to your creations. Get ready to make a statement with your one-of-a-kind keychains and accessories!

Wristlets with I Like Big Buttons! Key Fob Hardware Starter Kits September 11 2023

⭐️⭐️⭐️⭐️⭐️
Exactly what I needed to start making keychains. This is a perfect way to try it before making a larger investment with supplies. Everything worked perfectly!
-- Jessica
Shop with Confidence
#keyfobs #keyfobhardware #ilikebigbuttons #craftstore #customerlove #customershare #letsbecrafty #customerreview #smallbusiness
Key Fob Wristlets with I Like Big Buttons! Key Fob Hardware July 28 2023

⭐️⭐️⭐️⭐️⭐️
Nice hardware. We will purchase again. katskeyfobs.etsy.com
-- KAT
#keyfobs #keyfobhardware #ilikebigbuttons #craftstore #customerlove #customershare #letsbecrafty #customerreview #smallbusiness
Key Fob Purse Wristlets with I Like Big Buttons! Key Fob Hardware July 17 2023

⭐️⭐️⭐️⭐️⭐️
Love it..quick shipping!!!
-- Lori
#keyfobs #keyfobhardware #ilikebigbuttons #craftstore #customerlove #customershare #letsbecrafty #customerreview #smallbusiness
How to Make A Key Fob Lip Balm Holder by I Like Big Buttons! November 03 2022
How to Make A Key Fob Lip Balm Holder by I Like Big Buttons! Fun and Functional Tutorial! 💕💕💕
Check out our Inspiration Board for more Key Fob Hardware crafty projects.
See all our Key Fob Hardware How-To Videos here.
How to Make An Embroidered Key Fob Hardware Wristlet by I Like Big Buttons! October 27 2022
How to Make An Embroidered Key Fob Hardware Wristlet by I Like Big Buttons! Sew Easy! 💕💕💕
Check out our Inspiration Board for more Key Fob Hardware crafty projects.
See all our Key Fob Hardware How-To Videos here.
How to Make A Key Fob Wristlet with KAM Snaps by I Like Big Buttons! October 20 2022
How to Make A Key Fob Wristlet with KAM Snaps by I Like Big Buttons! Sew Adorable! ![]()
![]()
![]()
Check out our Inspiration Board for more Key Fob Hardware crafty projects.
See all our Key Fob Hardware How-To Videos here.
How to Make A Fabric Key Fob Wristlet by I Like Big Buttons October 13 2022
How to Make A Fabric Key Fob Wristlet by I Like Big Buttons! Sew Fun! ![]()
![]()
![]()
Check out our Inspiration Board for more Key Fob Hardware crafty projects.
See all our Key Fob Hardware How-To Videos here.
How to Make A Ribbon & Cotton Webbing Key Fob Wristlet by I Like Big Buttons! October 12 2022
How to Make A Ribbon & Cotton Webbing Key Fob Wristlet by I Like Big Buttons! Easy Peasy Tutorial! ![]()
![]()
![]()
Check out our Inspiration Board for more Key Fob Hardware crafty projects.
See all our Key Fob Hardware How-To Videos here.
How to Make Key Fob Wristlet by I Like Big Buttons! October 11 2022
Check out our Inspiration Board for more Key Fob Hardware crafty projects.
See all our Key Fob Hardware How-To Videos here.
What You Can Do Key Fob Hardware @ ILikeBigButtons.com September 14 2022
Fabric and Cotton Webbing Key Fob Hardware Wristlet May 24 2022

Christmas Gift Idea #2: Key Fob Wristlets @ ILikeBigButtons.com December 02 2021

- 11"x2.25" fabric strip (of your choosing)
- 1" or 1.25" cotton webbing (depending on Key Fob Hardware Size)
- Heat N Bond or Fusible Tape
- 1" or 1.25" Key Fob Hardware set
- Key Fob Hardware Pliers
- Sewing Clips
- Fray Stop
- Sewing Machine
- Iron

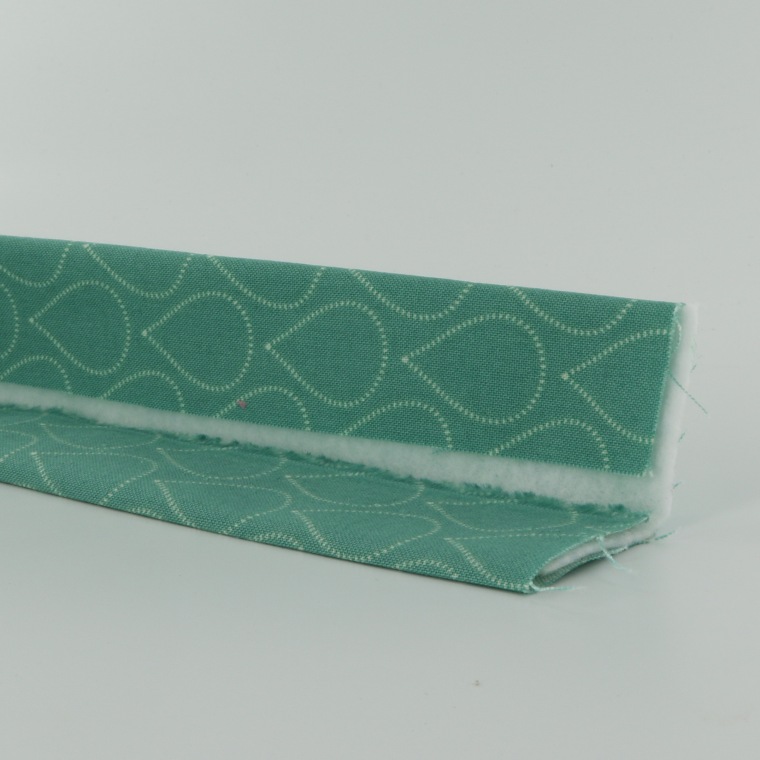
2. I made a template out of chipboard that was 12"x1.25" to help me achieve a consistent size and look. Fold in and iron the fabric to 1.25" wide.
4. Remove Heat N Bond backing and turn finished Fabric Strip right side up and iron to Cotton Webbing making sure to center it.
5. Stitch along the edge of your Fabric strip, securing the edge onto the webbing. Work slowly, keeping close to the edge. Go the whole length on both sides.

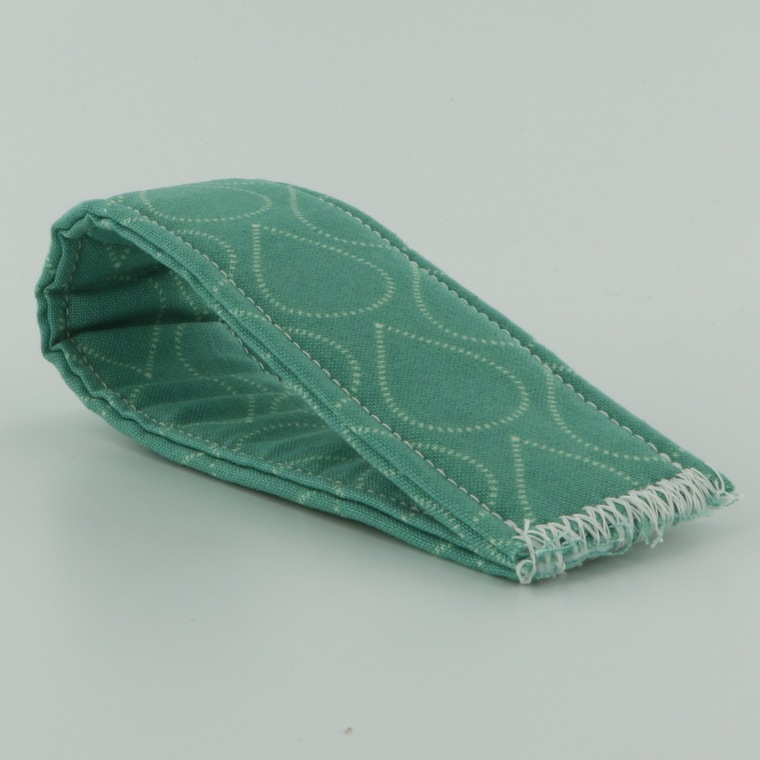
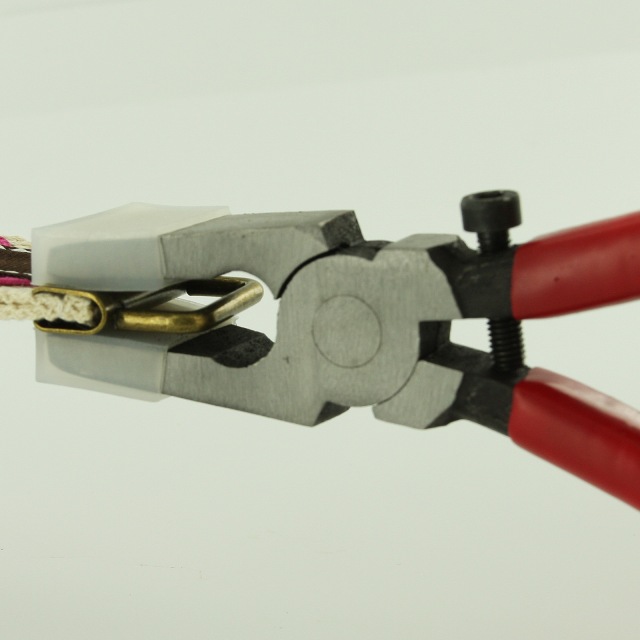
6. Fold the Cotton Webbing in half, right sides facing out and match up the ends. Secure with Sewing Clips and stitch the ends together with a zigzag stitch. Trim any loose threads and lightly coat the end in Fray Stop or equivalent liquid to help resist fraying over time.

8. Using your Key Fob Hardware pliers squeeze the Key Fob Hardware closed a little at a time. I like to go back and forth a couple times so that I don't over-crimp one side too much.


9. Add the Key Ring and Yay!!! You are done. Good Job!!!
* Instructions for 1.25" Key Fob Hardware (adjust accordingly if using 1" Hardware)
To see all our Key Fob Hardware Tutorials, visit our Projects section here.
Brand New! Hearts & Stars & Flowers! Oh my! @ ILikeBigButtons.com August 10 2021

Brand New! Hearts & Stars & Flowers! Oh my!
Check out I Like Big Buttons! Key Fob Hardware with shaped split rings!!!
Fabric Key Fob Hardware Wristlets by ILikeBigButtons.com October 27 2020


Supplies:
- 11" x 5" Fabric of your Choosing
- 11″ x 2.5" Piece of Fusible Fleece or 10" x 5" Fusible Interfacing
- 1 Key Fob Hardware and Split Ring
- Key Fob Hardware Pliers
- Sewing Clips
- Standard Sewing Machine
- Fray Check
Instructions:
- Cut a 11" x 5" section of Fabric of your choosing and 11" x 2.5" Fusible Fleece.
- Iron Fusible Fleece to the center of the fabric. Fold and iron the Fabric in half with the wrong sides together.
- Unfold and iron the Fabric in half again long sides to the center.
- It will look like this when you get done.
- Use your Sewing Clips to pin the Wristlet flat.
- Stitch along the edge of your Fabric strip, I stitched 1/4" in. Remove the Sewing Clips as you go. Work slowly, keeping close to the edge and as straight of a line as possible.
- Repeat 1/4" stitching along the opposing edge.
- Fold the Fabric Wristlet Strip in half, right sides facing out and match up the ends.
- Stitch the ends together with a zig zag stitch. I went back and forth a few times to ensure it held.
- Trim any loose threads. Use Fray Check to seal the end of the exposed Fabric edge.
- Tuck the sewn seam ends into the Key Fob Hardware, making sure that the Fabric Wristlet is centered.
- Using Key Fob Hardware Pliers squeeze the Key Fob Hardware closed with gentle pressure. Sometimes, I go back and forth from left to right added a little bit of pressure to each side until it eases together. Our Key Fob Hardware Pliers make this easy to do.
- Note the adjustable screw set to the distance I want the pliers to go to.
- Add the Split Ring and Yay!!!
- I love them and now I have a few sets to share!!!
How to Make a Key Fob Lip Balm Holder by I Like Big Buttons! October 21 2020

Supplies:
- 15.5" x 2.25" of Cotton Fabric
- 15.5" x 2.25" piece of Fusible Interfacing
- 1.25" Key Fob Hardware with Split Rings
- Key Fob Pliers
- Sewing Clips
- Standard Sewing Machine
- Iron and Ironing Board
- Scissors
Instructions:
- Cut a 15.5" x 2.25" piece of Cotton Fabric and Fusible Interfacing. These measurements will work for a standard Lip Balm Tube and a standard Blistex Tube. You may need to adjust measures for your favorite lip product.
- Iron the Fusible Interfacing to the wrong side of your fabric.
- Fold right sides together width-wise and sew both long sides with a 1/4" seam. Do not sew short sides.
- Turn the tube right side out through the open side, iron flat, and sew the open short side closed with a zig-zag stitch.
- Fold zig-zag side back on itself 1 1/4". Sew straight stitch 1/2" from the top, and again at 5/8" from the top. This is what it will look like from the back.
- Here is how the front turned out. This will be the front of the pocket on the Lip Balm Holder.
- Fold the tab that will be the front of the pocket at 2 3/4". Make sure the zig-zag stitch is hidden. Use Sewing Clips to hold the front pocket in place while sewing. Stitch at 1/4" seam around the whole holder. And again at 1/8". Start and finish at the top edge so that your start and finish stitches will be hidden.
- Center the 1.25" Key Fob Hardware on the top edge of the Lip Balm Holder.
- Using Key Fob Hardware Pliers squeeze the Key Fob Hardware closed with gentle pressure. Sometimes, I go back and forth from left to right added a little bit of pressure to each side until it eases together. Our Key Fob Hardware Pliers make this easy to do. Make sure the teeth in the Key Fob Hardware are sunk securely into the fabric.
- Tada! These little Lip Balm Holders were easy to make and are great as a quick thoughtful gift for a loved one who hates chapped lips.
- Hang them on your keychain, the outside of your purse, or anywhere you need for quick access.
Fabric and Cotton Webbing Key Fob Tutorial October 14 2020

How to make a Fabric Key Fob Wristlet:
You will need:
- Scissors
- Sewing Machine
- Iron
Supplies:
- 1.25" Cotton Webbing
- Ribbon (Narrower than the Cotton Webbing)
- Coordinating color thread
- Heat N Bond or Fusible Tape
- 1.25" (32 mm) Key Fob Hardware
- Key Fob Hardware Pliers
Instructions (adjust accordingly for 1" hardware):
- Cut a 10" section of Cotton Webbing and Fabric strip. Create a 10"x1.25" strip of Fabric and a 10"x0.75" strip of Heat N Bond.
- Center and Iron Heat N Bond to back side of Fabric strip.
- Remove backing and on each side fold 1/4" seam over and iron.
- Turn finished Fabric strip right side up and iron to Cotton Webbing, making sure to center it.
- Stitch along the edge of your Fabric strip, securing the edge onto the webbing. Work slowly, keeping close to the edge. Sew the whole length and around the ends of the fabric strip for added stability.
- Fold the Cotton Webbing in half, right sides facing out and match up the ends.
- Stitch the ends together with a 1/4" seam allowance.
- Trim any loose threads.
- Tuck the sewn seam ends into the Key Fob Hardware, making sure that the Cotton Webbing is centered.
- Using Key Fob Hardware Pliers with silicone tips to protect the metal from getting scratched, squeeze the Key Fob Hardware closed a little at a time. I like to go back and forth a couple times so that I don't over crimp one side.
- Add the Key Ring and Yay!!! You are done. Good Job!!!
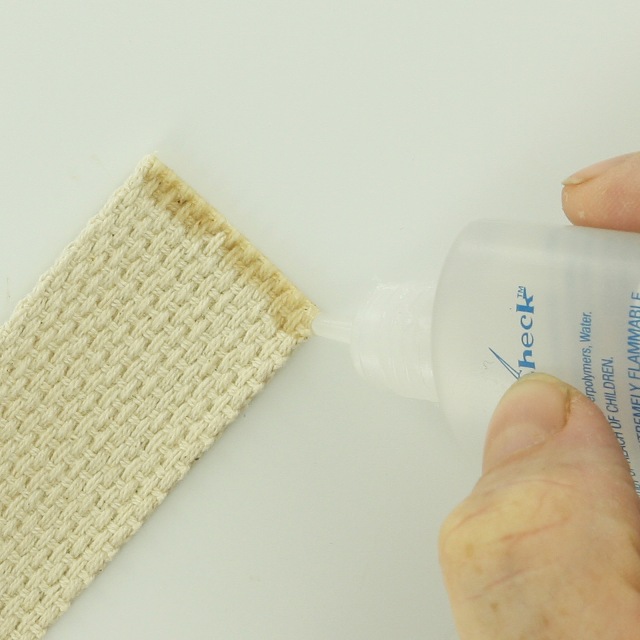
Ribbon and Cotton Webbing Key Fob Tutorial October 05 2020

How to make a Ribbon Key Fob Wristlet:
You will need:
- Scissors
- Sewing Machine
- Iron
Supplies:
- 1.25" Cotton Webbing
- Ribbon (Narrower than the Cotton Webbing)
- Coordinating color thread
- Heat N Bond or Fusible Tape
- 1.25" (32 mm) Key Fob Hardware
- Key Fob Hardware Pliers
Instructions (adjust accordingly for 1" hardware):
- Cut a 11" section of the Cotton Webbing and Ribbon of your choosing.
- Cut a 11" section of Heat N Bond, keeping it thinner than your ribbon.
- Iron the Heat N Bond to your Cotton Webbing, making sure to center it. This is not a necessary step but it makes it easier to sew the Ribbon on especially with embroidered ribbon.
- Iron the Ribbon to the Cotton Webbing.
- Sew up one side of the Ribbon and down the other. The Ribbon should now be securely attached to the Cotton Webbing.
- Trim the edges so they are even.
- Fold the Cotton Webbing in half, right sides facing out and match up the ends.
- Stitch the ends together with a 1/4" seam allowance.
- Trim any loose threads.
- Tuck the sewn seam ends into the Key Fob Hardware, making sure that the Cotton Webbing is centered.
- Using your Key Fob Hardware Pliers with silicone tips to protect the metal from getting scratched, squeeze the Key Fob Hardware closed a little at a time. I like to go back and forth a couple times so that I don't over crimp one side.
- Add the Key Ring and Yay!!! You are done. Good Job!!!
"No Sew" Key Fob for USB Memory Stick by ILikeBigButtons.com August 19 2019
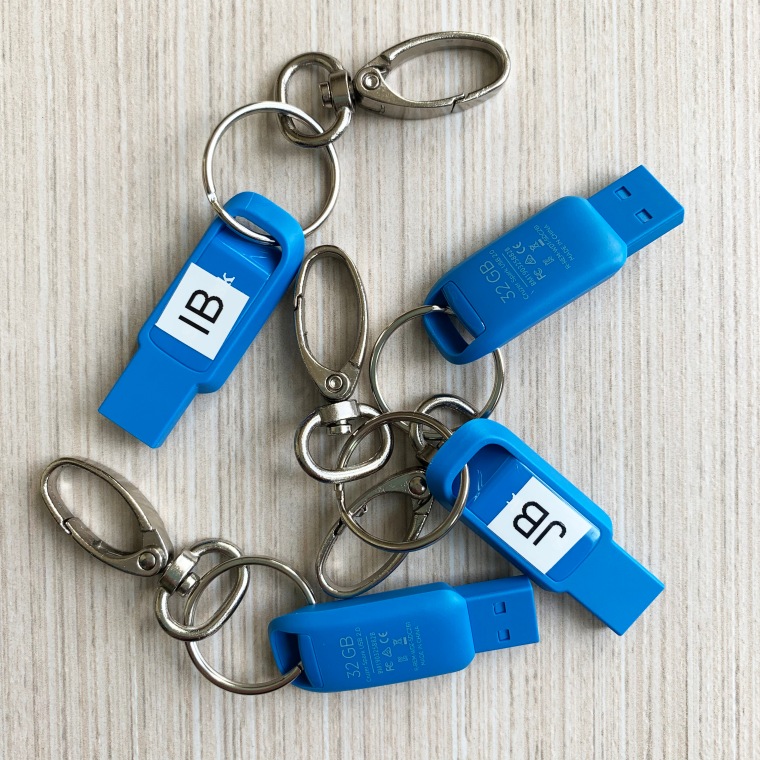
School supply time in the I Like Big Buttons! household. Almost all my kiddos need a USB memory stick these days, but they are SO small and prone to misplacement. I decided to make these simple "No Sew" Key Fobs to make them more challenging to lose, not that I don't have overachievers in losing things despite Mom's thoughtful planning. :P
Supplies:
- Split Rings
- Oval Lobster Clasps (Available in 1/2", 3/4", or 1" and Silver and Antique Brass)
- USB Memory Stick

Easy Peasy, twist a Split Ring onto an Oval Lobster Clasp. I used a Silver 1/2" Lobster Clasp, but we also offer them in 3/4" and carry them in 2 finishes: Silver and Antique Brass. Once the "No Sew" Key Fob is assembled simply twist the Split Ring onto the open ring at the top of the USB Memory stick. Tada!
To see other great Key Fob Hardware ideas, visit our DIY Project section here.
How to make a Ribbon and Cotton Webbing Key Fob Hardware Wristlet by ILikeBigButtons.com March 18 2019

Supplies:
- 11"x1.25" Fabric strip (of your choosing)
- Ribbon (make sure it's narrower than the Cotton Webbing)
- Heat N Bond or Fusible Tape
- 1" or 1.25" Key Fob Hardware set
- Key Fob Hardware Pliers
- Sewing Machine
- Iron


1. Cut a 11" section of Cotton Webbing and Ribbon of your choosing.

2. Iron Heat N Bond (11" by thinner than ribbon) to Cotton Webbing making sure to center it, this is not a necessary step but it makes it easier to sew the Ribbon on especially with embroidered ribbon.

3. Iron the Ribbon to the Cotton Webbing.

4. Now sew up one side of the Ribbon and down the other. The Ribbon is attached securely to the Cotton Webbing now. Trim the edges so that they are even.

5. Fold the Cotton Webbing in half, right sides facing out and match up the ends. Stitch the ends together with a 1/4" seam allowance. Trim any loose threads.

6. Tuck the sewn seam ends into the Key Fob Hardware, making sure that the Cotton Webbing is in there evenly and not hanging out one end or the other.

7. Using your Pliers wrapped in duct tape or a scrap of fabric to protect the metal from getting scratched, squeeze the Key Fob Hardware closed a little at a time. I like to go back and forth a couple of times so that I don't over crimp one side too much.

8. Add the Key Ring and Yay!!! You are done. Good Job!!!
To see all our Key Fob Hardware Tutorials, visit our Projects section here.
How to make a Fabric and Cotton Webbing Key Fob Hardware Wristlet by ILikeBigButtons.com February 28 2019
Supplies:
- 11"x1.25" Fabric strip (of your choosing)
- 1" or 1.25" cotton webbing (depending on Key Fob Hardware Size)
- Heat N Bond or Fusible Tape
- 1" or 1.25" Key Fob Hardware set
- Key Fob Hardware Pliers
- Sewing Machine
- Iron

1. Cut a 11" section of Cotton Webbing and Fabric strip, create a 11"x1.25" strip of Fabric and a 11"x0.75" strip of Heat N Bond.
2. Center and Iron Heat N Bond to the wrong side of Fabric strip.


3. Remove backing and on each side fold 1/4" seam over and iron.
4. Turn finished Fabric Strip right side up and iron to Cotton Webbing making sure to center it.

5. Stitch along the edge of your Fabric strip, securing the edge onto the webbing. Work slowly, keeping close to the edge. Go the whole length and around the ends of the fabric strip for added stability.

6. Fold the Cotton Webbing in half, right sides facing out and match up the ends. Stitch the ends together with a 1/4" seam allowance. Trim any loose threads.

7. Tuck the sewn seam ends into the Key Fob Hardware, making sure that the Cotton Webbing is in there evenly and not hanging out one end or the other.

8. Using your pliers wrapped in duct tape or a scrap of fabric to protect the metal from getting scratched, squeeze the Key Fob Hardware closed a little at a time. I like to go back and forth a couple times so that I don't over crimp one side too much.
9. Add the Key Ring and Yay!!! You are done. Good Job!!!
To see all our Key Fob Hardware Tutorials, visit our Projects section here.
Key Fob Lip Balm Holder by ILikeBigButtons.com December 10 2018

I have been admiring these Lip Balm Holders for some time and decided to today to make a few for my littles' Lip Balm and my Blistex. I love how they turned out!
Supplies:
- 15.5" x 2.25" of Cotton Fabric
- 15.5" x 2.25" piece of Fusible Interfacing
- 1.25" Key Fob Hardware with Split Rings
- Key Fob Pliers
- Sewing Clips
- Standard Sewing Machine
- Iron and Ironing Board
- Scissors

1. Cut a 15.5" x 2.25" piece of Cotton Fabric and Fusible Interfacing. These measurements will work for standard Lip Balm Tube and the standard Blistex Tube. You may need to adjust measures for your favorite lip product.

2. Iron the Fusible Interfacing to the wrong side of your fabric.

3. Fold right sides together width-wise and sew both long sides with a 1/4" seam. Do not sew short sides.

4. Turn tube right side out through the open side, iron flat, and sew the open short side closed with a zig-zag stitch.

5. Fold zig-zag side back on itself 1 1/4". Sew straight stitch 1/2" from the top, and again at 5/8" from the top. This is what it will look like from the back.

6. Here is how the front turned out. This will be the front of the pocket on the Lip Balm Holder.

7. Fold the tab that will be the front of the pocket at 2 3/4". Make sure the zig-zag stitch is hidden. Use Sewing Clips to hold front pocket in place while sewing. Stitch at 1/4" seam around the whole holder. And again at 1/8". Start and finish at the top edge so that your start and finish stitches will be hidden.

8. Center the 1.25" Key Fob Hardware on the top edge of the Lip Balm Holder.
9. Using Key Fob Hardware Pliers squeeze the Key Fob Hardware closed with gentle pressure. Sometimes, I go back and forth from left to right added a little bit of pressure to each side until it eases together. Our Key Fob Hardware Pliers make this easy to do. Make sure the teeth in the Key Fob Hardware are sunk securely into the fabric.

10. Tada! These little Lip Balm Holders were easy to make and are great as a quick thoughtful gift for a loved one who hates chapped lips.

11. Hang them on your keychain, the outside of your purse, or anywhere you need for quick access.
To see all our Key Fob Hardware Tutorials, visit our Projects section here.
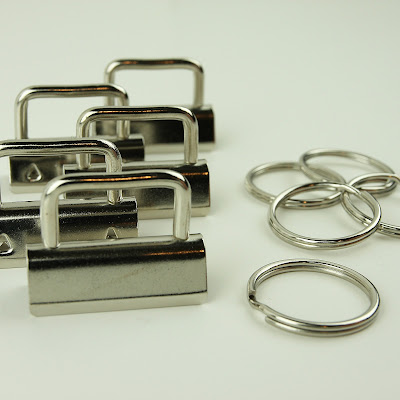
I Like Big Buttons! Key Fob Hardware February 05 2018

- 2 Sizes (1" and 1.25")
- 3 Finishes (Silver, Antique Brass, and Gunmetal)
Key Fob Hardware with Split Rings (1" - 25 mm)
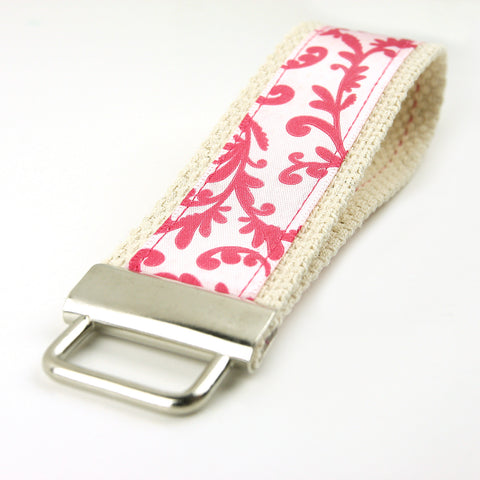
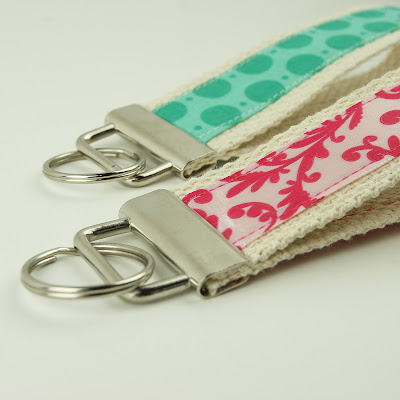
Key Fob Hardware is simple to use and produces amazing results. Just add your fabric, ribbon, or webbing for an instant, elegant wristlet.
(Optional) Add Key Fob Hardware Crimping Tool (required to apply key fob hardware):
- Key Fob Hardware Setting/Crimping Pliers
- Adjustable Screw (to adjust pressure applied to hardware)
- Set of Rubber Tips (helps prevent scratching and denting of hardware)
You can do it! See how easy it is with one of our step by step tutorials:
An I Like Big Buttons Christmas! Idea #3: Five Ways To Make Key Fob Hardware Wristlets November 22 2017

Gift idea #3: Key Fob Hardware Wristlets are a great useful and personal gift to give. Key Fob Hardware is simple to use and produces amazing results. Just add your fabric, ribbon, webbing, or embroidery for an instant, elegant wristlet. Check it out!
Five fun and simple tutorials:
- Fabric and Cotton Webbing Wristlet
- Ribbon and Cotton Webbing Wristlet
- Making a Smart Phone Case with Wristlet using Key Fob Hardware, KAM Snaps and PDF Pattern
- Making an Embroidered Key Fob Hardware Wristlet
- Fabric Key Fob Hardware Wristlets
#ilikebigbuttons #keyfob #keyfobwristlets #christmasideas #shopilikebigbuttons #wristlets #fobs


Brand New!!! Lobster Clasps by I Like Big Buttons! October 09 2017
We now carry Lobster Clasps in two finishes and three sizes!!! Lobster Swivel Clasps are great for key rings, lanyards, totes, purses and handbags, jewelry, leather craft, beading, and much more.
Silver-Toned Finish:

Our Silver-Toned Lobster Claps are available in 1/2" (13 mm), 3/4" (20 mm), and 1" (25 mm).
Lobster Swivel Clasps are great for key rings, lanyards, totes, purses and handbags, jewelry, leather craft, beading, and much more.
Lobster Clasps are frequently combined with:
- KAM snaps (size 16 for ribbon, size 20 for most other materials)
- Split Rings
Antique Brass Finish:

Our Antique Brass Lobster Claps are available in 1/2" (13 mm), 3/4" (20 mm), and 1" (25 mm).
Lobster Swivel Clasps are great for key rings, lanyards, totes, purses and handbags, jewelry, leather craft, beading, and much more.
Lobster Clasps are frequently combined with:
- KAM snaps (size 16 for ribbon, size 20 for most other materials)
- Split Rings


I Like Big Buttons! Product Video: What We Carry June 22 2017
Check out ILikeBigButtons.com - A family-run craft supply shop with a large variety of plastic KAM Snaps & accessories, Key Fob Hardware, Cover Buttons, Pacifier Supplies, Metal Findings and more! We are constantly expanding our selection of crafting supplies for you.
How to make Fabric Key Fob Hardware Wristlets by I Like Big Buttons! October 28 2016

Today, I am making a Fabric Key Fob Hardware Wristlets. While we wait for our Key Fob Starter Kit Giveaway to end (Monday, 10/31/16), I decided to make a few adorable Key Fob Wristlets to show just how easy and fun they are to make.
Supplies:
- 11" x 5" Fabric of your Choosing
- 11″ x 2.5" Piece of Fusible Fleece or 10" x 5" Fusible Interfacing
- 1 Key Fob Hardware and Split Ring
- Key Fob Hardware Pliers
- Sewing Clips
- Standard Sewing Machine
- Fray Check
♥♥♥♥♥♥♥♥♥♥♥♥♥♥♥♥♥♥♥♥♥♥♥♥♥♥♥♥♥♥♥♥♥♥♥♥♥♥♥♥♥♥♥♥♥♥♥♥♥♥♥♥

Instructions:
1. Cut a 11" x 5" section of Fabric of your choosing and 11" x 2.5" Fusible Fleece.

2. Iron Fusible Fleece to the center of the fabric. Fold and iron the Fabric in half with the wrong sides together.

3. Unfold and iron the Fabric in half again long sides to the center.
4. It will look like this when you get done.

5. Use your Sewing Clips to pin the Wristlet flat.

6. Stitch along the edge of your Fabric strip, I stitched 1/4" in. Remove the Sewing Clips as you go. Work slowly, keeping close to the edge and as straight of a line as possible.

7. Repeat 1/4" stitching along the opposing edge.
8. Fold the Fabric Wristlet Strip in half, right sides facing out and match up the ends.
9. Stitch the ends together with a zig zag stitch. I went back and forth a few times to insure it held.
10. Trim any loose threads. Use Fray Check to seal the end of the exposed Fabric edge.

11. Tuck the sewn seam ends into the Key Fob Hardware, making sure that the Fabric Wristlet is centered.

12. Using Key Fob Hardware Pliers squeeze the Key Fob Hardware closed with gentle pressure. Sometimes, I go back and forth from left to right added a little bit of pressure to each side until it eases together. Our Key Fob Hardware Pliers make this easy to do.
13. Note the adjustable screw set to the distance I want the pliers to go to.

14. Add the Split Ring and Yay!!!
15. I love them and now I have a few new sets to share!!!
An I Like Big Buttons Christmas! Idea #5: How to Make Key Fob Hardware Wristlets December 09 2015

Gift idea #5: Key Fob Hardware Wristlets are a great useful and personal gift to give. Key Fob Hardware is simple to use and produces amazing results. Just add your fabric, ribbon, webbing, or embroidery for an instant, elegant wristlet. Check it out!
Four fun and simple tutorials:
- Fabric and Cotton Webbing Wristlet
- Ribbon and Cotton Webbing Wristlet
- Making a Smart Phone Case with Wristlet using Key Fob Hardware, KAM Snaps and PDF Pattern
- Making a Embroidered Key Fob Hardware Wristlet
#ilikebigbuttons #keyfob #keyfobwristlets #christmasideas


How to make Embroidered Ribbon Key Fob Hardware Wristlets October 01 2014
How to make Embroidered Ribbon Key Fob Hardware Wristlets
Today, I am making embroidered ribbon Key Fob Hardware Wristlets. Just a couple weeks ago, my mom, sister and I had a girl's weekend at my home. In between long rounds of talking and catching up (we talk every week by phone ;), eating good food, chasing kids, and being put to work. They graciously volunteered to help me do some of the tedious day to day work for my business. We snuck in some time to make a few Key Fob Hardware Wristlets for them. Here are some examples of how they turned out.
Supplies:
- Ribbon of your choosing (Narrower than the Cotton Webbing)
- 1x 10″ Piece of 1.25″ Cotton Webbing
- 1x 10″ Piece of Ribbon
- 1 Key Fob Hardware and Split Ring
- Key Fob Hardware Pliers
- Fray Check
- Wonder Clips
- Standard Sewing Machine with Embroidery option


Instructions:
1. Cut a 10" section of the Cotton Webbing and Ribbon of your choosing.

2. The ribbon I was using was made of polyester so I used a lighter to seal the ends of the ribbon so it doesn't fray. (If you are unsure, you may want to practice on a scrap piece if this is your first time or you are unsure of the what the material is made of.)
-
If you would like (I didn't do it this time but have in the past): Cut a 10" section of Heat N Bond, keeping it thinner than your ribbon.
-
Iron the Heat N Bond to your Cotton Webbing, making sure to center it. This is not a necessary step but it makes it easier to sew the Ribbon on especially with embroidered ribbon.
-
Iron the Ribbon to the Cotton Webbing.

3. Using my Standard Sewing Machine with Embroidery options, I picked the word I wanted on my ribbon and sewed it on my ribbon. I folded my ribbon in half and estimated about where the letters would end up and came up with about 2 1/2" to 3" down to get the font centered on the Wristlet once finished.
4. Use Fray Check to seal the end of the Cotton Webbing.

5. I laid out my Ribbon and Rick Rack how I wanted it to look using my Wonder Clips. Love them!
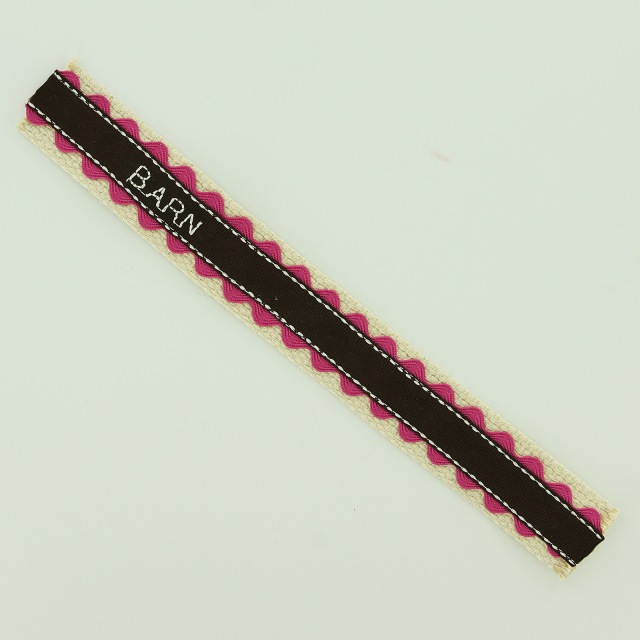
6. Sew up one side of the Ribbon and down the other. The Ribbon should now be securely attached to the Cotton Webbing.

7. Fold the Cotton Webbing in half, right sides facing out and match up the ends.
8. Stitch the ends together with a 1/4" seam allowance.
9. Trim any loose threads.

10. Tuck the sewn seam ends into the Key Fob Hardware, making sure that the Cotton Webbing is centered.

11. Using Key Fob Hardware Pliers squeeze the Key Fob Hardware closed with gentle pressure.
12. Note the adjustable screw set to the distance I want the pliers to go to.

13. Add the Split Ring and Yay!!!


14. I love them and now I have a set for myself too!
Antique Brass Key Fob Hardware November 22 2013
Who needs some more Antique Brass craft items? Well, I do. Brand New! Antique Brass Key Fob Hardware with Split Rings are now available here in 1" and 1.25".
Check them out! I hope you love them as much as I do!
Key Fob Hardware is simple to use and produces amazing results. Just add your fabric, ribbon, or webbing for an instant, elegant wristlet.
Rubber tipped glass pliers or welding lock grip pliers work great for attaching this hardware. Make sure they are padded or covered with tape to prevent scratching.
You can do it! See how easy it is with one of our step by step tutorials:
Where to buy:
http://ilikebigbuttons.com/collections/key-fob-hardware
