News
Making Cover Button Paper Clip Bookmarks @ ILikeBigButtons.com April 05 2021
 |
 |
 |
 |
How To Make Fabric Cover Button Jumbo Paper Clip Bookmarks:
Supplies:
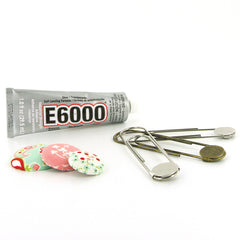
- 1 Completed Flat Back Fabric Cover Button (Attach size 36 (7/8" - 23 mm), size 45 (1 1/8" - 28 mm), or size 60 (1 1/2" - 38 mm) flat back cover buttons.)
- 1 Jumbo Paper Clip
- E6000 or comparable adhesive
Instructions:
- Follow these instructions to make Flat Back Fabric Covered Buttons.
- Make sure the surfaces of the Cover Button back and Paper Clip gluepad are clean and free of oil.
- Apply E6000 to the back of the Cover Button.
- Press into place over the glue pad on the Paper clip at the desired height and remove any extra Adhesive. The bigger the Cover Button the higher you will want to center the cover button.
- Let dry and enjoy.
- Tada!
You are done! Use these adorable Paper Clips to hold your place in your favorite book or cookbook. Enjoy!
How To Wrap Cover Buttons With Paper by ILikeBigButtons.com January 31 2019
I recently had a customer, Annie, ask if Cover Buttons could be wrapped in paper. I knew of a few customers who had success doing so but had never attempted it myself. Here is a tutorial on how to make Paper Wrapped Cover Buttons and some tips that Annie and I discovered and used.
I love how they turned out. Being an avid reader, I think they are the perfect touch for that special bookworm in your life.
How to Make Paper Wrapped Cover Buttons:
Cover Buttons are easy to assemble:
1. Cut your paper scrap. You will want a circle that is about twice the diameter of your button blank. We used book pages, children's books, and scrapbook paper and they all worked great. You may need to experiment and find what works best for you.
2. Cut a square of wax paper or piece of parchment paper slightly larger than your paper circle. You should be able to reuse it a number of times. I found that the parchment paper held up best.
3. Mist your paper circle on both sides and blot dry. This will help the paper to mold more smoothly to the rounded surface of the cover button front.
4. Layer the wax/parchment paper, then your paper circle on the larger assembly tool mold piece (RIGHT SIDE DOWN). When you look into the underside of the tool you want to see the back of the fabric.
5. Place the button front (the domed piece) on top of the paper and press into the mold. This will require firm pressure. Leave the paper edges hanging out.
6. Press the paper edges down into the backside of the button front.
7. Place the back cover button piece on top of your paper and button front. If the cover button will be subject to repeated tugging from the back, you may want to add a little e6000 adhesive before attaching the back.
8. Take the smaller piece of the assembly tool and with the open side down place it on the button back.
9. Press down firmly. You may hear a pop when the last bit of the button back slips into place. If you take the tool out and the button is not completely secured, just put it back in and press down again.
10. When you take the small assembly tool piece off, the paper edges will be secured underneath the button back.
11. Remove the button from the larger assembly tool piece carefully using the wax/parchment paper to ease the button free.
12. If desired, you can clear coat the completed button with Modge Podge or some equivalent sealer. It will extend the life of the Paper Wrapped Cover Button and give it a glossy finish.
13. Tada! I am particularly in love with the Word Cover Buttons, it was fun picking the words I wanted centered and highlighted.


