News
KAM® Snap Life Hack @ ILikeBigButtons.com February 17 2023

Did you know you can use half a KAM® plastic snap as a rivet?
The sheets on our bed love to snap off after a day or two. It is one of my husband's biggest pet peeves. We have tried all kinds of sheets and gadgets to keep them on. My husband mostly recently bought this gadget that comes with three clips and elastic that slides. Which worked great for the first month, now they just slide all the way to the end, rendering them useless.
KAM® snaps to the rescue. I decided to use the snaps as rivets to keep the tri-glide buckle from sliding to the end. With half of a Long Prong KAM® snap (a Cap and Socket), I went through the two layers of elastic, pinning them together at a distance that gives them some stretch but not too much.
So far, so good!

New Colors! Long Prong Size 20 KAM Snaps in Neutrals! January 19 2022

We also offer Long Prong Size 20 (0.5" - 12.4 mm) in a rainbow of colors, now including B24 - Light Gray and B25 - Tan. They are great for embroidered key fobs using Marine or Glitter Vinyl as well as other projects where you need just a little more prong length. Long Prong Size 20 snaps have a 6.2mm prong length.
Shop with Confidence!
🥰 This feedback made my day! @ ILikeBigButtons.com October 21 2021
🥰 This feedback made my day! As a Mompreneur 😊, some days I really need these thoughtful reviews to let me know that the time, energy, and sacrifices I make for my customers are seen and appreciated.
⭐️⭐️⭐️⭐️⭐️
Perfect transaction. Seller was super-responsive, fast to deliver, and incredibly helpful with information about her products and questions I had about my specific project. I bought from her BECAUSE of how she responded to me and my questions. Great seller!
-- Jeri

Long Prong vs Standard Prong Customer Review @ ILikeBigButtons.com April 06 2021

LOVE these long prong KAM buttons. They work wonders with thicker fabric, such as double layer leather like fabric you often use in projects like “hand sanitizer bottle holders”, “key fogs “, and others .
Until I bought these I had managed to press the standard size 20 prong length Kam snaps in by carefully cutting a layer out (a small circle) using sharp manicure scissors -but it was far from ideal.
Now I simply use these size 20 LONGER prong buttons with leather like double layer fabrics, so much neater!!
DELIVERY was very fast & CUSTOMER support is excellent.
Highly recommend this product & this seller. Won’t hesitate to buy more here.
❤ this review! It is very detailed. Rejane even took the time to include a picture of the way she used to work around when using Standard Prong on thicker material versus how easy and clean it looks using Long Prong on her project. Thank you, Rejane, for the thoughtful review and share!
Shop Long Prong KAM Plastic Snaps @ ILikeBigButtons.com
How To Make A KAM Plastic Snap Cord Keeper/Organizer by ILikeBigButtons.com February 05 2019
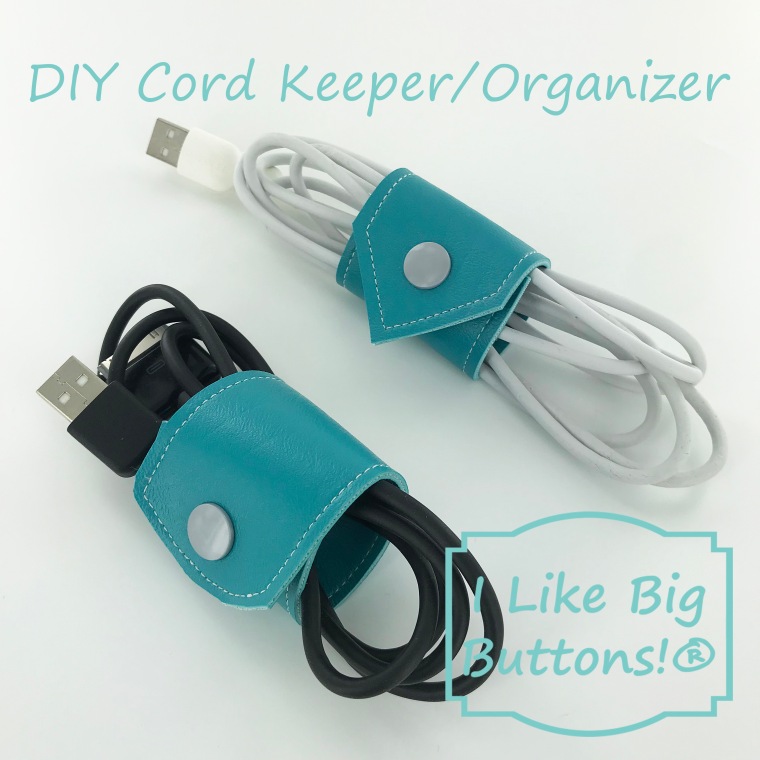
Cords, cords, cords!!! Despite my husband's best efforts to make our house wireless, there are cords everywhere. Part of the joy of being a mom of many, I suppose. 😜 Everyone has one or more somethings that need to be charged and my husband makes sure there are enough cords so that no one is left crying. Have I mentioned he is my resident computer wiz? A job he proudly takes on.
So with cords abounding in my life and house, I decided we needed a better way to manage them all. Here are the results of my efforts. Cord keepers/organizers to simplify my life and corral the cords we can't live without. 🤪
Supplies:
- Approximately 5.25" x 2" Marine Vinyl or material of your choice
- KAM Plastic Snaps (I used Long Prong KAM Plastic Snaps because I was working with 2 layers of Marine Vinyl)
- KAM Plastic Snap Pliers and Awl
- Sewing Clips
- Standard Sewing Machine
- Scissors
- Rotary Cutter

Instructions:
1. Cut out your material of choice, I used Marine Vinyl I had left over from a summer project. I cut each piece approximately 5.25" x 2" and gave them two different styles of finished ends. One is a pointed end, I used my quilting square to accomplish this, and the other has a rounded end, I used a small drinking cup to create the rounded tip. *The cords I was making these for were 6' cords, you may need to adjust the length of your cord keeper to accommodate a larger or smaller cord.


2. Place the two pieces of Marine Vinyl with wrong sides together and pin with Sewing Clips, if desired. Straight stitch with a 1/4" seam around the whole piece using a back stitch at the beginning and end to set the stitch.
3. Trim the edges down to 1/8" to remove the excess vinyl and any uneven edges. The Marine Vinyl can slip a little bit when you are sewing and I found this was the easiest way to get a clean edge.
4. Measure to the center at the top and bottom of each cord keeper/organizer and place a mark where you want your KAM Plastic Snap to sit. I don't like to eye it as I often find them off-center when I wing it.
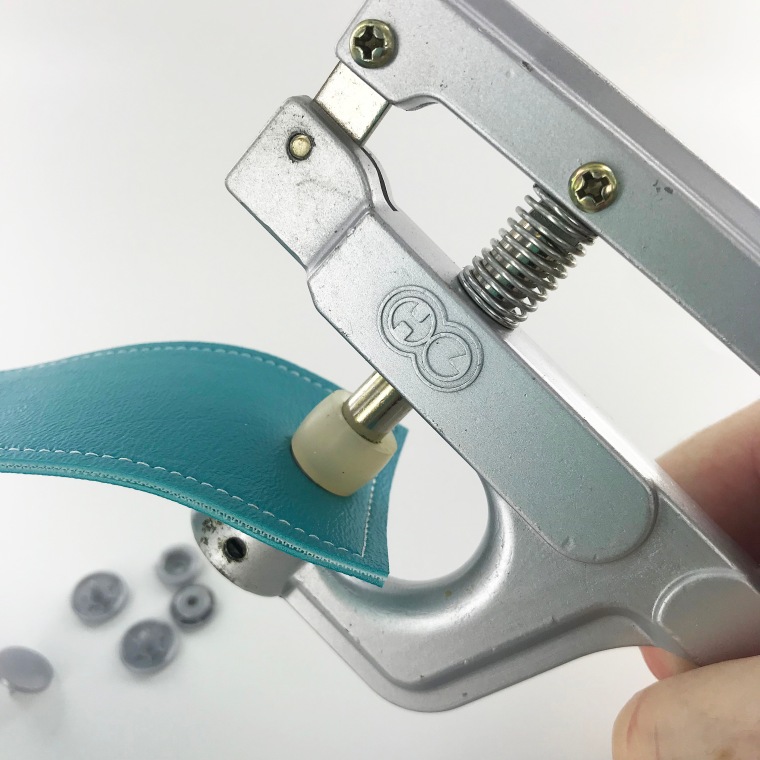
5. Poke a hole through the centered mark with your KAM Awl and insert the KAM Plastic Snap Cap prong through the hole. You will want the cap on the top side (the side that was up when sewing) of your cord keeper and the socket or stud on the bottom side.
6. Flip the cord keeper over and add the socket. Install the KAM Plastic Snap Cap and Socket on the edge that is rounded or pointed and a Cap and Stud on the square edge as pictured below.

7. Remember to install the snaps so that one half (Cap and Stud) are face up and one (Cap and Socket) are face down so that when you fold the cord keeper around the cord, the socket and stud meet.
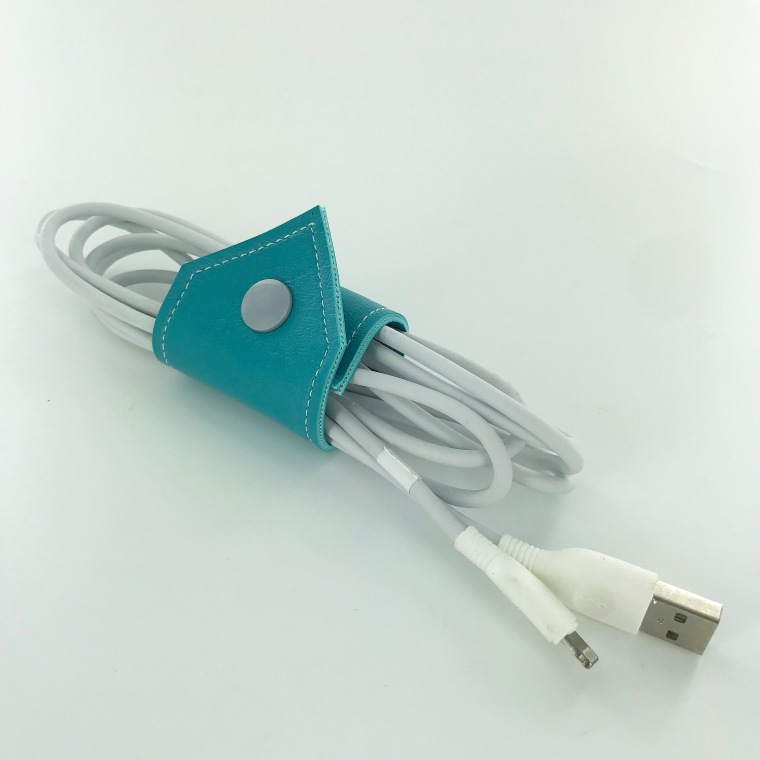

8. Tada! These cord keepers/organizers take only minutes to make with scraps of vinyl/fabric, a few KAM Plastic Snaps, and are already making my life feel less crazy. At least until they all get home from school. 😜
To see other great KAM Plastic Snap ideas, visit our DIY Project section here.
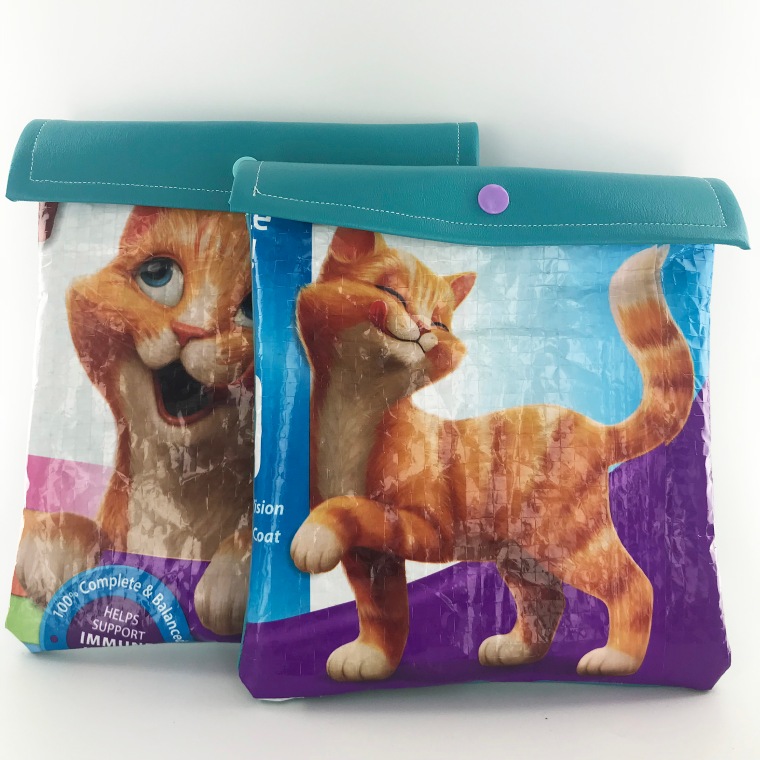
I Like Big Buttons! Upcycled Messenger Bag/Purse Tutorial November 09 2018

We are a cat loving family here at I Like Big Buttons. As such, we have a few fluffy friends scurrying around. Recently, my husband picked up a few bags of cat food that not only were made of a more durable material than the paper bags ones but also had cute kitty images on them. I couldn't resist turning them into some cute messenger bags for a couple of my little cat lovers. :)
How to make an Upcycled/Recycled Messenger Bag/Purse with KAM Snaps and Pet Food Bag
Supplies:
- Pet Food Bag of your choice (Look for the ones made of woven plastic)
- Marine Vinyl or a material of your choice
- 2 KAM Snap Sets (Depending on the thickness of the material you may want Long Prong)
- KAM Snap Pliers and Awl
- 1″ Cotton Webbing
- Scissors/Rotary Blade
- Standard Sewing Machine

1. Cut the bag along the seams. I plan on making 2 bags with it. For this project, I am focusing on making each bag with a kitty image front and center. Use a damp cloth to wipe the leftover cat food crumbs from the interior of the bags and let air dry. This doesn't take more than a few minutes.

2. Decide on your shape. I like to craft off the cuff. This lid of a storage container was just the right size and shape to showcase the kitty image. Trace around it with a marker.

3. I picked the height based on the image. I left a 1" above each kitty image. *If I did it again, I might do 2" or 3" instead. As you will see later, the flap of the bag covers some of the image. If I had dropped it another inch I think it would have looked slightly better when snapped closed.

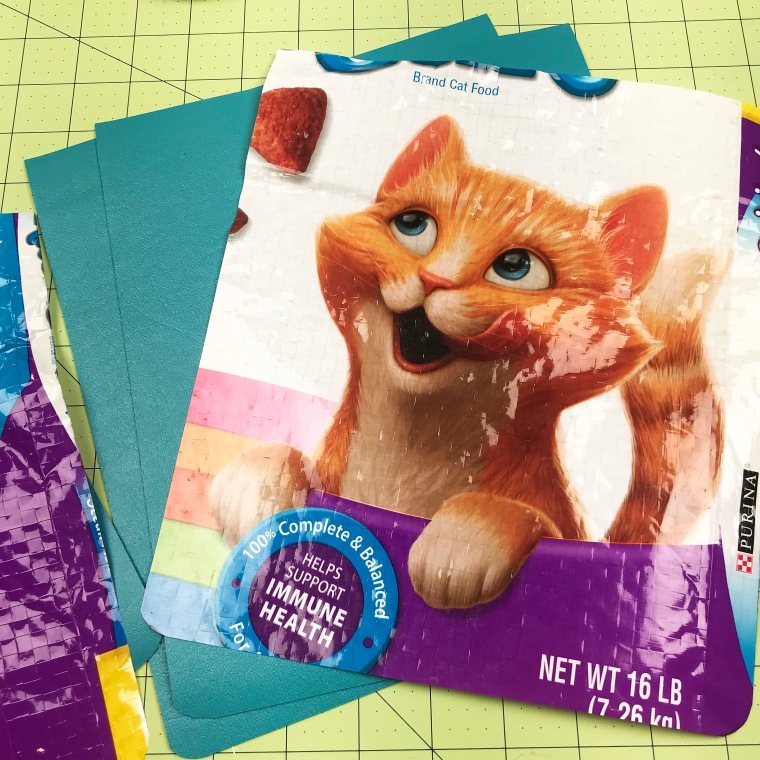
4. Cut 2 pieces of Marine Vinyl or material of your choice the same size at the kitty images. I had some vinyl left over from a summer chair reupholstering product. I love it because the color goes nicely with the kitty image and it is durable.

5. Cut two flaps for the messenger bags. I cut them the same width as the bags and longer than I thought I would need so I could adjust on the fly.

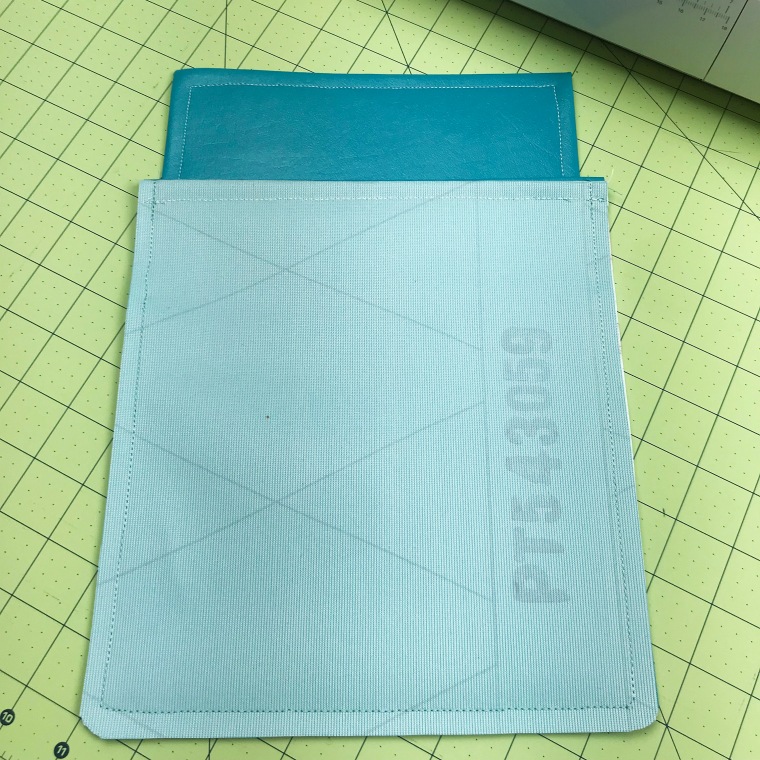
6. Using a 1/2" seam sew the kitty image to the front piece of Marine Vinyl, right sides together. I chose to put the Marine Vinyl front to the front so that the interior of the bag was uniform, but you could turn the right side of the Marine Vinyl inward so that it was to the inside of the bag. Sewer's choice. :)

7. Fold the sewed seam flat and smooth. Then, fold it until the kitty image is right side out. Smooth the sewed seam and Marine Vinyl.


8. Sew 1/4" seam along the top of the finished edge.
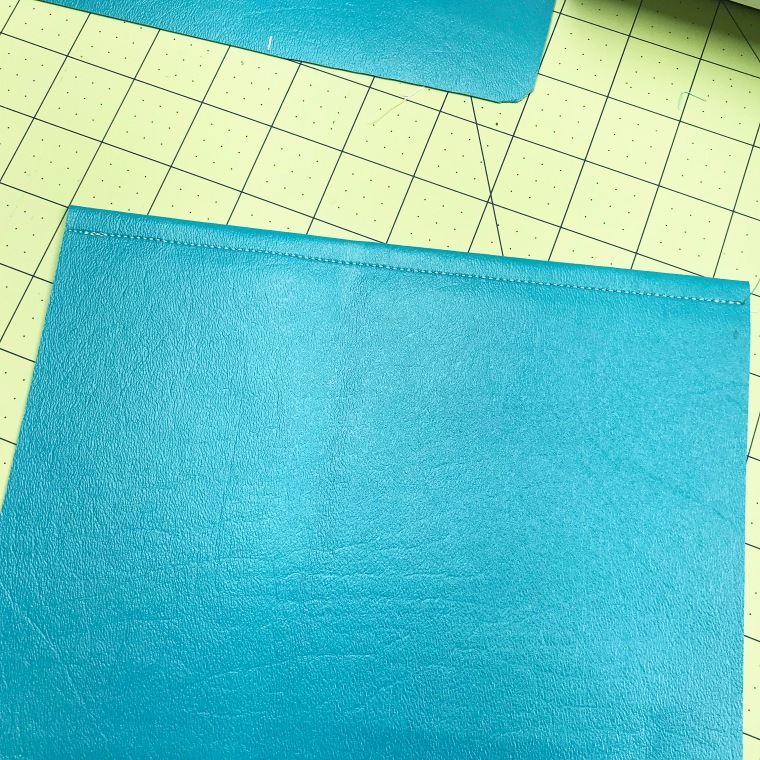
9. Fold the top edge of the back piece of the bag over a 1/2". Sew 1/4" seam along the edge, creating a finished edge.

10. For the top flap, I created a simple square with three finished edges. Marine Vinyl is durable and the raw edges hold up nicely. If using another material, you will have to give consideration to the material you are using and adjust accordingly. The messenger bag/purse will be about 8" wide when finished so I made the flaps slightly smaller at 7.75". *If I did it again, I might have shaved off a little bit more to give the shoulder strap more room to fill.

11. I, then, cut the height of the flap down to 3" because I wanted to see as much of the kitty image as I could after the KAM plastic snap was installed.


12. Align and use a zigzag stitch to attach the flap to the back piece of the purse. Make sure to center it.

13. Put right sides together and sew the 2 sides and bottom of the purse with a 3/8" to 1/2" seam. Make sure to use a Stay Stitch the beginning and end of your sewing so that the stitches stay put.


14. Turn the bags right side out and square the corners as much as possible. I used the backside of a Sharpie marker to help square the corners. Remember I slightly rounded them so they won't be perfectly square. Smooth bags flat.

15. Measure the center of the flap and use a KAM awl to poke a hole for the KAM plastic snap that you will adding. I am only going through 1 layer of Marine Vinyl so a Standard Prong snap will work. If you are using thicker material or multiple layers, I would recommend our Long Prong KAM plastic snaps.

16. Install KAM plastic snap (Cap and Socket).

17. Repeat in front of the bag, where KAM plastic snap lines up. I poked the hole through both layers at once so that I had a point of reference. Then I widened the hole after double-checking the placement of the internal hole. Install KAM plastic snap (Cap and Stud).


18. I think they turned out super cute! Now to add shoulder straps.

19. For the sake of time and my sanity, I simply attached the shoulder straps with a half of a KAM snap set (Cap and Socket). I used the snap like a rivet. I also used Long Prong KAM plastic snaps for this piece because I was working with the thickness of the Marine Vinyl and Cotton Webbing. *I doubled the edge of the Cotton Webbing over on itself and sewed a straight line back and forth across it a half dozen times so it doesn't unravel. With Polyester Webbing, you could melt the edge to secure it.


20. Tada!!! I think they turned out great, it took less than 2 hours to make both of them, and my little cat lovers are ecstatic. They have a new place to store their treasures.
😻 😻 😻
Friday Fun Facts - The Anatomy Of A KAM Plastic Snap July 28 2017

KAM plastic snaps are wonderful. They are a SNAP to install and much easier and durable than a standard metal snap or sewable button. They come in a multitude of colors and sizes. Which one is right for you?
Here is a simple tutorial on the anatomy of a plastic snap set. There are 4 parts to a set:
- 2 Caps (Before installation they resemble a tack with a Round, Heart, or Star shaped head. They give a neat finished look to your snap.)
- 1 Socket (The female part with the larger raised circle that the stud (male part) fits into)
- 1 Stud (The male part with the smaller raised circle that fits inside the socket (female part))
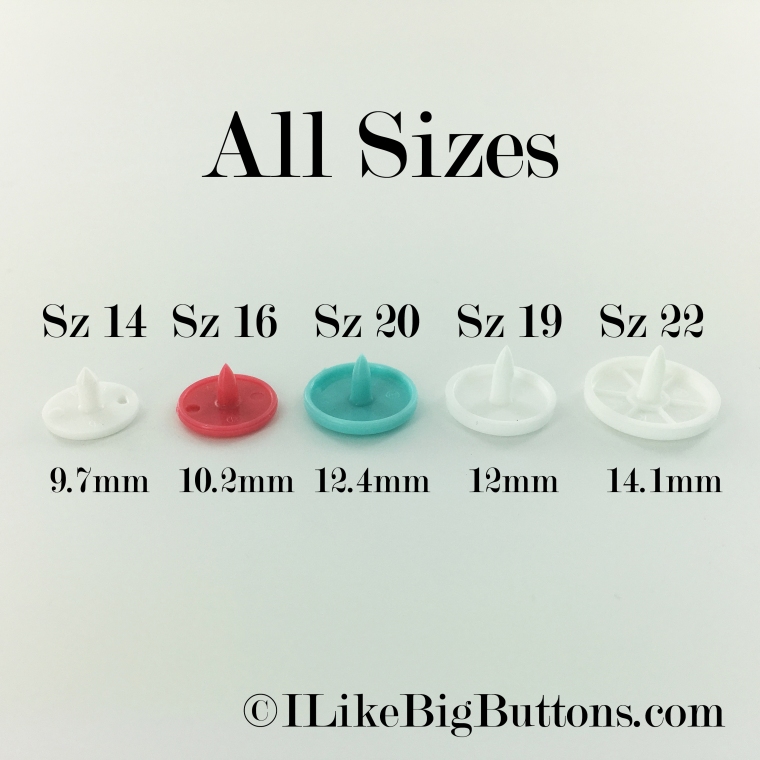
SIZE 20:

- Size 20 (0.5" - 12.4 mm) snaps can be used for most general projects like baby diapers and clothing. They are our most popular plastic snap size, have the largest color variety, and have a good strong hold. We carry them in all 130 colors and clear.
- Standard Size 20 snaps have a 5.6mm prong length. Prong length refers to the length of the shaft on the backside of the Cap. When formed, the prong will compress and form a 'mushroom' shape to hold the Cap and Socket or Stud together.
- We also offer Long Prong Size 20 (0.5" - 12.4 mm) in a rainbow of colors. They are great for embroidered key fobs using Marine or Glitter Vinyl as well as other projects where you need just a little more prong length. Long Prong Size 20 snaps have a 6.2mm prong length.
SIZE 16:
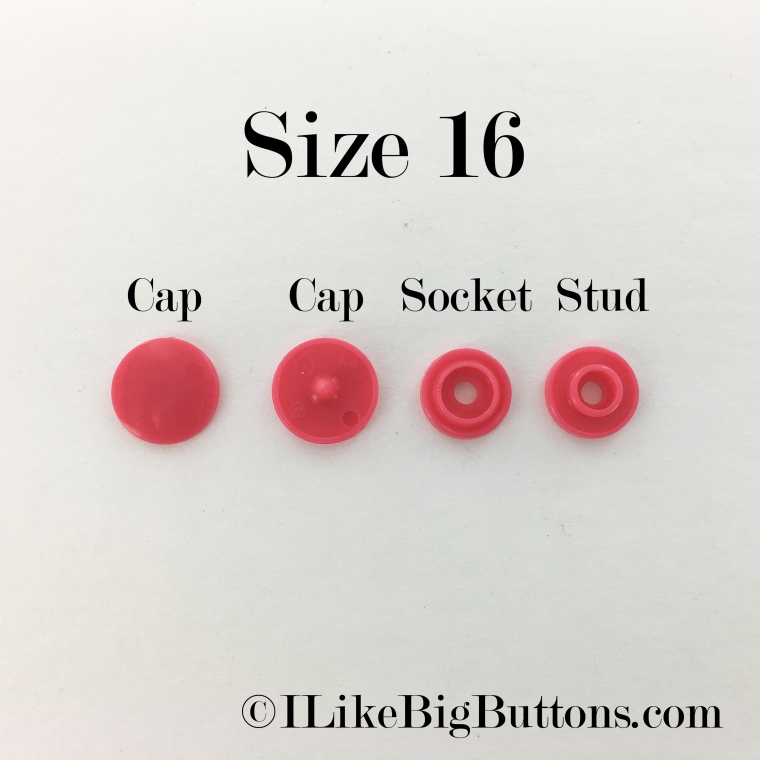
- Size 16 (0.4" - 10.2 mm) snaps are most commonly used for baby and toddler clothing, pacifier clips, mama pads, and small crafts. We carry them in our first 60 ("B") colors and clear.
- Size 16 snaps have a 4.2mm prong length. Prong length refers to the length of the shaft on the backside of the Cap. When formed, the prong will compress and form a 'mushroom' shape to hold the Cap and Socket or Stud together.
- The Size 16 Socket and Stud are less noticeably different. Many first time users don't immediately see the distinction. The Socket's raised circle is the larger of the two pictured, and the Stud's raised circle is smaller and inserts into the Socket (female) side.
SIZE 14:
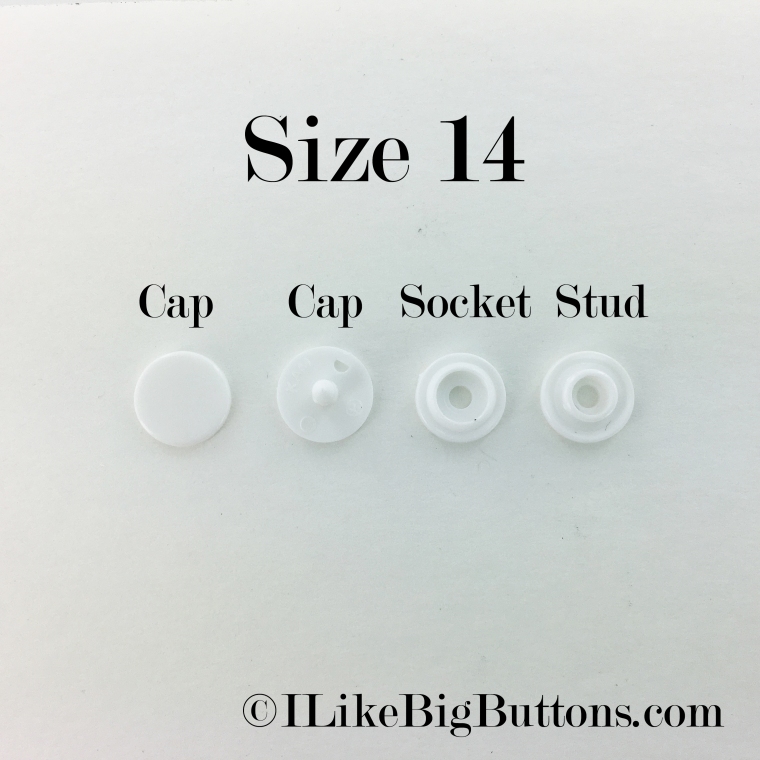
- Our Size 14 (0.35" - 9.7 mm) snaps can be used in most applications where Size 16 snaps are used. We carry them in White and Black at this time.
- Our Size 14 snaps have a 5.0mm prong length. Prong length refers to the length of the shaft on the backside of the Cap. When formed, the prong will compress and form a 'mushroom' shape to hold the Cap and Socket or Stud together.
- As with the Size 16, the Size 14 Socket and Stud are less noticeably different. The Socket's circle is the larger of the two pictured. The Stud's circle is smaller and inserts into the Socket (female) side. Size 16 and Size 14 Sockets and Studs are the same; only the cap differs.
SIZE 19:
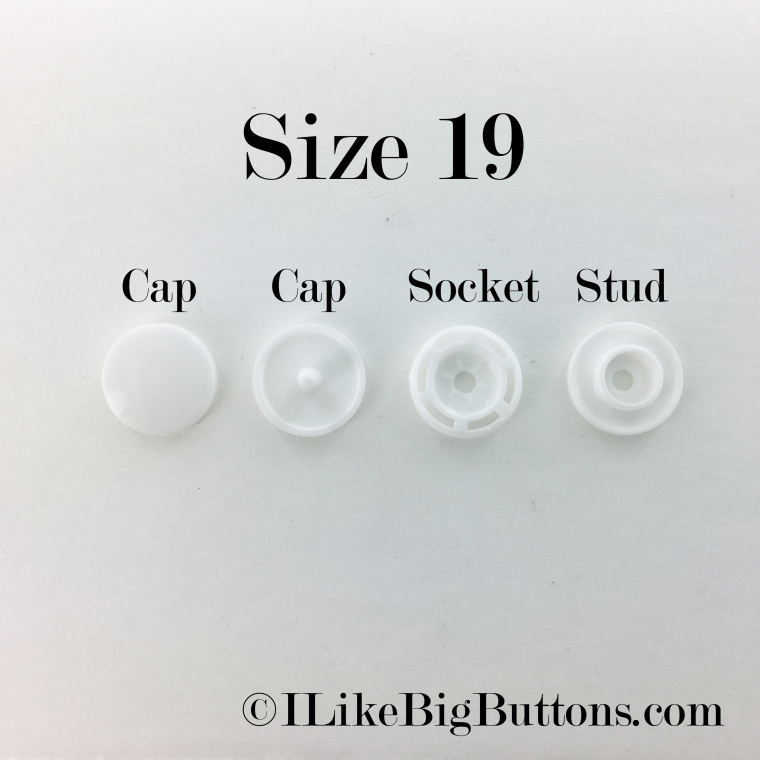
- Size 19 (0.475" - 12 mm) snaps are used for heavy duty applications requiring a strong grip. They are often used with tote bags, coats, tarps, and upholstery. We carry them in White and Black at this time.
- Size 19 snaps have a 6.9mm prong length. Prong length refers to the length of the shaft on the backside of the Cap. When formed, the prong will compress and form a 'mushroom' shape to hold the Cap and Socket or Stud together.
- The Size 19 Socket and Studs are larger, but similar in appearance to Size 20 Sockets and Studs.
SIZE 22:

- Size 22 (0.55" - 14.1 mm) snaps are used for heavy duty applications requiring a strong grip. They are often used with tote bags, coats, tarps, and upholstery. We carry them in White and Black at this time.
- Size 22 snaps have a 6.9mm prong length. Prong length refers to the length of the shaft on the backside of the Cap. When formed, the prong will compress and form a 'mushroom' shape to hold the Cap and Socket or Stud together.
- The Size 22 Socket and Studs are larger, but similar in appearance to Size 20 Sockets and Studs.