News
I Like Big Buttons! Crafty Tip 💡 February 26 2026

Get Ahead on Holiday Crafting! October 16 2025


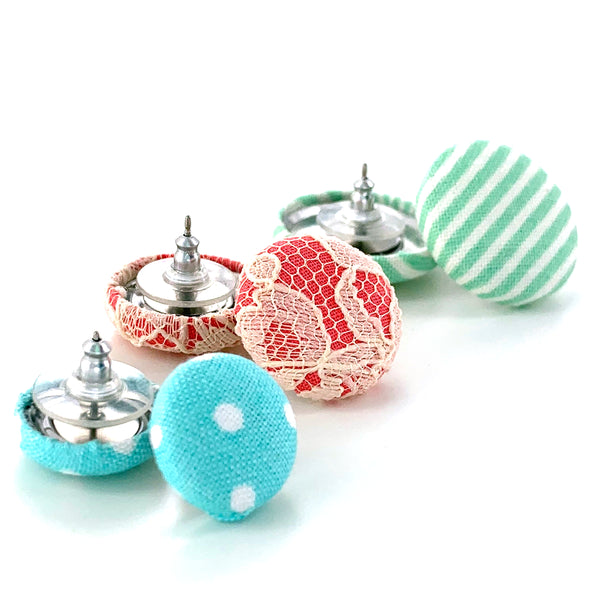
How to make Cover Button Earrings with I Like Big Buttons! DIY Kit April 27 2022
How To Make Fabric Cover Button Earrings @ ILikeBigButtons.com January 10 2022
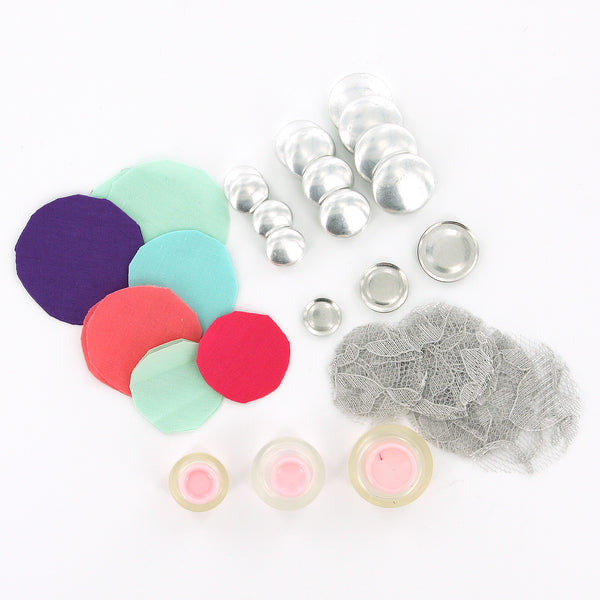
Assembling fabric covered buttons is easy and fun! ILikeBigButtons.com carries 7 sizes of fabric cover buttons. Our buttons range from 1/2 inch to 1 7/8 inches in diameter. We offer them in both flat back (glueable) and wire back (sewable).
Visit our Cover Button page to see our full selections of Fabric Cover Buttons and tools.
Visit our Earring Supplies page to see our full selection of Earring Posts and Backs.
Check out our Inspiration Board to find a plethora of Tutorials and Ideas for how to use Cover Buttons and Earring Supplies in your crafty projects.
Have a great crafty day,
ILikeBigButtons.com
Christmas Gift Idea #3: Cover Button Christmas Card @ ILikeBigButtons.com December 13 2021

*Just a reminder our Christmas Crafts Giveaway Week is coming to an end soon! Make sure you have entered to win:
GRAND PRIZE: KAM Professional Snap Press: Enter to Win
& Final Daily Prize: 200 sets Long Prong Starter Kit with Pliers: Enter to Win
🎄 ![]() 🎄
🎄 ![]() 🎄
🎄 ![]() 🎄
🎄 ![]() 🎄
🎄 ![]() 🎄
🎄 ![]() 🎄
🎄 ![]() 🎄
🎄 ![]() 🎄
🎄 ![]() 🎄
🎄
You could make the Cover Buttons into fabric cover button earrings with our Earring Supplies and it could double as a gift and Christmas Card.
Supplies:
- Flat Back Cover Buttons (I used Size 20, Size 24, and Size 30 Cover Buttons)
- Cover Button Assembly Tools
- Cover Button Templates
- Fabric Scraps
- E6000 Adhesive or Hot Glue
- Sharpie Permanent Marker
- Card Stock or Pre-Made Card


Instructions:
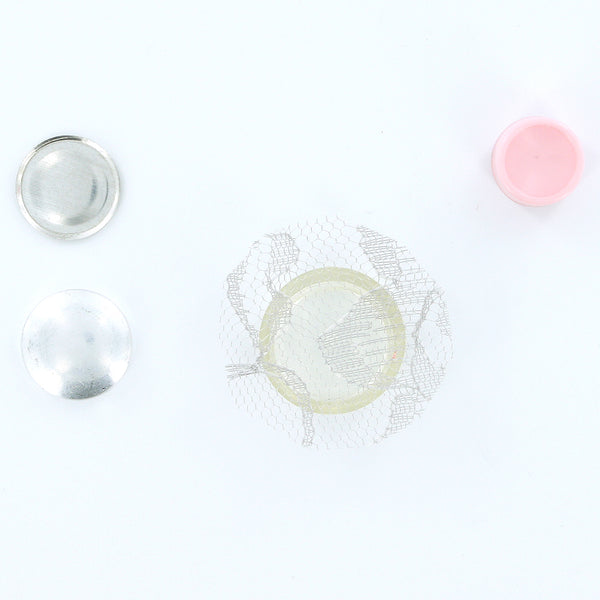
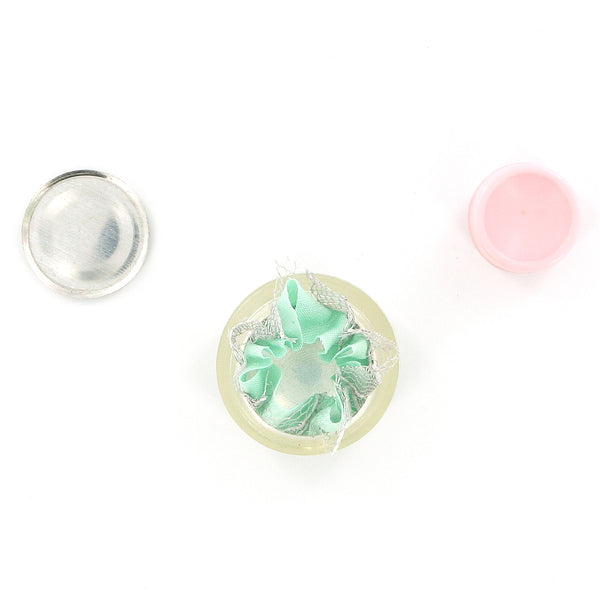
1. Cut your fabric scrap. You will want a circle that is about twice the diameter of your button blank or use one of our handy Plastic Cover Button Templates.

2. Put your fabric piece in the larger assembly tool piece (RIGHT SIDE DOWN). When you look into the tool you want to see the back of the fabric.


3. Place the button front (the domed piece) on top of the fabric. Leave the fabric edges hanging out.

4. Press the cover button edges down into the tool.

5. Place the back cover button piece on top of your fabric and button front. If the cover button will be subject to repeated tugging from the back, you may want to add a little e6000 adhesive before attaching the back.

6. Take the smaller piece of the assembly tool and with the open side down place it on the button back.
7. Press down. You may hear a pop when the last bit of the button back slips into place. If you take the tool out and the button is not completely secured, just put it back in and press down again.

8. When you take the small assembly tool piece off, the fabric edges will be secured underneath the button back.


9. Remove the button from the larger assembly tool piece.

10. Tada! First step complete.

11. Using a ruler, I made 8 straight lines of varying lengths. Then I drew a bow on top of each and a small ornament top.


12. Then in your best print write Merry Christmas. How else doesn't like their own handwriting :P ? I need to practice my pretty cursive more often.


13. I think it turned out lovely. You could also make the Cover Buttons into fabric cover button earrings with our Earring Supplies: Earring Posts and it could double as a gift and Christmas Card.
Christmas Gift Idea #1: Fabric Cover Button Earrings @ ILikeBigButtons.com November 30 2021
Gift idea #1: Cute and super easy to make, these Fabric Cover Button Earrings have great impact and use Fabric Cover Buttons. I made these as gifts for some of my trendy cousins a few Christmases ago and they loved them. Easy to embellish, monogram or personalize and add extra pizzazz to your loved one's attire!
Supplies:
- 2 Completed Flat Back Fabric Cover Button (Choose your size, Size 20 through Size 75 all work great, size depends on the statement you want to make)
- 1 set of Earring Post & Backs
- E6000 or comparable adhesive
Steps:
- Follow these instructions to make Flat Back Fabric Covered Buttons. See More
Pin for Later:

Making Lace & Fabric Cover Button Earrings @ ILikeBigButtons.com June 09 2021
Supplies:
- Flat Back Cover Buttons (I used Size 24, Size 30, and Size 36 Cover Buttons)
- Cover Button Assembly Tools
- Cover Button Templates
- Fabric Scraps
- Lace Scraps
- E6000 Adhesive or Hot Glue
- Sharpie Permanent Marker
- Surgical Stainless Steel Earring Posts and Backs


Instructions:
1. Cut your fabric scrap. You will want a circle that is about twice the diameter of your button blank or use one of our handy Plastic Cover Button Templates.


2. Put your lace piece in the larger assembly tool piece (RIGHT SIDE DOWN). Then, put your fabric piece in the larger assembly tool piece (RIGHT SIDE DOWN). When you look into the tool you want to see the back of the fabric.

3. Place the button front (the domed piece) on top of the fabric. Leave the fabric edges hanging out.


4. Press the Cover Button edges down into the tool.

5. Place the back cover button piece on top of your fabric and button front. If the cover button will be subject to repeated tugging from the back, you may want to add a little e6000 adhesive before attaching the back.

6. Take the smaller piece of the assembly tool and with the open side down place it on the button back.
7. Press down. You may hear a pop when the last bit of the button back slips into place. If you take the tool out and the button is not completely secured, just put it back in and press down again.

8. When you take the small assembly tool piece off, the fabric edges will be secured underneath the button back.


9. Remove the button from the larger assembly tool piece.

10. Tada! First step complete.


11. Lightly scuff the back of the Cover Button so the glue will adhere better (not essential but recommended).

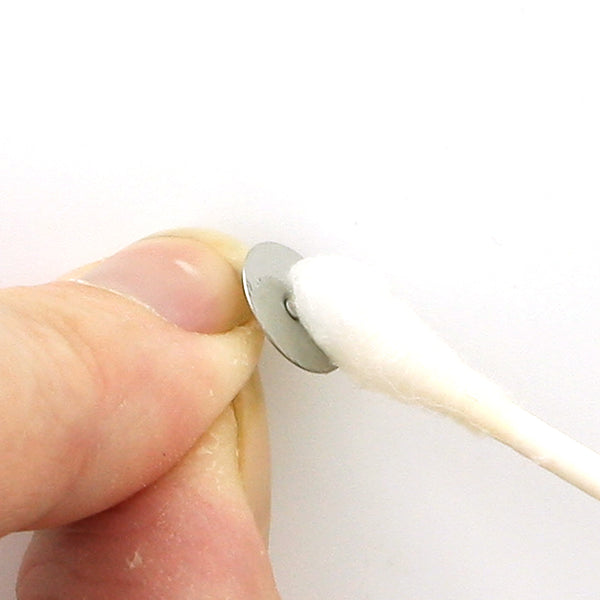
12. Clean both surfaces of dust. I used rubbing alcohol and a cotton swab.

13. Apply E6000 to back of Cover Button or Earring Post.

14. Press Earring Post into place and remove any extra Adhesive. On smaller sized Cover Buttons center the post, as they increase in size adjust post towards top.

15. Let dry, add Earring Backing/Nut, and enjoy.

16. Tada! Lace and Fabric Cover Button Earrings are great a gifts or as products for your shop.
Making Fabric Cover Button Earrings @ ILikeBigButtons.com February 16 2021
 |
 |
|
 |
 |
|
 |
 |
|
How to Make Cover Button Earrings:
Supplies:
- 2 Completed Flat Back Fabric Cover Button (Choose your size, Size 20 through Size 60 all work great, size depends on the statement you want to make)
- 1 set of Earring Post & Backs
- E6000 or comparable adhesive
Steps:
- Follow these instructions to make Flat Back Fabric Covered Buttons.
- Apply E6000 to the back of the Cover Button.
- Press Earring Post into place and remove any extra Adhesive. On smaller sized Cover buttons center the post, as they increase in size adjust the post towards the top.
- Let dry, add Earring Backing/Nut, and enjoy.
- Tada!
You are done! Wear these adorable Earrings to match or accent your favorite outfit or dress up your favorite t-shirt and jeans for an afternoon outing. Enjoy!
Christmas Gift Idea: Lace & Fabric Cover Button Earrings December 08 2020


Supplies:
- Flat Back Cover Buttons (I used Size 24, Size 30, and Size 36 Cover Buttons)
- Cover Button Assembly Tools
- Cover Button Templates
- Fabric Scraps
- Lace Scraps
- E6000 Adhesive or Hot Glue
- Sharpie Permanent Marker
- Stainless Steel Earring Posts and Backs
Instructions:
- Cut your fabric scrap. You will want a circle that is about twice the diameter of your button blank or use one of our handy Plastic Cover Button Templates.
- Put your lace piece in the larger assembly tool piece (RIGHT SIDE DOWN). Then, put your fabric piece in the larger assembly tool piece (RIGHT SIDE DOWN). When you look into the tool you want to see the back of the fabric.
- Place the button front (the domed piece) on top of the fabric. Leave the fabric edges hanging out.
- Press the Cover Button edges down into the tool.
- Place the back cover button piece on top of your fabric and button front. If the cover button will be subject to repeated tugging from the back, you may want to add a little e6000 adhesive before attaching the back.
- Take the smaller piece of the assembly tool and with the open side down place it on the button back.
- Press down. You may hear a pop when the last bit of the button back slips into place. If you take the tool out and the button is not completely secured, just put it back in and press down again.
- When you take the small assembly tool piece off, the fabric edges will be secured underneath the button back.
- Remove the button from the larger assembly tool piece.
- Tada! First step complete.
- Lightly scuff the back of the Cover Button so the glue will adhere better (not essential but recommended).
- Clean both surfaces of dust. I used rubbing alcohol and a cotton swab.
- Apply e6000 to back of Cover Button or Earring Post.
- Press Earring Post into place and remove any extra Adhesive. On smaller sized Cover Buttons center the post, as they increase in size adjust post towards top.
- Let dry, add Earring Backing/Nut and enjoy.
- Tada! You could also make the Cover Button Clip Ons Earrings and these are great a gifts or as products for your shop.
NEW! DIY Starter Kits @ ILikeBigButtons.com February 11 2019
![]()
We have had a lot of requests for DIY Starter Kits for our most popular supplies. We have compiled our customers' favorite craft findings and supplies into great Starter Kits. Check them out!
--> 10% off all our DIY Kits through Friday (2/15/2019) no coupon necessary. <--

Cover Buttons Starter Kits:
We have assembled several Cover Button kits with our customer's favorite supplies. Jumbo Paper Clips, Pendant Bezels, Thumb Tacks, Jewelry Supplies, Bobby Pins, Snap Barrettes, and Badge Reels. Choose from 3 Cover Button sizes and a variety of finishes/colors. Everything that you need to get started (fabric and glue not included *).

Key Fob Hardware Starter Kits:
We have also put together ready-to-go Key Fob Starter Kits with Pliers in a mix of sizes, finishes, or both. Everything that you need to get started (fabric not included *).

To see other great DIY STARTER KIT options, visit our DIY KITS section here.
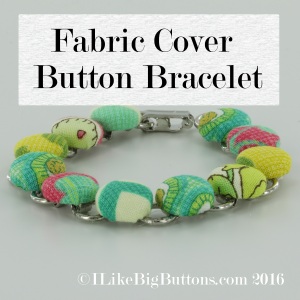
I Like Big Buttons! LEGO Earrings and Cover Button Bracelet September 24 2018

Today I worked alongside my daughter to make her dear friend a special and one of a kind birthday gift. I think they turned out great and it was wonderful to get to work with one of my kiddos. :)
LEGO Earring Supplies:
- 2x LEGO Bricks of your choosing (We used 2x2's)
- E6000 Adhesive or Hot Glue
- Surgical Stainless Steel Earring Posts and Backs
LEGO Bracelet Supplies:
- 11-13 x LEGO Bricks of your choosing (We used 2x2's and LEGO Dots)
- 1 Disk and Loop Bracelet (We have two sizes available 7.2" or 8.25")
- E6000 or comparable adhesive

This project would also work great with Cufflinks, Barrettes, Bobby Pins, or Badge Reels.

Check out our other great jewelry Tutorials, by visiting our DIY Project section here.
An I Like Big Buttons Christmas! Idea #5: How To Make Fabric Cover Button Earrings December 01 2017
Gift idea #5: Super easy with a lot of impact these cute Earrings using Fabric Cover Buttons and Earring Backs or Clip On Earring Backs. I made these as gifts for some of my trendy cousins a few Christmas's ago and they loved them. Easy to embellish, monogram or personalize and add extra pizzazz to your loved ones attire!
Supplies:
- 2 Completed Flat Back Fabric Cover Button (Choose your size, Size 20 through Size 60 all work great, size depends on the statement you want to make)
- 1 set of Earring Post & Backs
- E6000 or comparable adhesive
Steps:
- Follow these instructions to make Flat Back Fabric Covered Buttons. See More
Pin for Later:
#ilikebigbuttons #earrings #tutorials #coverbuttons #coverbuttonearrings #shopilikebigbuttons #fabriccoverbuttons #coverbuttonearrings #buttonearrings #fabriccoverbuttonearrings #clipon #christmasgifts #christmasideas #gift #giftidea

An I Like Big Buttons Christmas! Idea #4: How To Make Fabric Cover Button Christmas Cards November 30 2017

Gift idea #4: These charming Christmas cards are adorable and easy to make using Fabric Cover Buttons. You could embellish these additionally by making the cover buttons Cover Buttons earrings with our Earring Supplies: Earring Posts or Clip Ons and it could double as a gift and Christmas Card. Check it out!
Supplies:
- Flat Back Cover Buttons (I used Size 20, Size 24, and Size 30 Cover Buttons)
- Cover Button Assembly Tools
- Cover Button Templates
- Fabric Scraps
- E6000 Adhesive or Hot Glue
- Sharpie Permanent Marker
- Card Stock or Pre-Made Card
Instructions:
1. Cut your fabric scrap. You will want a circle that is about twice the diameter of your button blank or use one of our handy Plastic Cover Button Templates. See More
#ilikebigbuttons #tutorials #coverbuttons #christmas #christmascards

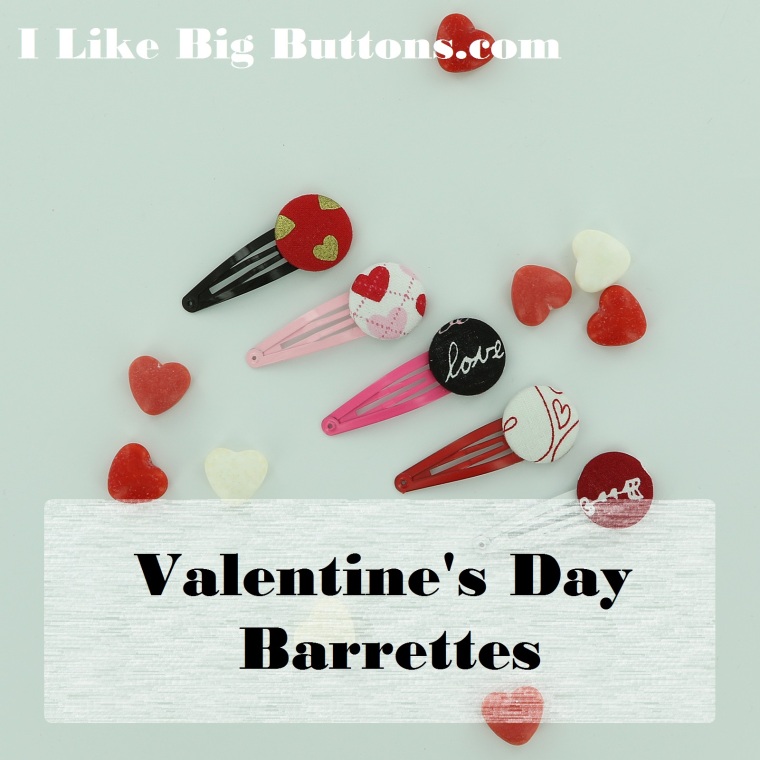
I Like Big Buttons! "No Sew" Valentine's Day Craft Ideas February 03 2017

![]()


As we approach Valentine's Day, lets look at some fun and easy "No Sew" Cover Button crafts we can make for those we love!
Take 10% Off on any Cover Button order on our website through 1/10/17 with Coupon Code: NOSEWVALENTINE
Valentine's Day Fabric Cover Button Barrettes
Wear these adorable Snap Barrettes to match or accent your favorite outfit for Valentine's Day or dress up your favorite t-shirt and jeans for an afternoon outing. Enjoy!
Supplies:
- 1-2 Completed Flat Back Fabric Cover Button (Choose your size, Size 20 through Size 36 all work great, size depends on the statement you want to make)
- 2 Snap Barrettes
- E6000 or comparable adhesive ... See More
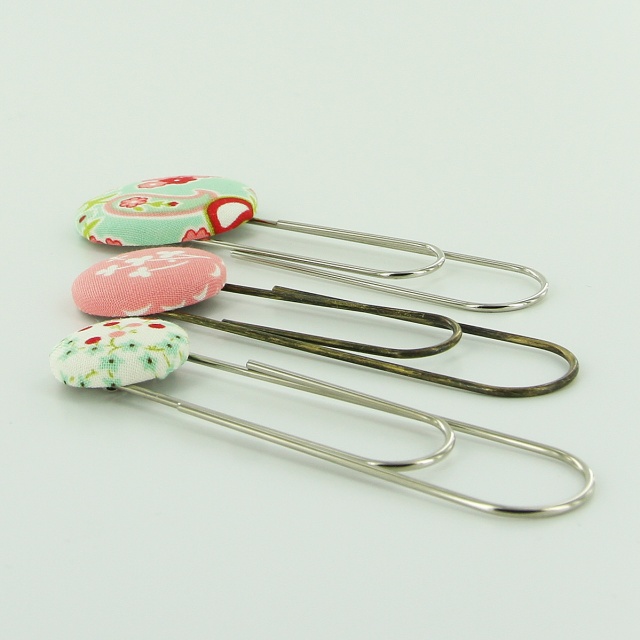
Valentine's Day Fabric Cover Button Jumbo Paper Clip Bookmarks
Use these adorable Paper Clip Bookmarks to accent a Valentine for your special loved one or hold your place in your favorite book or cook book. Enjoy!
Supplies:
- 1 Completed Flat Back Fabric Cover Button (Attach size 36 (7/8" - 23 mm), size 45 (1 1/8" - 28 mm), or size 60 (1 1/2" - 38 mm) flat back cover buttons.)
- 1 Jumbo Paper Clip
- 1 6" Piece of Ribbon
- E6000 or comparable adhesive ... See More

Valentine's Day Fabric Cover Button Badge Reels
Use these adorable Valentine's Day Badge Reels to hold your ID for work, school, or play. Enjoy!
Supplies:
- 1 Completed Flat Back Fabric Cover Button (Size 45 sits on top of Badge Reel, Size 60 rest over Badge Reel)
- 1 Badge Reel
- E6000 or comparable adhesive ... See More
![]()
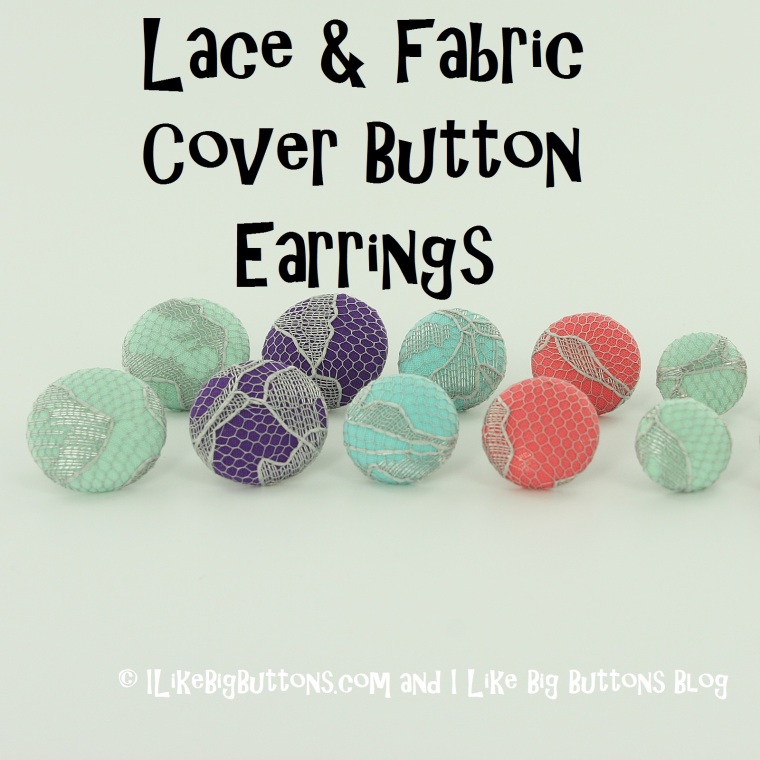
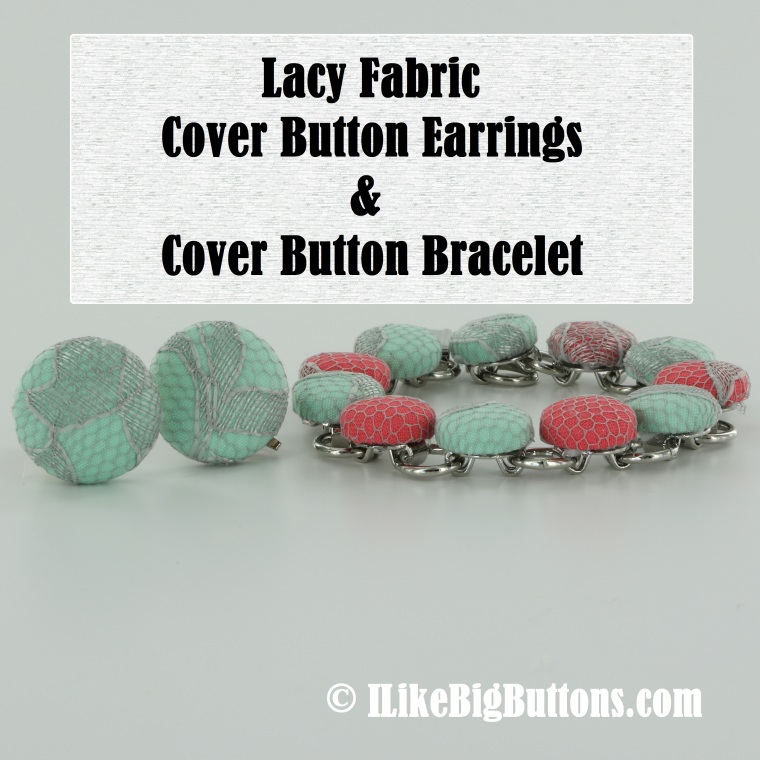
Lace & Fabric Cover Button Earrings
Give these cute Lace & Fabric Cover Button Earrings as Valentine gift for your best friend or loved ones. Enjoy!
Supplies:
- Flat Back Cover Buttons (I used Size 24, Size 30, and Size 36 Cover Buttons)
- Cover Button Assembly Tools
- Cover Button Templates
- Fabric Scraps
- Lace Scraps
- E6000 Adhesive or Hot Glue
- Sharpie Permanent Marker
- Surgical Stainless Steel Earring Posts and Backs ... See More
Fabric Cover Button Bracelet Tutorial
Give this charming Cover Button Bracelet as Valentine gift for your best friend or loved ones. Enjoy!
Supplies:
- 11 to 13 - Completed Size 20 Flat Back Fabric Cover Buttons
- 1 Disk and Loop Bracelet (We have two sizes available 7.2" or 8.25")
- 11 to 13 - 1/2" x 1/2" Felt squares
- E6000 or comparable adhesive ... See More

Give these adorable Cover Button Bobby Pins as Valentine gifts for your best friend or loved ones. Enjoy!
Supplies:
- 1 Completed Flat Back Fabric Cover Button (Choose your size, Size 20 through Size 45 all work great, size depends on the statement you want to make)
- 1 Bobby Pin
- E6000 or comparable adhesive ... See More

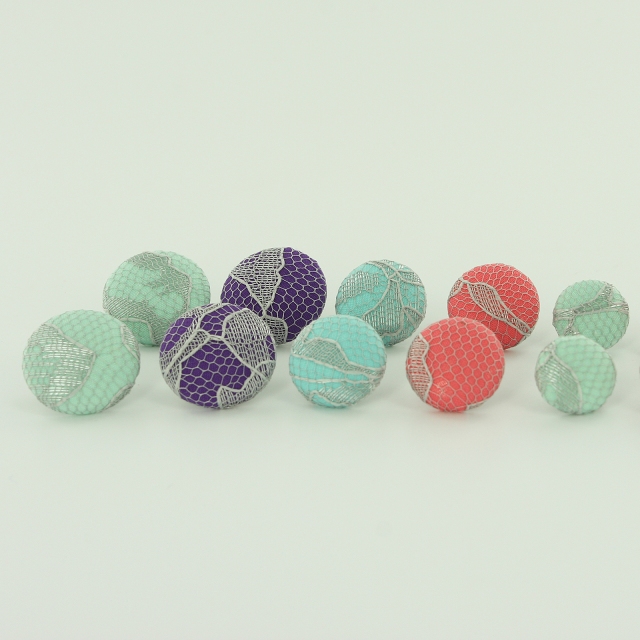
I Like Big Buttons! Lacy Fabric Cover Button Earrings and Cover Button Bracelet November 12 2016
Today I worked alongside my daughter to make her dear friend a special and one of a kind birthday gift. I think they turned out great and it was wonderful to get to work with one of my kiddos. :)
Take 10% off our Cover Buttons on our website (Good through 11/14): BUTTONLOVE
Lacy Fabric Cover Button Earring Supplies:
- Flat Back Cover Buttons (I used Size 30, but you can also use Size 24 and Size 36 Cover Buttons)
- Cover Button Assembly Tools
- Cover Button Templates
- Fabric Scraps
- Lace Scraps
- E6000 Adhesive or Hot Glue
- Sharpie Permanent Marker
- Clip On Earring Backs or Surgical Stainless Steel Earring Posts and Backs
Lacy Fabric Cover Button Bracelet Supplies:
- Size 20 Flat Back Cover Buttons
- Cover Button Assembly Tools
- Cover Button Templates
- Fabric Scraps
- Lace Scraps
- 11 to 13 - Completed Size 20 Flat Back Fabric Cover Buttons
- 1 Disk and Loop Bracelet (We have two sizes available 7.2" or 8.25")
- 11 to 13 - 1/2" x 1/2" Felt squares
- E6000 or comparable adhesive
Check out our Tutorials below.
Lacy Fabric Cover Button Earring Tutorial here.
Fabric Cover Button Bracelet Tutorial here.
To see our other great Fabric Cover button ideas, visit our DIY Project section here.
Happy Customers Make Our Day!!! June 30 2016
Today, I was reading through our feedback and just wanted to share what a few of our happy customers had to say:
♥ Color choices were fantastic and was able to get a mix of colors. My order arrived very quickly and was exactly what I had special ordered. Will definitely order from this site again!
♥ I continue to buy all my snaps from this seller. 5 Star Seller!
♥ These look great on my diapers! I love the color and they came quickly!
♥ I big BUTTons and I can not lie; Fast shipping of just what I asked for. Thank you!
♥ Exactly what I was looking for to make pacifier clips. Love the colors and the shipping was very fast! Thanks!!!
♥ I've ordered from this seller multiple times and have always been very happy with my purchases. Huge selection of items and fast, fast shipping!
♥ All snaps are packaged in small bags with info on it (color name and number), to make it easier to re-order... Love that!!! Great product! SUPER customer service! ... quick answering of messages... Super nice!!!
♥ Great items, great prices and will be back for more, thanks for fast shipping
♥ Love this shop! I needed to make 75 key fobs in a hurry and they shipped on Saturday of Memorial Day weekend so I could make my deadline. Great customer service. The hardware was just what I needed and arrived super fast.
♥ LOVE these snaps! So many colors & great prices too! A+++
♥ Sent everything just as ordered! Awesomeness!
Thank you to all of you who take the time to post your positive experience, it makes our day to see how all our hard work is appreciated!!!
Thank you, I Like Big Buttons! and all our Little Buttons!

An I Like Big Buttons Christmas! Idea #4: How To Make Fabric Cover Button Christmas Cards December 04 2015

Gift idea #4: These charming Christmas cards are adorable and easy to make using Fabric Cover Buttons. You could embellish these additionally by make the Cover Buttons actual earrings with our Earring Supplies: Earring Posts or Clip Ons and it could double as a gift and Christmas Card. Check it out!
Supplies:
- Flat Back Cover Buttons (I used Size 20, Size 24, and Size 30 Cover Buttons)
- Cover Button Assembly Tools
- Cover Button Templates
- Fabric Scraps
- E6000 Adhesive or Hot Glue
- Sharpie Permanent Marker
- Card Stock or Pre-Made Card
Instructions:
1. Cut your fabric scrap. You will want a circle that is about twice the diameter of your button blank or use one of our handy Plastic Cover Button Templates. See More
#ilikebigbuttons #tutorials #coverbuttons #christmas #christmascards
An I Like Big Buttons Christmas! Idea #3: How To Make Fabric Cover Button Earrings December 01 2015
Gift idea #3: Super easy with a lot of impact these cute Earrings using Fabric Cover Buttons and Earring Backs or Clip On Earring Backs. I made these as gifts for some of my trendy cousins last Christmas and they loved them. Easy to embellish, monogram or personalize and add extra pizzazz to your loved ones attire!
Supplies:
- 2 Completed Flat Back Fabric Cover Button (Choose your size, Size 20 through Size 60 all work great, size depends on the statement you want to make)
- 1 set of Earring Post & Backs
- E6000 or comparable adhesive
Steps:
- Follow these instructions to make Flat Back Fabric Covered Buttons. See More
Pin for Later:
#ilikebigbuttons #earrings #tutorials #coverbuttons #coverbuttonearrings
Lace & Fabric Cover Button Earrings February 09 2015
Today, I am working on some cute Lacy Earrings using Fabric Cover Buttons*. I made these as gifts for some of my trendy cousins for Christmas and they loved them. Check them out!
Supplies:
- Flat Back Cover Buttons (I used Size 24, Size 30, and Size 36 Cover Buttons)
- Cover Button Assembly Tools
- Cover Button Templates
- Fabric Scraps
- Lace Scraps
- E6000 Adhesive or Hot Glue
- Sharpie Permanent Marker
- Surgical Stainless Steel Earring Posts and Backs
Instructions:
1. Cut your fabric scrap. You will want a circle that is about twice the diameter of your button blank or use one of our handy Plastic Cover Button Templates.
2. Put your lace piece in the larger assembly tool piece (RIGHT SIDE DOWN). Then, put your fabric piece in the larger assembly tool piece (RIGHT SIDE DOWN). When you look into the tool you want to see the back of the fabric.
3. Place the button front (the domed piece) on top of the fabric. Leave the fabric edges hanging out.
4. Press the Cover Button edges down into the tool.
5. Place the back cover button piece on top of your fabric and button front. If the cover button will be subject to repeated tugging from the back, you may want to add a little e6000 adhesive before attaching the back.
6. Take the smaller piece of the assembly tool and with the open side down place it on the button back.
7. Press down. You may hear a pop when the last bit of the button back slips into place. If you take the tool out and the button is not completely secured, just put it back in and press down again.
8. When you take the small assembly tool piece off, the fabric edges will be secured underneath the button back.
9. Remove the button from the larger assembly tool piece.
10. Tada! First step complete.
11. Lightly scuff the back of the Cover Button so the glue will adhere better (not essential but recommended).
12. Clean both surfaces of dust. I used rubbing alcohol and a cotton swab.
13. Apply E6000 to back of Cover Button or Earring Post.
14. Press Earring Post into place and remove any extra Adhesive. On smaller sized Cover Buttons center the post, as they increase in size adjust post towards top.
15. Let dry, add Earring Backing/Nut, and enjoy.
16. Tada! You could also make the Cover Button Clip Ons Earrings and these are great a gifts or as products for your shop.
Fabric Cover Button Christmas Card Tutorial December 12 2014
Fabric Cover Button Christmas Cards
Today, I am working on some cute Christmas cards using Fabric Cover Buttons*. Check them out!
*Just a reminder our Cover Buttons are 10%OFF on our website today using Coupon Code: COVERBUTTON10
Supplies:
- Flat Back Cover Buttons (I used Size 20, Size 24, and Size 30 Cover Buttons)
- Cover Button Assembly Tools
- Cover Button Templates
- Fabric Scraps
- E6000 Adhesive or Hot Glue
- Sharpie Permanent Marker
- Card Stock or Pre-Made Card
Instructions:
1. Cut your fabric scrap. You will want a circle that is about twice the diameter of your button blank or use one of our handy Plastic Cover Button Templates.
2. Put your fabric piece in the larger assembly tool piece (RIGHT SIDE DOWN). When you look into the tool you want to see the back of the fabric.
3. Place the button front (the domed piece) on top of the fabric. Leave the fabric edges hanging out.
4. Press the cover button edges down into the tool.
5. Place the back cover button piece on top of your fabric and button front. If the cover button will be subject to repeated tugging from the back, you may want to add a little e6000 adhesive before attaching the back.
6. Take the smaller piece of the assembly tool and with the open side down place it on the button back.
7. Press down. You may hear a pop when the last bit of the button back slips into place. If you take the tool out and the button is not completely secured, just put it back in and press down again.
8. When you take the small assembly tool piece off, the fabric edges will be secured underneath the button back.
9. Remove the button from the larger assembly tool piece.
10. Tada! First step complete.
11. Using a ruler, I made 8 straight lines of varying lengths. Then I drew a bow on top of each and a small ornament top.
12. Then in your best print write Merry Christmas. Who else doesn't like their own handwriting :P ? I need to practice my pretty cursive more often.
13. I think it turned out lovely. You could also make the Cover Buttons actual earrings with our Earring Supplies: Earring Posts or Clip Ons and it could double as a gift and Christmas Card.
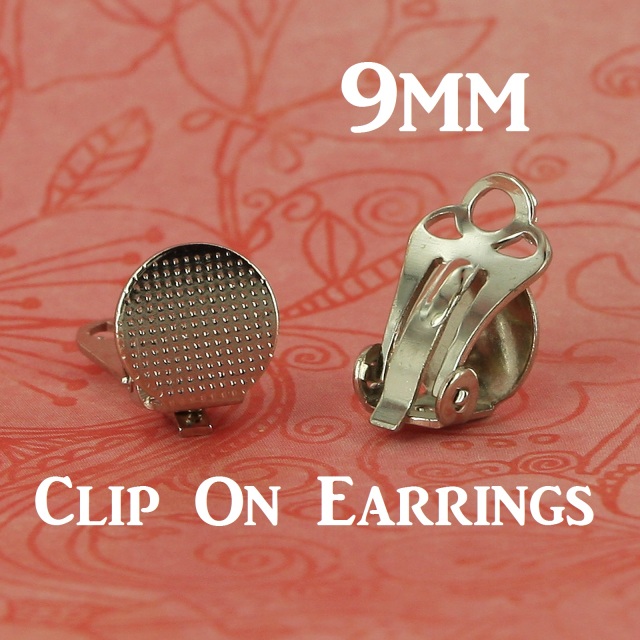
New Arrivals!!! Clip On Earring Backs for Fabric Cover Button Earrings December 02 2014
We are excited to announce that we now carry Clip-On Earring Backs in 2 sizes for our line of Cover Buttons! We thrilled to offer a non-pierced earring option for our customers. You can purchase them with or without rubber cushions that help provide support and comfort for earring wearing.
Check them out!


Just received this Awesome note from one of our Amazing customers about our Cover Buttons!!! September 11 2014
Just received this Awesome note from one of our Amazing customers:
"Hello there!! Yesterday I received the special size 30 cover buttons kit to make a start of 10 buttons and oh my gosh they are fantastic!!! So I just placed an order...!! I am so hooked!!!! Excellent shipping too!! P.S. even my 17 year old son thought they were cool to make!!!... I will be leaving you excellent feedback too!! Looking forward to getting the other stuff that I have just ordered too!!! Thank you!! Sincerely Cindy"
:) That is wonderful! I am so glad you like them. They are so easy and fun to make! Thank you for taking the time to share your joy :)! Have a great week! Thank you, I Like Big Buttons!
Have you checked out our Cover Buttons recently? If not here's a link to them in our store.
You can make so many great things with Cover Buttons.

Embellished Cover Button Badge Reels:
![]()
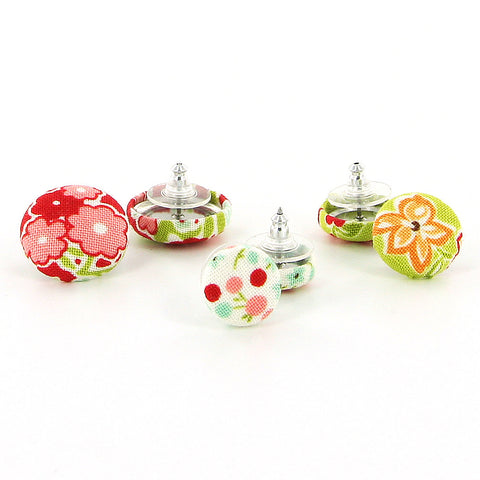
Cover Button Earrings:

Cover Button Cufflinks:

Cover Button Paper Clips:
Cover Button Push Pins:

Cover Button Bobby Pins:

Cover Button Barrettes:

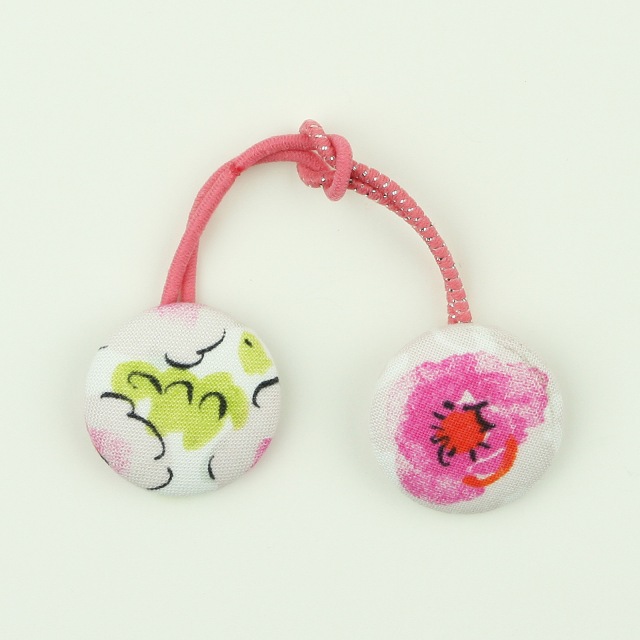
And Cover Button Ponytail Holders:
These are just a few of the options. Check out all our tutorials here.
Fabric Cover Button Earrings April 03 2014
How to Make Cover Button Earrings:
Supplies:
- 2 Completed Flat Back Fabric Cover Button (Choose your size, Size 20 through Size 60 all work great, size depends on the statement you want to make)
- 1 set of Earring Post & Backs
- E6000 or comparable adhesive
Steps:
1. Follow these instructions to make Flat Back Fabric Covered Buttons.

2. Apply E6000 to back of Cover Button.

3. Press Earring Post into place and remove any extra Adhesive. On smaller sized Cover buttons center the post, as they increase in size adjust post towards top.

4. Let dry, add Earring Backing/Nut, and enjoy.


5. Tada!
You are done! Wear these adorable Earrings to match or accent your favorite outfit or dress up your favorite t-shirt and jeans for an afternoon outing. Enjoy!