News
I Like Big Buttons! Crafty Tip 💡 February 12 2026

Flip over the tool base with the fabric/cap in it. This is a preview of how the button will look and the time to make adjustments before installing the back.
#CoverButtonCrafts #DIYWithCoverButtons #CoverButtonProjects #CraftingWithButtons #SewingWithButtons #ilikebigbuttons #CraftingCommunity
Making A Fabric Cover Button Full-Size Clothespin @ ILikeBigButtons.com February 23 2021
 |
 |
 |
 |
 |
 |
 |
 |
 |
How to Make Cover Button Bobby Full-Size Clothespins:
Supplies:
- 1 Completed Flat Back Fabric Cover Button (Attach Size 30 (3/4 inch / 19 mm), Size 36 (7/8 inch / 23 mm), or Size 45 (1 1/8 inch / 28 mm) flat back cover buttons.)
- 1x Full-Size Wooden Clothespin
- 1x Medium Plain Button
- E6000, Hot Glue, or comparable adhesive
Instructions:
- Cut your fabric scrap. You will want a circle that is about twice the diameter of your button blank.
- Put your fabric piece in the larger assembly tool piece (RIGHT SIDE DOWN). When you look into the tool you want to see the back of the fabric.
- Place the button front (the domed piece) on top of the fabric. Leave the fabric edges hanging out.
- Press the cover button edges down into the tool. *TIP* To make it easier on my fingers, I use a sharpie marker to apply pressure.
- Place the back cover button piece on top of your fabric and button front. *TIP* If the cover button will be subject to repeated tugging from the back, you may want to add a little e6000 adhesive before attaching the back.
- Take the smaller piece of the assembly tool and with the open side down place it on the button back.
- Press down. You may hear a pop when the last bit of the button back slips into place. If you take the tool out and the button is not completely secured, just put it back in and press down again. *TIP* I often use a flat piece of wood to apply pressure, again to save my fingers. It also helps to avoid the button back going in at an angle.
- When you take the small assembly tool piece off, the fabric edges will be secured underneath the button back.
- Remove the button from the larger assembly tool piece.
- Tada! Now to attach it to the Clothespin.
- Use Hot Glue or E6000 to adhere a small plain button to the underside of the Cover Button. This is to fill the space between the back and the edges. You can also use felt or some other small object. You just need it to be sturdy enough to offer support. A small plastic button works great for this. You will see that the button is now flush across the bottom. I cut off the little nubs of glue that leaked through the button holes.
- Now adhere the finished Cover Button to the Clothespin. Press into place and center it until you are pleased with the alignment. Set aside to dry.
- Tada! Additional uses:
- Add a thin magnet to the back and use on your magnetic board.
- Add a push pin to the back and use on your cork board.
How To Make A Fabric Cover Button Mini Clothespin
To see other great Fabric Cover Button ideas, visit our DIY Project section here.
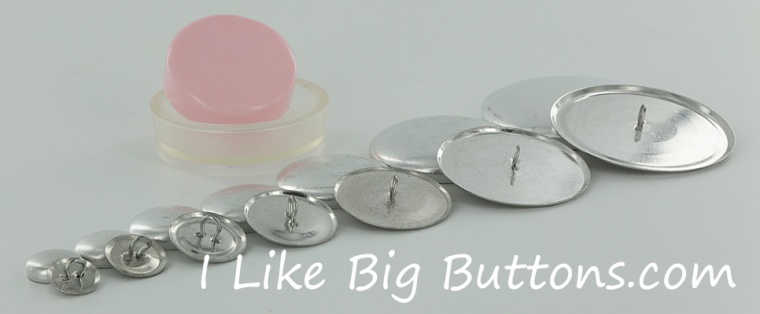
Fabric Cover Buttons - Easy To Make, Great Impact! @ ILikeBigButtons.com February 06 2020
These aren't your grandma's Cover Buttons!!! Well, actually they are ;) only better, with so many many great uses for them.
Flat Backs are used for crafts where you would like to glue a cover button: jewelry, bracelets, rings, earrings, necklaces, bobby pins and barrettes, scrapbooking, and much more.
Wire Backs are used for fabric cover buttons in sewing, shoes, clothing, ponytail holders and much, much more.

Here are the 7 sizes we carry. From 1/2", which is about as small as your pinky nail, all the way up to 1 7/8" in diameter, about the size of the round side of a kiwi fruit. We carry them in both flat back (glueable) and wire back (sewable).
- Size 20 (1/2 inch / 12 mm)
- Size 24 (5/8 inch / 15 mm)
- Size 30 (3/4 inch / 19 mm)
- Size 36 (7/8 inch / 23 mm)
- Size 45 (1 1/8 inch / 28 mm)
- Size 60 (1 1/2 inch / 38 mm)
- Size 75 (1 7/8 inch / 48 mm)
Assembling fabric Cover Buttons is fast and simple. In just seconds, you will have a button ready for your latest craft project.
Our I Like Big Buttons! 💘 Cover Button Love Sale 💘
Cover Button Sets and Cover Button DIY Kits are 10% OFF
No Coupon Necessary | Good Through February 29, 2020.
See our pictorial below:

How to Make Fabric Cover Buttons:
Cover Buttons are easy to assemble:
- Cut your fabric scrap. You will want a circle that is about twice the diameter of your button blank.
- Put your fabric piece in the larger assembly tool piece (RIGHT SIDE DOWN). When you look into the tool you want to see the back of the fabric.
- Place the button front (the domed piece) on top of the fabric. Leave the fabric edges hanging out.
- Press the cover button edges down into the tool.
- Place the back cover button piece on top of your fabric and button front. If the cover button will be subject to repeated tugging from the back, you may want to add a little e6000 adhesive before attaching the back.
- Take the smaller piece of the assembly tool and with the open side down place it on the button back.
- Press down. You may hear a pop when the last bit of the button back slips into place. If you take the tool out and the button is not completely secured, just put it back in and press down again.
- When you take the small assembly tool piece off, the fabric edges will be secured underneath the button back.
- Remove the button from the larger assembly tool piece.
- Tada!
To see other great Fabric Cover Button ideas, visit our DIY Project section here.
"No Sew" Valentine's Day Craft Ideas from ILikeBigButtons.com February 13 2019
 |
 |
 |
 |
 |
 |
I can't believe Valentine's Day snuck up on us so fast, let's look at some fun and easy "No Sew" Cover Button crafts we can make for those we love!
Don't forget our DIY Kits are on sale on our website through 2/15/19, no coupon necessary.
Valentine's Day Fabric Cover Button Barrettes
Wear these adorable Snap Barrettes to match or accent your favorite outfit for Valentine's Day or dress up your favorite t-shirt and jeans for an afternoon outing. Enjoy!
Supplies:
- 1-2 Completed Flat Back Fabric Cover Button (Choose your size, Size 20 through Size 36 all work great, size depends on the statement you want to make)
- 2 Snap Barrettes
- E6000 or comparable adhesive ... See More

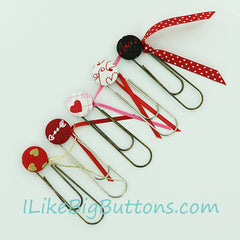
Valentine's Day Fabric Cover Button Jumbo Paper Clip Bookmarks
Use these adorable Paper Clip Bookmarks to accent a Valentine for your special loved one or hold your place in your favorite book or cookbook Enjoy!
Supplies:
- 1 Completed Flat Back Fabric Cover Button (Attach size 36 (7/8" - 23 mm), size 45 (1 1/8" - 28 mm), or size 60 (1 1/2" - 38 mm) flat back cover buttons.)
- 1 Jumbo Paper Clip
- 1 6" Piece of Ribbon
- E6000 or comparable adhesive
- Sand Paper ... See More

Valentine's Day Fabric Cover Button Badge Reels
Use these adorable Valentine's Day Badge Reels to hold your ID for work, school, or play. Enjoy!
Supplies:
- 1 Completed Flat Back Fabric Cover Button (Size 45 sits on top of Badge Reel, Size 60 rest over Badge Reel)
- 1 Badge Reel
- E6000 or comparable adhesive
- Sand Paper ... See More

Lace & Fabric Cover Button Earrings
Give these cute Lace & Fabric Cover Button Earrings as Valentine gift for your best friend or loved ones. Enjoy!
Supplies:
- Flat Back Cover Buttons (I used Size 24, Size 30, and Size 36 Cover Buttons)
- Cover Button Assembly Tools
- Cover Button Templates
- Fabric Scraps
- Lace Scraps
- E6000 Adhesive or Hot Glue
- Sharpie Permanent Marker
- Surgical Stainless Steel Earring Posts and Backs ... See More

Fabric Cover Button Bracelet Tutorial
Give this charming Cover Button Bracelet as Valentine gift for your best friend or loved ones. Enjoy!
Supplies:
- 11 to 13 - Completed Size 20 Flat Back Fabric Cover Buttons
- 1 Disk and Loop Bracelet (We have two sizes available 7.2" or 8.25")
- 11 to 13 - 1/2" x 1/2" Felt squares
- E6000 or comparable adhesive ... See More

Give these adorable Cover Button Bobby Pins as Valentine gifts for your best friend or loved ones. Enjoy!
Supplies:
- 1 Completed Flat Back Fabric Cover Button (Choose your size, Size 20 through Size 45 all work great, size depends on the statement you want to make)
- 1 Bobby Pin
- E6000 or comparable adhesive ... See More

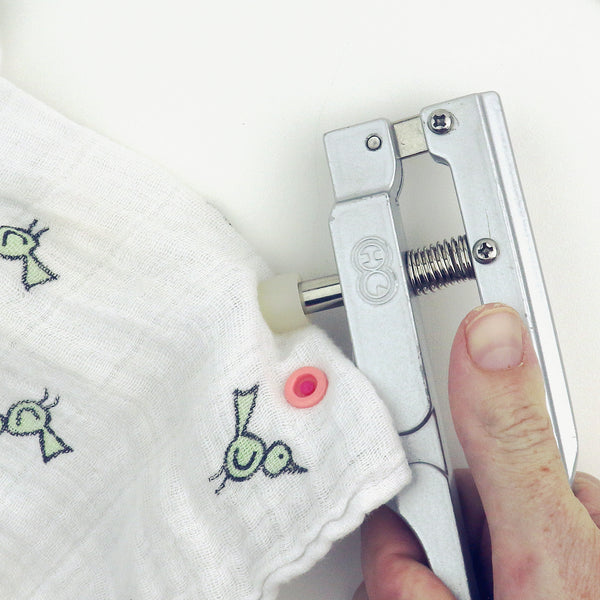
How To Make A KAM Plastic Snap Cord Keeper/Organizer by ILikeBigButtons.com February 05 2019
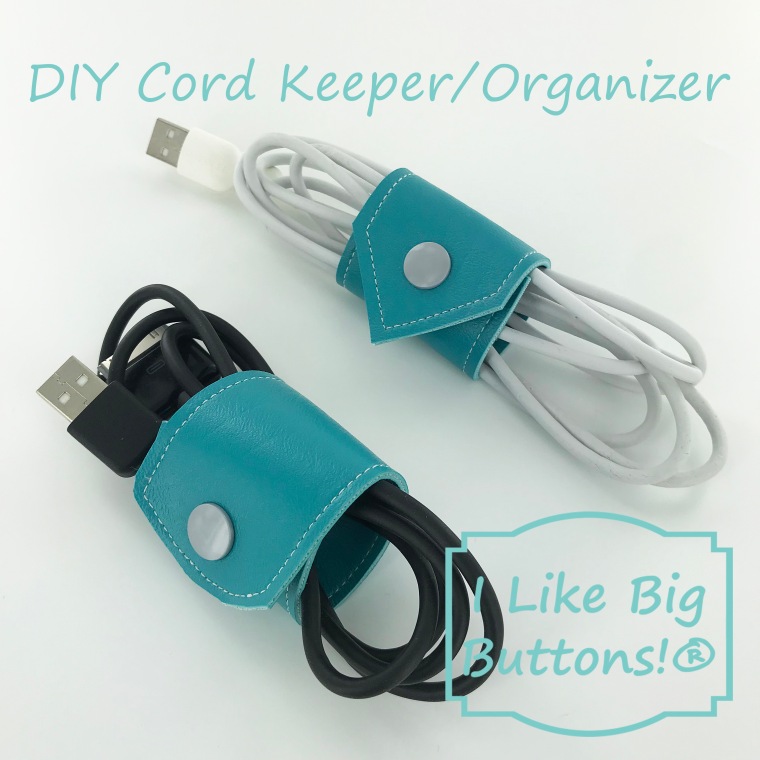
Cords, cords, cords!!! Despite my husband's best efforts to make our house wireless, there are cords everywhere. Part of the joy of being a mom of many, I suppose. 😜 Everyone has one or more somethings that need to be charged and my husband makes sure there are enough cords so that no one is left crying. Have I mentioned he is my resident computer wiz? A job he proudly takes on.
So with cords abounding in my life and house, I decided we needed a better way to manage them all. Here are the results of my efforts. Cord keepers/organizers to simplify my life and corral the cords we can't live without. 🤪
Supplies:
- Approximately 5.25" x 2" Marine Vinyl or material of your choice
- KAM Plastic Snaps (I used Long Prong KAM Plastic Snaps because I was working with 2 layers of Marine Vinyl)
- KAM Plastic Snap Pliers and Awl
- Sewing Clips
- Standard Sewing Machine
- Scissors
- Rotary Cutter

Instructions:
1. Cut out your material of choice, I used Marine Vinyl I had left over from a summer project. I cut each piece approximately 5.25" x 2" and gave them two different styles of finished ends. One is a pointed end, I used my quilting square to accomplish this, and the other has a rounded end, I used a small drinking cup to create the rounded tip. *The cords I was making these for were 6' cords, you may need to adjust the length of your cord keeper to accommodate a larger or smaller cord.


2. Place the two pieces of Marine Vinyl with wrong sides together and pin with Sewing Clips, if desired. Straight stitch with a 1/4" seam around the whole piece using a back stitch at the beginning and end to set the stitch.
3. Trim the edges down to 1/8" to remove the excess vinyl and any uneven edges. The Marine Vinyl can slip a little bit when you are sewing and I found this was the easiest way to get a clean edge.
4. Measure to the center at the top and bottom of each cord keeper/organizer and place a mark where you want your KAM Plastic Snap to sit. I don't like to eye it as I often find them off-center when I wing it.
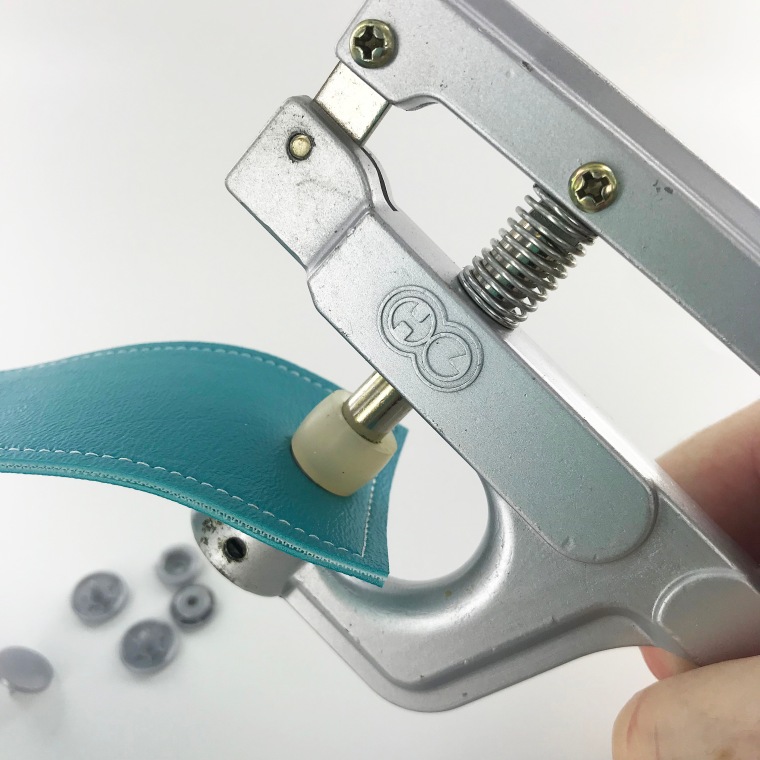
5. Poke a hole through the centered mark with your KAM Awl and insert the KAM Plastic Snap Cap prong through the hole. You will want the cap on the top side (the side that was up when sewing) of your cord keeper and the socket or stud on the bottom side.
6. Flip the cord keeper over and add the socket. Install the KAM Plastic Snap Cap and Socket on the edge that is rounded or pointed and a Cap and Stud on the square edge as pictured below.

7. Remember to install the snaps so that one half (Cap and Stud) are face up and one (Cap and Socket) are face down so that when you fold the cord keeper around the cord, the socket and stud meet.
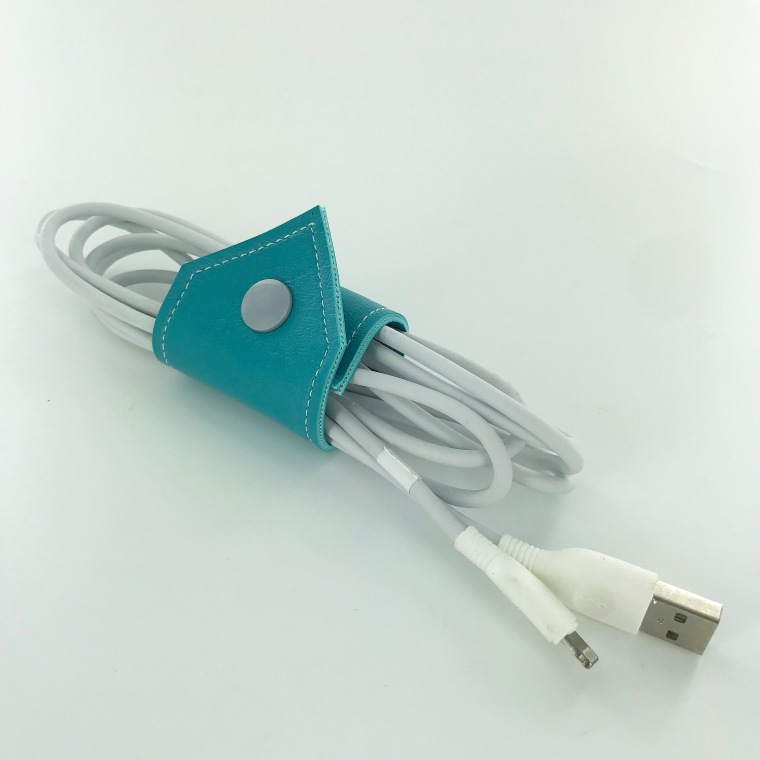

8. Tada! These cord keepers/organizers take only minutes to make with scraps of vinyl/fabric, a few KAM Plastic Snaps, and are already making my life feel less crazy. At least until they all get home from school. 😜
To see other great KAM Plastic Snap ideas, visit our DIY Project section here.
Key Fob Lip Balm Holder by ILikeBigButtons.com December 10 2018

I have been admiring these Lip Balm Holders for some time and decided to today to make a few for my littles' Lip Balm and my Blistex. I love how they turned out!
Supplies:
- 15.5" x 2.25" of Cotton Fabric
- 15.5" x 2.25" piece of Fusible Interfacing
- 1.25" Key Fob Hardware with Split Rings
- Key Fob Pliers
- Sewing Clips
- Standard Sewing Machine
- Iron and Ironing Board
- Scissors

1. Cut a 15.5" x 2.25" piece of Cotton Fabric and Fusible Interfacing. These measurements will work for standard Lip Balm Tube and the standard Blistex Tube. You may need to adjust measures for your favorite lip product.

2. Iron the Fusible Interfacing to the wrong side of your fabric.

3. Fold right sides together width-wise and sew both long sides with a 1/4" seam. Do not sew short sides.

4. Turn tube right side out through the open side, iron flat, and sew the open short side closed with a zig-zag stitch.

5. Fold zig-zag side back on itself 1 1/4". Sew straight stitch 1/2" from the top, and again at 5/8" from the top. This is what it will look like from the back.

6. Here is how the front turned out. This will be the front of the pocket on the Lip Balm Holder.

7. Fold the tab that will be the front of the pocket at 2 3/4". Make sure the zig-zag stitch is hidden. Use Sewing Clips to hold front pocket in place while sewing. Stitch at 1/4" seam around the whole holder. And again at 1/8". Start and finish at the top edge so that your start and finish stitches will be hidden.

8. Center the 1.25" Key Fob Hardware on the top edge of the Lip Balm Holder.
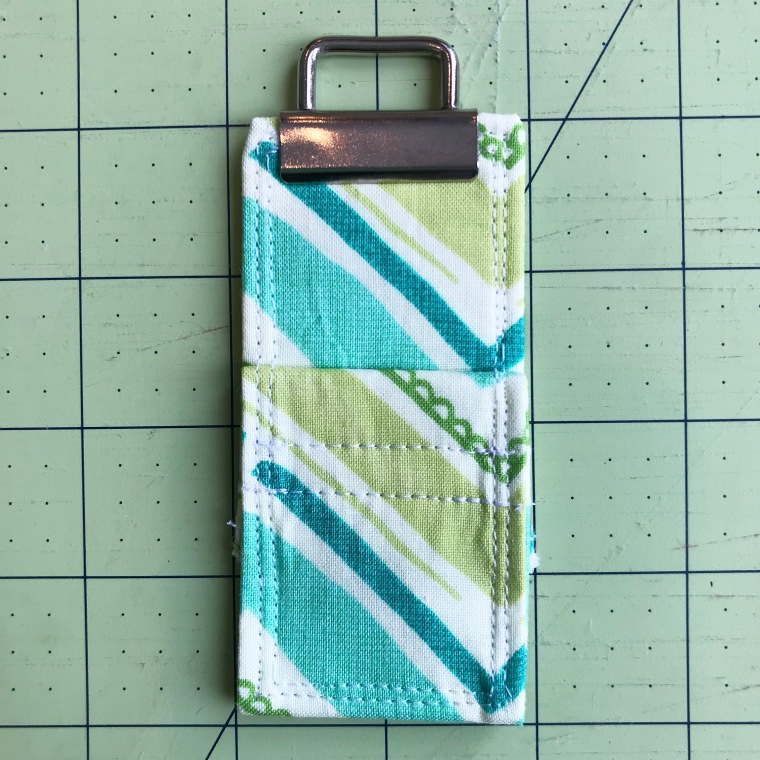
9. Using Key Fob Hardware Pliers squeeze the Key Fob Hardware closed with gentle pressure. Sometimes, I go back and forth from left to right added a little bit of pressure to each side until it eases together. Our Key Fob Hardware Pliers make this easy to do. Make sure the teeth in the Key Fob Hardware are sunk securely into the fabric.

10. Tada! These little Lip Balm Holders were easy to make and are great as a quick thoughtful gift for a loved one who hates chapped lips.

11. Hang them on your keychain, the outside of your purse, or anywhere you need for quick access.
To see all our Key Fob Hardware Tutorials, visit our Projects section here.
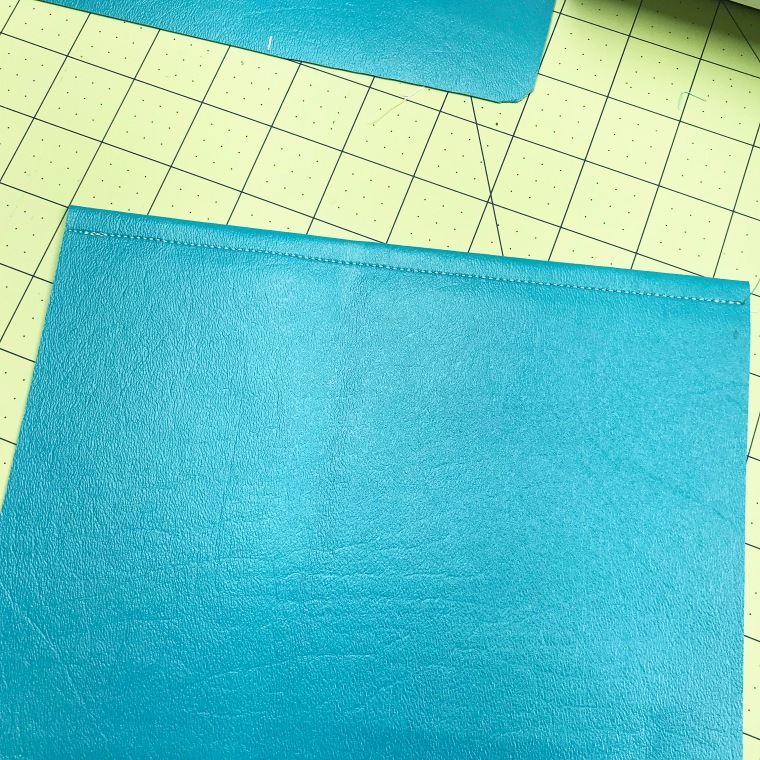
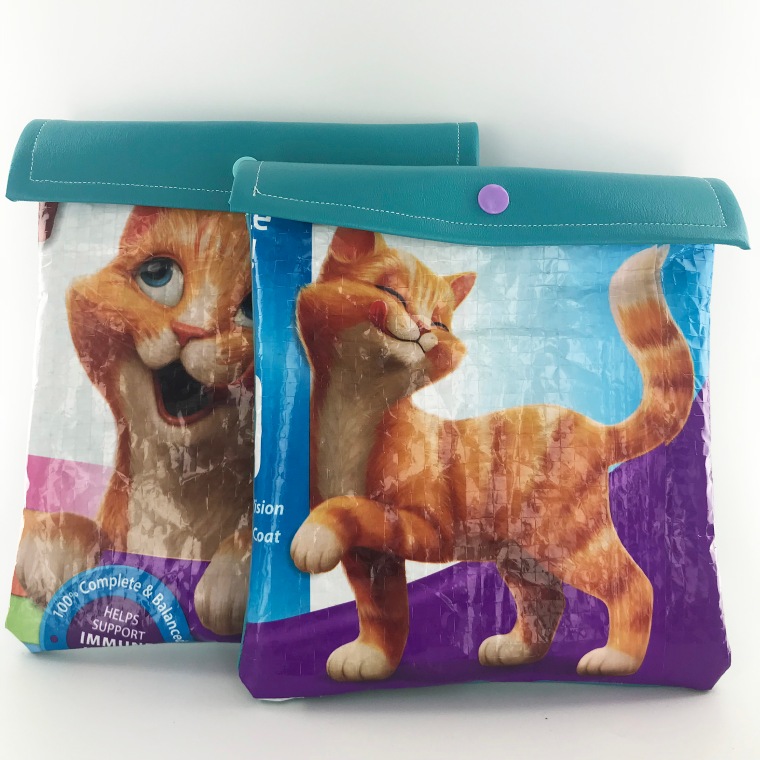
I Like Big Buttons! Upcycled Messenger Bag/Purse Tutorial November 09 2018

We are a cat loving family here at I Like Big Buttons. As such, we have a few fluffy friends scurrying around. Recently, my husband picked up a few bags of cat food that not only were made of a more durable material than the paper bags ones but also had cute kitty images on them. I couldn't resist turning them into some cute messenger bags for a couple of my little cat lovers. :)
How to make an Upcycled/Recycled Messenger Bag/Purse with KAM Snaps and Pet Food Bag
Supplies:
- Pet Food Bag of your choice (Look for the ones made of woven plastic)
- Marine Vinyl or a material of your choice
- 2 KAM Snap Sets (Depending on the thickness of the material you may want Long Prong)
- KAM Snap Pliers and Awl
- 1″ Cotton Webbing
- Scissors/Rotary Blade
- Standard Sewing Machine

1. Cut the bag along the seams. I plan on making 2 bags with it. For this project, I am focusing on making each bag with a kitty image front and center. Use a damp cloth to wipe the leftover cat food crumbs from the interior of the bags and let air dry. This doesn't take more than a few minutes.

2. Decide on your shape. I like to craft off the cuff. This lid of a storage container was just the right size and shape to showcase the kitty image. Trace around it with a marker.

3. I picked the height based on the image. I left a 1" above each kitty image. *If I did it again, I might do 2" or 3" instead. As you will see later, the flap of the bag covers some of the image. If I had dropped it another inch I think it would have looked slightly better when snapped closed.

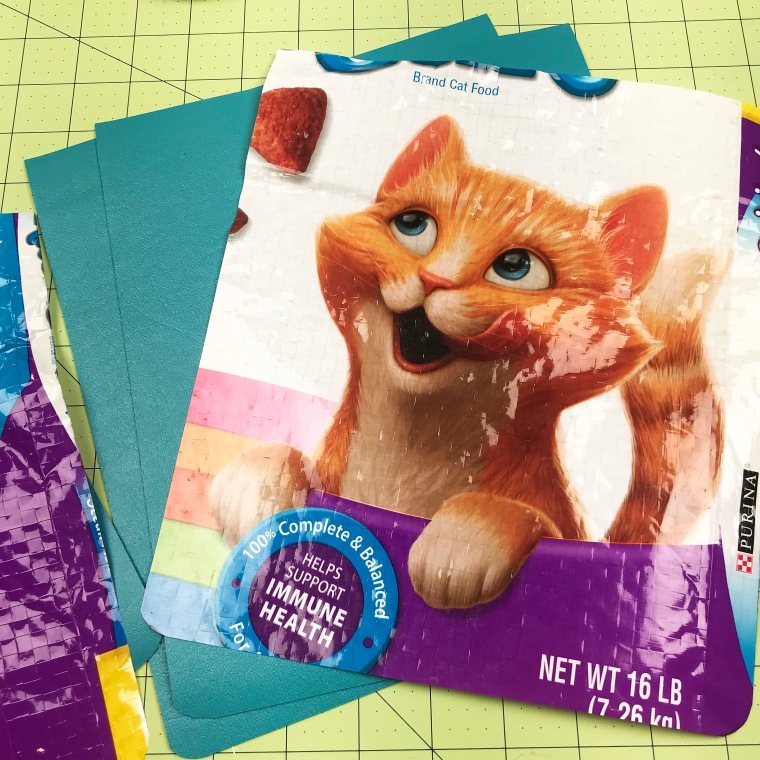
4. Cut 2 pieces of Marine Vinyl or material of your choice the same size at the kitty images. I had some vinyl left over from a summer chair reupholstering product. I love it because the color goes nicely with the kitty image and it is durable.

5. Cut two flaps for the messenger bags. I cut them the same width as the bags and longer than I thought I would need so I could adjust on the fly.

6. Using a 1/2" seam sew the kitty image to the front piece of Marine Vinyl, right sides together. I chose to put the Marine Vinyl front to the front so that the interior of the bag was uniform, but you could turn the right side of the Marine Vinyl inward so that it was to the inside of the bag. Sewer's choice. :)

7. Fold the sewed seam flat and smooth. Then, fold it until the kitty image is right side out. Smooth the sewed seam and Marine Vinyl.


8. Sew 1/4" seam along the top of the finished edge.
9. Fold the top edge of the back piece of the bag over a 1/2". Sew 1/4" seam along the edge, creating a finished edge.

10. For the top flap, I created a simple square with three finished edges. Marine Vinyl is durable and the raw edges hold up nicely. If using another material, you will have to give consideration to the material you are using and adjust accordingly. The messenger bag/purse will be about 8" wide when finished so I made the flaps slightly smaller at 7.75". *If I did it again, I might have shaved off a little bit more to give the shoulder strap more room to fill.

11. I, then, cut the height of the flap down to 3" because I wanted to see as much of the kitty image as I could after the KAM plastic snap was installed.


12. Align and use a zigzag stitch to attach the flap to the back piece of the purse. Make sure to center it.

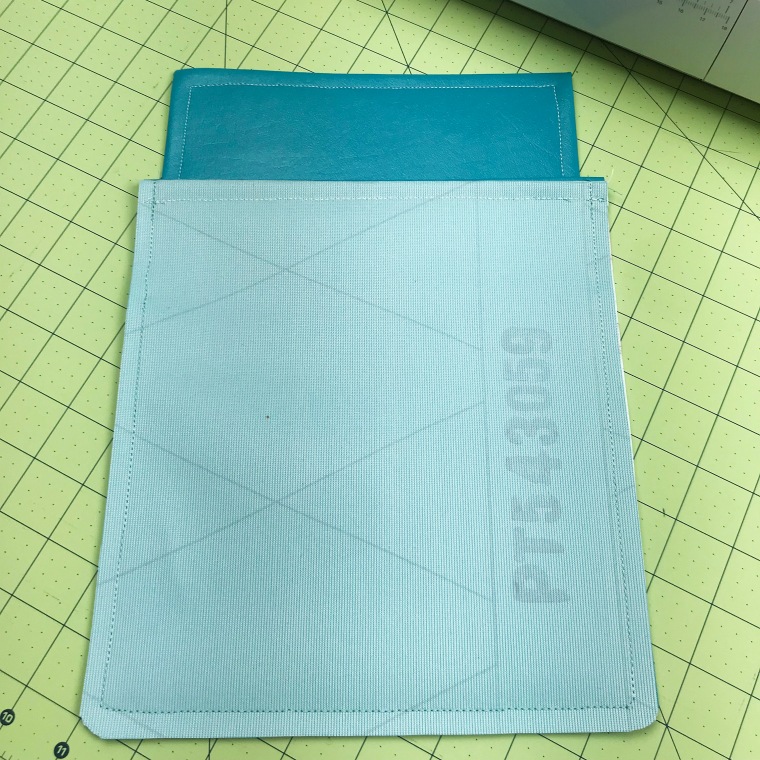
13. Put right sides together and sew the 2 sides and bottom of the purse with a 3/8" to 1/2" seam. Make sure to use a Stay Stitch the beginning and end of your sewing so that the stitches stay put.


14. Turn the bags right side out and square the corners as much as possible. I used the backside of a Sharpie marker to help square the corners. Remember I slightly rounded them so they won't be perfectly square. Smooth bags flat.

15. Measure the center of the flap and use a KAM awl to poke a hole for the KAM plastic snap that you will adding. I am only going through 1 layer of Marine Vinyl so a Standard Prong snap will work. If you are using thicker material or multiple layers, I would recommend our Long Prong KAM plastic snaps.

16. Install KAM plastic snap (Cap and Socket).

17. Repeat in front of the bag, where KAM plastic snap lines up. I poked the hole through both layers at once so that I had a point of reference. Then I widened the hole after double-checking the placement of the internal hole. Install KAM plastic snap (Cap and Stud).


18. I think they turned out super cute! Now to add shoulder straps.

19. For the sake of time and my sanity, I simply attached the shoulder straps with a half of a KAM snap set (Cap and Socket). I used the snap like a rivet. I also used Long Prong KAM plastic snaps for this piece because I was working with the thickness of the Marine Vinyl and Cotton Webbing. *I doubled the edge of the Cotton Webbing over on itself and sewed a straight line back and forth across it a half dozen times so it doesn't unravel. With Polyester Webbing, you could melt the edge to secure it.


20. Tada!!! I think they turned out great, it took less than 2 hours to make both of them, and my little cat lovers are ecstatic. They have a new place to store their treasures.
😻 😻 😻
I Like Big Buttons! - Fabric Cover Buttons - Easy To Make, Great Impact! October 09 2018
These aren't your grandma's Cover Buttons!!! Well, actually they are ;) only better, with so many many great uses for them.
Flat Backs are used for crafts where you would like to glue a cover button: jewelry, bracelets, rings, earrings, necklaces, bobby pins and barrettes, scrapbooking, and much more.
Wire Backs are used for fabric cover buttons in sewing, shoes, clothing, ponytail holders and much, much more.
Here are the 7 sizes we carry. From 1/2", which is about as small as your pinky nail, all the way up to 1 7/8" in diameter, about the size of the round side of a kiwi fruit. We carry them in both flat back (glueable) and wire back (sewable).
- Size 20 (1/2 inch / 12 mm)
- Size 24 (5/8 inch / 15 mm)
- Size 30 (3/4 inch / 19 mm)
- Size 36 (7/8 inch / 23 mm)
- Size 45 (1 1/8 inch / 28 mm)
- Size 60 (1 1/2 inch / 38 mm)
- Size 75 (1 7/8 inch / 48 mm)
Assembling fabric Cover Buttons is fast and simple. In just seconds, you will have a button ready for your latest craft project.
See our pictorial below:
How to Make Fabric Cover Buttons:
Cover Buttons are easy to assemble:
- Cut your fabric scrap. You will want a circle that is about twice the diameter of your button blank.
- Put your fabric piece in the larger assembly tool piece (RIGHT SIDE DOWN). When you look into the tool you want to see the back of the fabric.
- Place the button front (the domed piece) on top of the fabric. Leave the fabric edges hanging out.
- Press the cover button edges down into the tool.
- Place the back cover button piece on top of your fabric and button front. If the cover button will be subject to repeated tugging from the back, you may want to add a little e6000 adhesive before attaching the back.
- Take the smaller piece of the assembly tool and with the open side down place it on the button back.
- Press down. You may hear a pop when the last bit of the button back slips into place. If you take the tool out and the button is not completely secured, just put it back in and press down again.
- When you take the small assembly tool piece off, the fabric edges will be secured underneath the button back.
- Remove the button from the larger assembly tool piece.
- Tada!
To see other great Fabric Cover Button ideas, visit our DIY Project section here.
Friday Fun Facts - The Anatomy Of A KAM Plastic Snap June 08 2018

KAM plastic snaps are wonderful. They are a SNAP to install and much easier and durable than a standard metal snap or sewable button. They come in a multitude of colors and sizes. Which one is right for you?
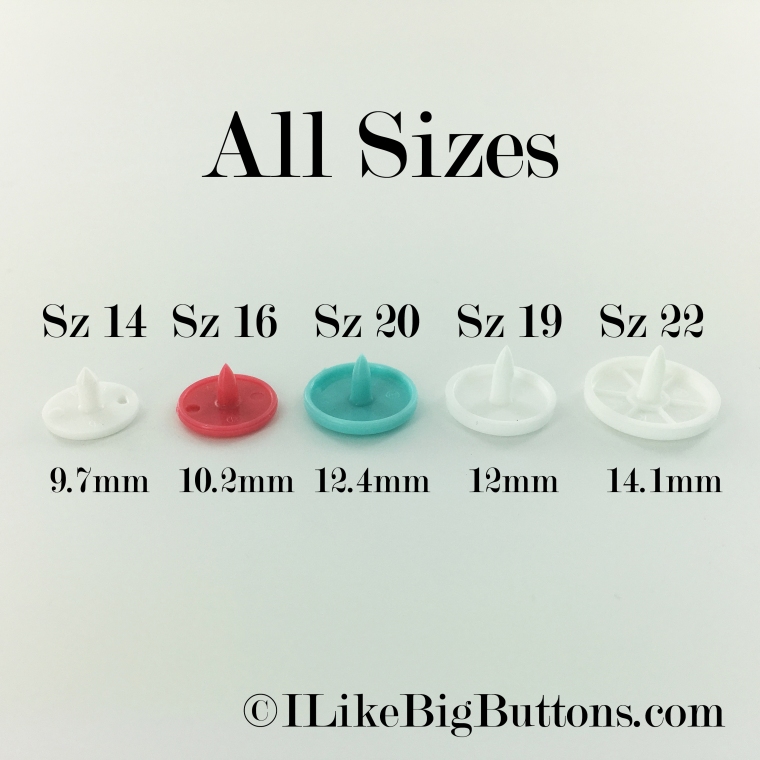
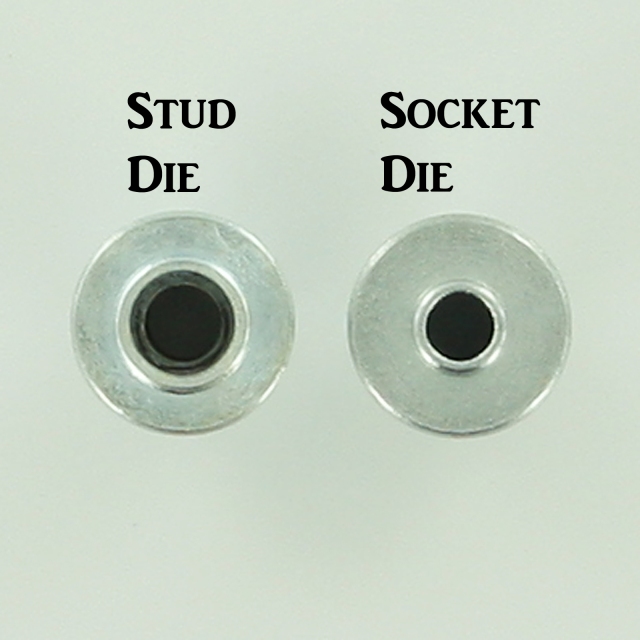
Here is a simple tutorial on the anatomy of a plastic snap set. There are 4 parts to a set:
- 2 Caps (Before installation they resemble a tack with a Round, Heart, or Star shaped head. They give a neat finished look to your snap.)
- 1 Socket (The female part with the larger raised circle that the stud (male part) fits into)
- 1 Stud (The male part with the smaller raised circle that fits inside the socket (female part))
SIZE 20:

- Size 20 (0.5" - 12.4 mm) snaps can be used for most general projects like baby diapers and clothing. They are our most popular plastic snap size, have the largest color variety, and have a good strong hold. We carry them in all 130 colors and clear.
- Standard Size 20 snaps have a 5.6mm prong length. Prong length refers to the length of the shaft on the backside of the Cap. When formed, the prong will compress and form a 'mushroom' shape to hold the Cap and Socket or Stud together.
- We also offer Long Prong Size 20 (0.5" - 12.4 mm) in a rainbow of colors. They are great for embroidered key fobs using Marine or Glitter Vinyl as well as other projects where you need just a little more prong length. Long Prong Size 20 snaps have a 6.2mm prong length.
SIZE 16:
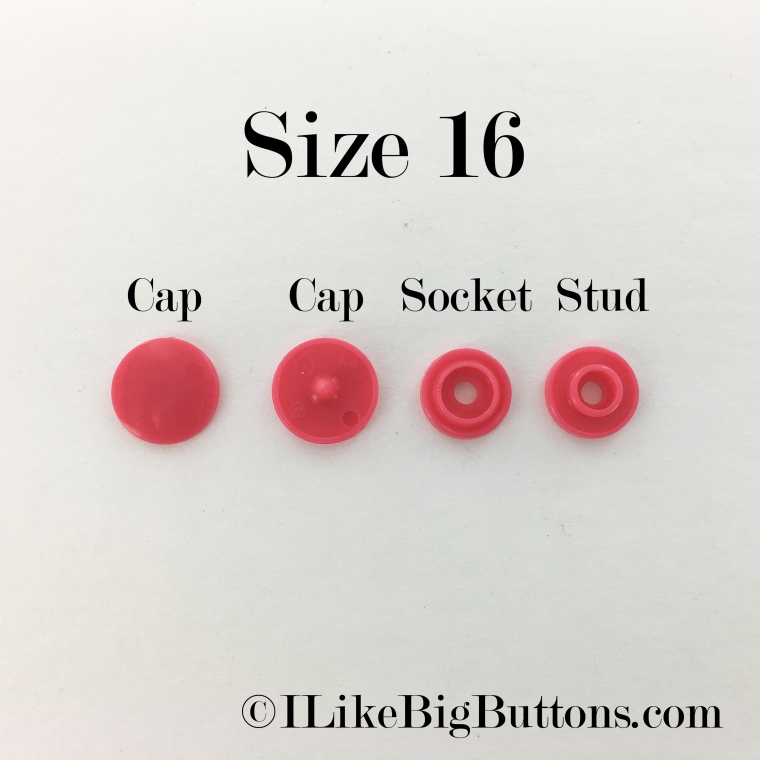
- Size 16 (0.4" - 10.2 mm) snaps are most commonly used for baby and toddler clothing, pacifier clips, mama pads, and small crafts. We carry them in our first 60 ("B") colors and clear.
- Size 16 snaps have a 4.2mm prong length. Prong length refers to the length of the shaft on the backside of the Cap. When formed, the prong will compress and form a 'mushroom' shape to hold the Cap and Socket or Stud together.
- The Size 16 Socket and Stud are less noticeably different. Many first time users don't immediately see the distinction. The Socket's raised circle is the larger of the two pictured, and the Stud's raised circle is smaller and inserts into the Socket (female) side.
SIZE 14:
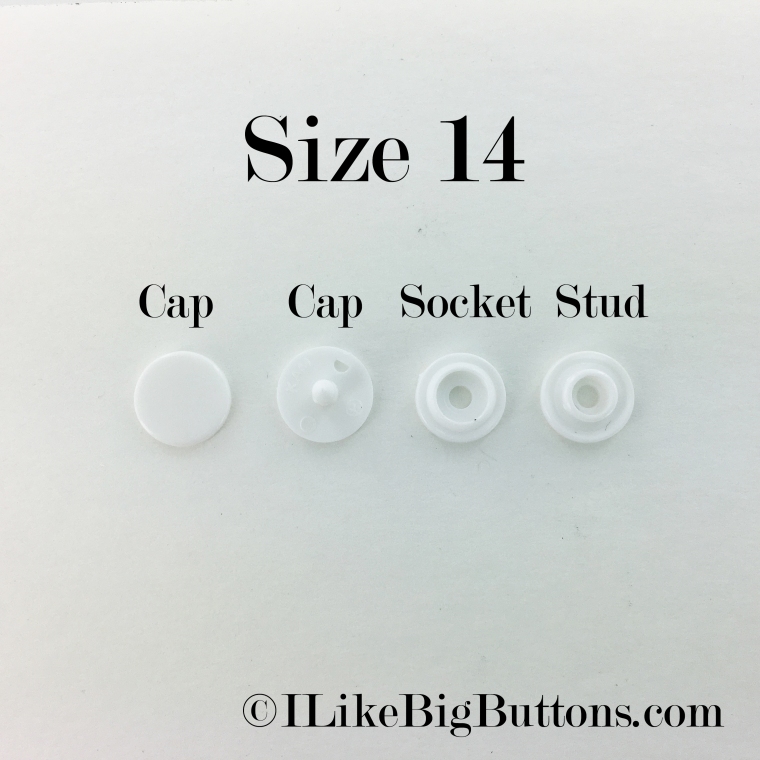
- Our Size 14 (0.35" - 9.7 mm) snaps can be used in most applications where Size 16 snaps are used. We carry them in White and Black at this time.
- Our Size 14 snaps have a 5.0mm prong length. Prong length refers to the length of the shaft on the backside of the Cap. When formed, the prong will compress and form a 'mushroom' shape to hold the Cap and Socket or Stud together.
- As with the Size 16, the Size 14 Socket and Stud are less noticeably different. The Socket's circle is the larger of the two pictured. The Stud's circle is smaller and inserts into the Socket (female) side. Size 16 and Size 14 Sockets and Studs are the same; only the cap differs.
SIZE 19:
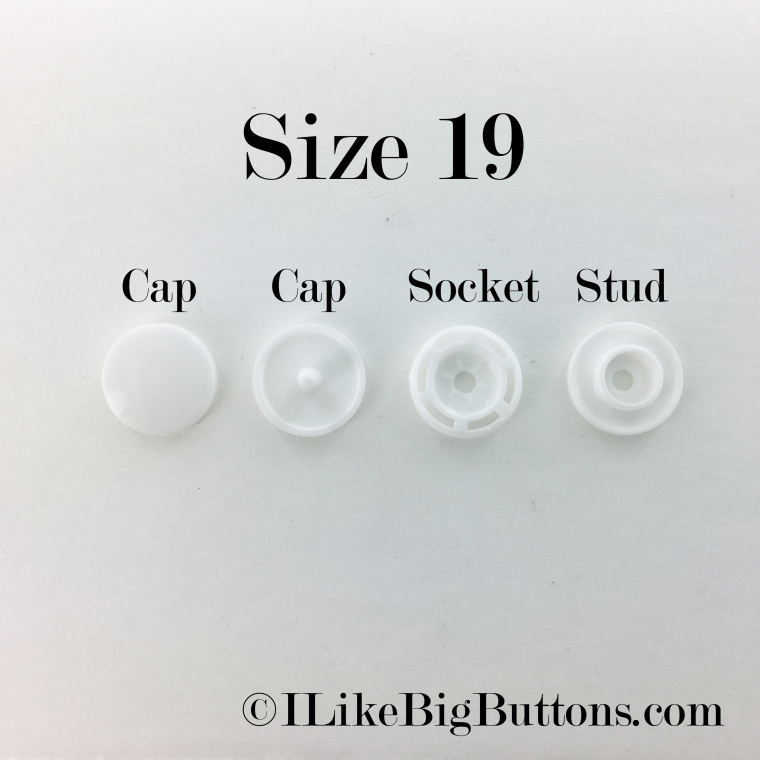
- Size 19 (0.475" - 12 mm) snaps are used for heavy duty applications requiring a strong grip. They are often used with tote bags, coats, tarps, and upholstery. We carry them in White and Black at this time.
- Size 19 snaps have a 6.9mm prong length. Prong length refers to the length of the shaft on the backside of the Cap. When formed, the prong will compress and form a 'mushroom' shape to hold the Cap and Socket or Stud together.
- The Size 19 Socket and Studs are larger, but similar in appearance to Size 20 Sockets and Studs.
SIZE 22:

- Size 22 (0.55" - 14.1 mm) snaps are used for heavy duty applications requiring a strong grip. They are often used with tote bags, coats, tarps, and upholstery. We carry them in White and Black at this time.
- Size 22 snaps have a 6.9mm prong length. Prong length refers to the length of the shaft on the backside of the Cap. When formed, the prong will compress and form a 'mushroom' shape to hold the Cap and Socket or Stud together.
- The Size 22 Socket and Studs are larger, but similar in appearance to Size 20 Sockets and Studs.
I Like Big Buttons! – How To Make A Fabric Cover Button Pendant October 03 2017

Fabric Cover Button Pendants are simple to make and add a stylish twist to any outfit. My oldest and I made some simple Cover Button Pendants for her to share with her dearest friends. We integrated her school colors into the design. We are in love with how they turned out. Can't wait to hear how her friends react!!!
We carry Pendant Bezel Trays in 23 mm (Size 36) and 38 mm (Size 60). They are available in three finishes: Silver, Antique Brass, and Gunmetal. We chose Size 60 for our project.
First Step:
Assembling fabric Cover Buttons is fast and simple. In just seconds, you will have a button ready for your latest craft project.
See our pictorial below:
How to Make Fabric Cover Buttons:
Cover Buttons are easy to assemble:
- Cut your fabric scrap. You will want a circle that is about twice the diameter of your button blank.
- Put your fabric piece in the larger assembly tool piece (RIGHT SIDE DOWN). When you look into the tool you want to see the back of the fabric.
- Place the button front (the domed piece) on top of the fabric. Leave the fabric edges hanging out.
- Press the cover button edges down into the tool.
- Place the back cover button piece on top of your fabric and button front. If the cover button will be subject to repeated tugging from the back, you may want to add a little e6000 adhesive before attaching the back.
- Take the smaller piece of the assembly tool and with the open side down place it on the button back.
- Press down. You may hear a pop when the last bit of the button back slips into place. If you take the tool out and the button is not completely secured, just put it back in and press down again.
- When you take the small assembly tool piece off, the fabric edges will be secured underneath the button back.
- Remove the button from the larger assembly tool piece.
- Tada!
*The only addendum to the above instructions was that we cut out small 3/4" red felt hearts to sandwich between each piece of lace and fabric. You will want to do this before placing the fabric upside down on the tool. Once you press the button cap into place, you can flip our translucent tool over and make sure the heart is placed where you want it.
Step 2:
- Carefully apply E6000 to the inside edges of the Pendant Bezel.
- Press the assembled Fabric Cover Button into place.
- Let dry for the recommended time, add necklace or cord as we did, and enjoy.
- Tada!

To see other great Fabric Cover Button ideas, visit our DIY Project section here.
Our 5 Most Popular Cover Button Tutorials - I Like Big Buttons! September 19 2017

These aren't your grandma's Cover Buttons!!! Well actually they are ;) only better, with so many many great uses for them.
Flat Backs are used for crafts were you would like to glue a cover button: jewelry, bracelets, rings, earrings, necklaces, bobby pins and barrettes, scrap booking, and much more.
Wire Backs are used for fabric cover buttons in sewing, shoes, clothing, pony tail holders and much, much more.
Here are our 5 most popular Cover Button Tutorials:
#1 - Fabric Cover Button Push Pins

#2 - Fabric Cover Button Badge Reels
![]()
#3 - Fabric Cover Button Paper Clip Bookmarks

#4 - Lace and Fabric Cover Button Earrings

#5 - Fabric Cover Button Snap Barrettes

Our 5 Most Popular KAM Plastic Snap Tutorials For Babies & Toddlers - I Like Big Buttons! September 12 2017

KAM plastic snaps are a SNAP to use and work almost anywhere Velcro or sewable button can be used. Here are some great Baby and Toddler KAM plastic snap tutorials from our KAM Plastic Snap Project Page!
#1 - Bib Bandana with KAM Plastic Snaps and a PDF Pattern

#2 - Sensory Ribbon Baby Tag Blanket with KAM Plastic Snaps and Pacifier Supplies
![]()
#3 - The Ultimate Catch-All Bib with KAM Plastic Snaps

#4 - “No Sew” Leash for a Toddler Cup with KAM Plastic Snaps

#5 - A Cover Button Metal Pacifier Clips with Cover Buttons, Round Faced Metal Suspender Clips, and KAM Plastic Snaps

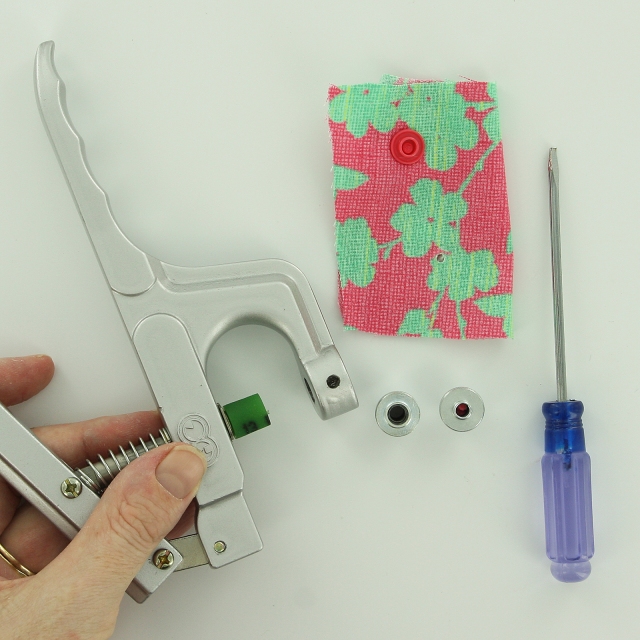
I Like Big Buttons! How To Apply KAM Plastic Snaps With Hand Pliers August 28 2017

How To Apply KAM Plastic Snaps With Hand Pliers Slideshow:
OR
How To Apply KAM Plastic Snaps With Hand Pliers Video:
Today I spent the day laying out a photo slideshow of how to apply KAM plastic snaps with hand pliers. Installing snaps is, well, a SNAP to do! Check out how simple it is below.
Supplies:
- KAM Snap Pliers and Awl
- 1 Complete KAM Plastic Snap Set (2 Round Caps, 1 Studs, and 1 Socket)
- Scrap of Fabric or Sewing Project


1. Use the Awl to poke a hole where you want to install the KAM plastic snap.

2. Press the plastic snap Cap through the hole created by the Awl. The prong of the Cap will be visible.

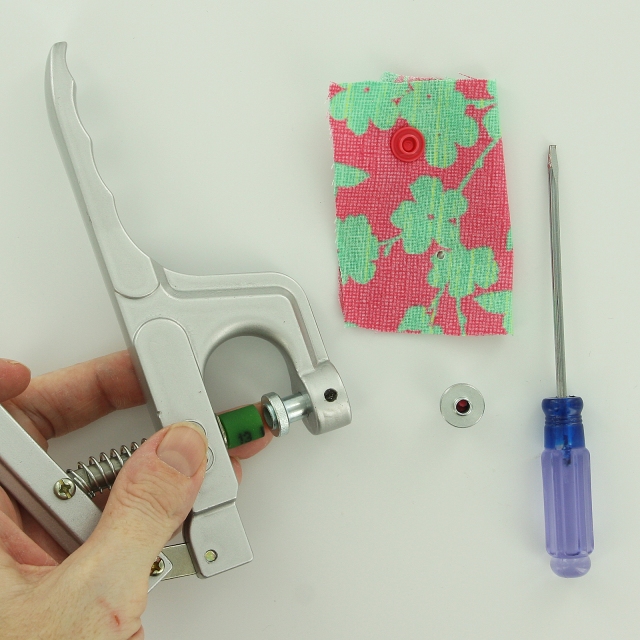
3. Settle the Socket over the prong shaft.

4. Use the Hand Pliers to install the Cap and Socket together.

5. The Cap should be securely nestled in the die before you apply pressure. I am using Size 20 snaps so the T5 die is installed. Each size of snap has a correlating die.

6. Apply firm hand pressure. The rubber head should bulge slightly as pictured.

7. The prong of the Cap is now flattened. When formed, the prong will compress and form a 'mushroom' shape to hold the Cap and Socket together.

8. Repeat steps to create the Stud side of the snap. Create a hole with the Awl and insert the Cap. The prong of the Cap will be visible.

9. Settle the Stud over the prong shaft.

9. Use the Hand Pliers to install the Cap and Stud together.
10. Apply firm hand pressure. The rubber stopper should bulge slightly.

11. The prong of the Cap is now flattened. When formed, the prong will compress and form a 'mushroom' shape to hold the Cap and Stud together.

12. Now simply press the snaps sides together.

13. You have created a plastic snap that is durable, functional, and adds a colorful finish to your project.


14. Both sides of your snap have a clean finished look.

15. Happy Snapping!!!
Friday Fun Facts - The Anatomy Of A KAM Plastic Snap July 28 2017
KAM plastic snaps are wonderful. They are a SNAP to install and much easier and durable than a standard metal snap or sewable button. They come in a multitude of colors and sizes. Which one is right for you?
Here is a simple tutorial on the anatomy of a plastic snap set. There are 4 parts to a set:
- 2 Caps (Before installation they resemble a tack with a Round, Heart, or Star shaped head. They give a neat finished look to your snap.)
- 1 Socket (The female part with the larger raised circle that the stud (male part) fits into)
- 1 Stud (The male part with the smaller raised circle that fits inside the socket (female part))
SIZE 20:
- Size 20 (0.5" - 12.4 mm) snaps can be used for most general projects like baby diapers and clothing. They are our most popular plastic snap size, have the largest color variety, and have a good strong hold. We carry them in all 130 colors and clear.
- Standard Size 20 snaps have a 5.6mm prong length. Prong length refers to the length of the shaft on the backside of the Cap. When formed, the prong will compress and form a 'mushroom' shape to hold the Cap and Socket or Stud together.
- We also offer Long Prong Size 20 (0.5" - 12.4 mm) in a rainbow of colors. They are great for embroidered key fobs using Marine or Glitter Vinyl as well as other projects where you need just a little more prong length. Long Prong Size 20 snaps have a 6.2mm prong length.
SIZE 16:
- Size 16 (0.4" - 10.2 mm) snaps are most commonly used for baby and toddler clothing, pacifier clips, mama pads, and small crafts. We carry them in our first 60 ("B") colors and clear.
- Size 16 snaps have a 4.2mm prong length. Prong length refers to the length of the shaft on the backside of the Cap. When formed, the prong will compress and form a 'mushroom' shape to hold the Cap and Socket or Stud together.
- The Size 16 Socket and Stud are less noticeably different. Many first time users don't immediately see the distinction. The Socket's raised circle is the larger of the two pictured, and the Stud's raised circle is smaller and inserts into the Socket (female) side.
SIZE 14:
- Our Size 14 (0.35" - 9.7 mm) snaps can be used in most applications where Size 16 snaps are used. We carry them in White and Black at this time.
- Our Size 14 snaps have a 5.0mm prong length. Prong length refers to the length of the shaft on the backside of the Cap. When formed, the prong will compress and form a 'mushroom' shape to hold the Cap and Socket or Stud together.
- As with the Size 16, the Size 14 Socket and Stud are less noticeably different. The Socket's circle is the larger of the two pictured. The Stud's circle is smaller and inserts into the Socket (female) side. Size 16 and Size 14 Sockets and Studs are the same; only the cap differs.
SIZE 19:
- Size 19 (0.475" - 12 mm) snaps are used for heavy duty applications requiring a strong grip. They are often used with tote bags, coats, tarps, and upholstery. We carry them in White and Black at this time.
- Size 19 snaps have a 6.9mm prong length. Prong length refers to the length of the shaft on the backside of the Cap. When formed, the prong will compress and form a 'mushroom' shape to hold the Cap and Socket or Stud together.
- The Size 19 Socket and Studs are larger, but similar in appearance to Size 20 Sockets and Studs.
SIZE 22:
- Size 22 (0.55" - 14.1 mm) snaps are used for heavy duty applications requiring a strong grip. They are often used with tote bags, coats, tarps, and upholstery. We carry them in White and Black at this time.
- Size 22 snaps have a 6.9mm prong length. Prong length refers to the length of the shaft on the backside of the Cap. When formed, the prong will compress and form a 'mushroom' shape to hold the Cap and Socket or Stud together.
- The Size 22 Socket and Studs are larger, but similar in appearance to Size 20 Sockets and Studs.
I Like Big Buttons! Friday Fun Facts: How We Prepare Our Plastic Snaps And Why June 30 2017
For all our new friends and followers of I Like Big Buttons!, it seemed like a great time to introduce you to our amazing Plastic Snaps!!! For those of you who have been with us for a long time, here is a refresher.
We carry a variety of package deals for our snaps from 10 sets, 25 sets, 100 sets up to thousands of KAM snaps with and without pliers or professional press all at a great price. We have a listing for just about everyone at the price range and quantity you desire.
Unlike other vendors, our KAM plastic snaps are optically counted. This means every cap, socket, and stud is counted, and the amount purchase is assured to be at or above the purchased quantity (we allow overcounts, but not undercounts). Plastic snap batches can vary by 5% or more in weight (even between batches of the same color), so if your vendor is weighing them, you may not be getting what you paid for.
25 packs sets came to be largely for cloth diapers. Most customers that replace Velcro on cloth diapers with snaps have numerous diapers in varying colors. Many found purchasing 100 of each color wasteful, as they ended up with 75% of their snaps left over.
We provide the best of both worlds, smaller packs to those that want greater variety and larger packs for those looking to use snaps in bulk.

Some of these reasons we offer these great options include:
*A large demand from customers for just 25 snaps to convert or complete a single diaper.
*An equally large demand for “just a sampling of every color”, which gave birth to our sets of 10 and Starter Packs.
* More compact, informational packaging that includes the name, quantity, prong length, and instructions about which Die and Rod to use.
* We also offer individual parts in quantities of 100 and 1000 in all of KAM Plastic Snaps 130+ colors.
If you aren't sure how to jump into plastic snaps, we also carry starter packs including multi-packs of 10 or 25 sets of snaps. If you are new to snapping, we have starter packs with plastic snap pliers, awl, and an instructional DVD. These Starter Packs are a great way to get addicted :). We have 18 preset themes including Rainbow Spectrum, Pastel Spectrum, Vibrant Boy, Vibrant Girl, Patriotic, Military, and many others.
Check out our convenient Starter Packs:

We also offer an option to choose your own colors. You can pick from any of KAM Plastic Snaps 130+ fun colors. Have you taken a moment to check out our new easy to navigate KAM Snap Visual Ordering Chart with new lower pricing!?!

Here is our chart of available colors, we carry over 130+ great KAM Plastic Snap colors.

Friday Fun Facts - What is your Shipping and Handling turn around? June 23 2017
We often get questions from our customers about our shipping and handling time. We have it posted on our site, but here it is for your convenience.
"Orders purchased before 3pm Pacific time are typically prepared for shipment the following business day in our 9am pickup."
Here are some reviews of our shipping from our happy customers:
★★★★★ Super fast shipping as always!! I can't stop making these buttons!!
★★★★★ Perfect, super sonic shipping, A+++ seller!
★★★★★ Great customer service, expedient delivery, excellent communication. Product exactly as described. Will use this shop again for sure.
★★★★★ aS ADVERTISED AND VERY FAST SERVICE!
★★★★★ Wow Super Fast Shipping!! Totally impressed and will definitely order again!! Great product!
★★★★★ Super fast shipping! Thanks!!
★★★★★ Excellent Lightning Fast Shipping I totally appreciate that and product is terrific I highly recommend this shop!!
★★★★★ thank you for super quick shipping Thank you.
★★★★★ Once again I am very happy with these snaps! You absolutely can't beat the price or the color options here and the shipping is so fast!
★★★★★ Perfect item. Fast shipping. Smooth Sailing.
★★★★★ I love using the KAM snaps. The really prompt shipping from "I like big buttons" was surprising. I ordered one day and shipped the same day. Got them the next day. I will be shopping with them again soon.
★★★★★ lightning fast shipment, above quality snaps
★★★★★ Great Items....can't wait to use them. Thanks for the fast delivery.
★★★★★ AMAZING service. Shipped out the next day. Had in 2 days! Will definitely be doing business with this company again! Thank you so much!
★★★★★ great merchandise and fast shipping makes buying easy
★★★★★ Everything was great. Shipped faster than expected and packaging was more than expected.
★★★★★ Perfect and super fast shipping!
★★★★★ They got here days before estimated arrival time.
★★★★★ This is a repeat buy. I reordered because they have the products I want at a good price. Quick delivery!
★★★★★ Quick shipping and an excellent price.
★★★★★ QUICK DELIVERY...EXACTLY WHAT I WANTED..THANK YOU
As always, there are exceptions to these customers reviews. We, just like our customers, are at the mercy of the US Postal Service, but on a whole, more than 99% of the time, they serve us well. We love our local US Postal workers who make shipping your packages a delight. If your purchase is taking longer than you had hoped, please feel free to contact us.
Thank you,
Gena (CEO of ILikeBigButtons.com)
I Like Big Buttons! Product Video: What We Carry June 22 2017
Check out ILikeBigButtons.com - A family-run craft supply shop with a large variety of plastic KAM Snaps & accessories, Key Fob Hardware, Cover Buttons, Pacifier Supplies, Metal Findings and more! We are constantly expanding our selection of crafting supplies for you.
I Like Big Buttons! Creation Share August 25 2016

How to change the dies in the KAM Snap Removal Pliers July 12 2016
How to change the dies in the KAM Snap Removal Pliers.
Supplies:
- KAM Snap Removal Pliers
- Stud Die or Socket Die (included in kit)
- Screwdriver (included in kit)
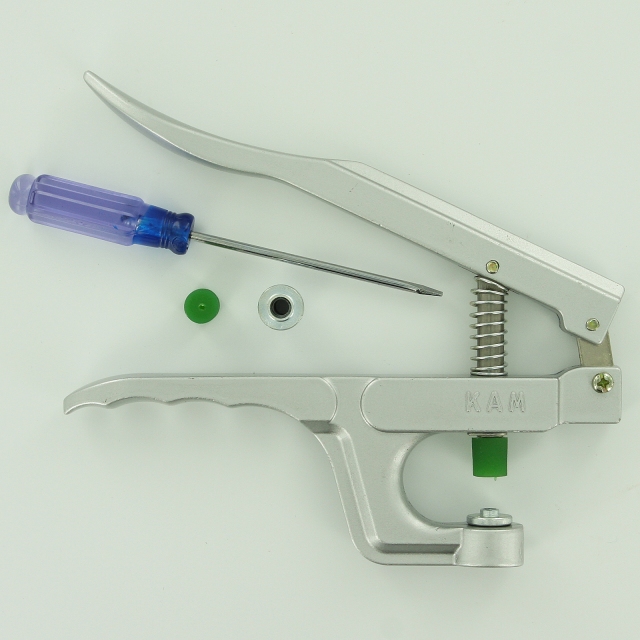
Instructions:
1. The KAM Snap Removal Pliers will come with one of the dies installed.

2. Use the screwdriver, included in kit, to loosen the set screw on the base of the pliers.
3. Remove the die from the base.
4. Insert the desired die into the base of the pliers.
5. Push it flush with base.

6. Re-tighten the set screw with the screwdriver.
7. Tada! It is ready to use.
Cover Button FAQs: How To Convert Wire Back To Flat Back Tip #2 April 13 2016
-
Assembling fabric covered buttons is easy and fun but did you know you can convert Wire Back Cover Buttons to Flat Back Cover Buttons in 1 simple step?
- Watch how easy it is below:
I Like Big Buttons! - How To Covert Wire Back To Flat Back
To see other great Fabric Cover Button ideas, visit our DIY Project section here.
I Like Big Buttons! How to remove Plastic Snaps with a Cuticle Cutter (Socket) February 22 2016
How to remove a plastic snap (socket side) with Cuticle Cutters. In most cases, you can reuse the socket if done with care.
Supplies:
- Broken or incorrectly installed plastic snaps
- Cuticle Cutter
Want our KAM Plastic Snap Removal Pliers, shop here.
Crafty Saturday! February 20 2016
Working on a project using ILikeBigButtons.com for a new sweet cousin. Can't wait to meet her!!!
#ilikebigbuttons #sootherblanket #pacifierclip #craftsupplies #lazysaturday #kamsnaps #plasticsnaps

Cover Button FAQs: How To Assemble A Fabric Cover Button Tip #1 February 09 2016
- Assembling fabric covered buttons is easy and fun but here is a handy trick to make it even simpler.
- This tip is great for saving your thumbs or when using slightly thicker fabric.