I Like Big Buttons! How To Apply KAM Plastic Snaps With Hand Pliers August 28 2017

How To Apply KAM Plastic Snaps With Hand Pliers Slideshow:
OR
How To Apply KAM Plastic Snaps With Hand Pliers Video:
Today I spent the day laying out a photo slideshow of how to apply KAM plastic snaps with hand pliers. Installing snaps is, well, a SNAP to do! Check out how simple it is below.
Supplies:
- KAM Snap Pliers and Awl
- 1 Complete KAM Plastic Snap Set (2 Round Caps, 1 Studs, and 1 Socket)
- Scrap of Fabric or Sewing Project


1. Use the Awl to poke a hole where you want to install the KAM plastic snap.

2. Press the plastic snap Cap through the hole created by the Awl. The prong of the Cap will be visible.

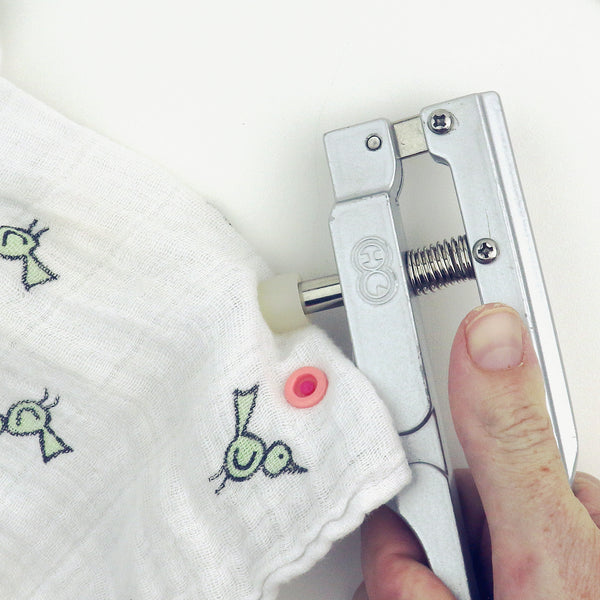
3. Settle the Socket over the prong shaft.

4. Use the Hand Pliers to install the Cap and Socket together.

5. The Cap should be securely nestled in the die before you apply pressure. I am using Size 20 snaps so the T5 die is installed. Each size of snap has a correlating die.

6. Apply firm hand pressure. The rubber head should bulge slightly as pictured.

7. The prong of the Cap is now flattened. When formed, the prong will compress and form a 'mushroom' shape to hold the Cap and Socket together.

8. Repeat steps to create the Stud side of the snap. Create a hole with the Awl and insert the Cap. The prong of the Cap will be visible.

9. Settle the Stud over the prong shaft.

9. Use the Hand Pliers to install the Cap and Stud together.
10. Apply firm hand pressure. The rubber stopper should bulge slightly.

11. The prong of the Cap is now flattened. When formed, the prong will compress and form a 'mushroom' shape to hold the Cap and Stud together.

12. Now simply press the snaps sides together.

13. You have created a plastic snap that is durable, functional, and adds a colorful finish to your project.


14. Both sides of your snap have a clean finished look.

15. Happy Snapping!!!