I Like Big Buttons! - Fabric Cover Buttons - Easy To Make, Great Impact! October 09 2018
These aren't your grandma's Cover Buttons!!! Well, actually they are ;) only better, with so many many great uses for them.
Flat Backs are used for crafts where you would like to glue a cover button: jewelry, bracelets, rings, earrings, necklaces, bobby pins and barrettes, scrapbooking, and much more.
Wire Backs are used for fabric cover buttons in sewing, shoes, clothing, ponytail holders and much, much more.
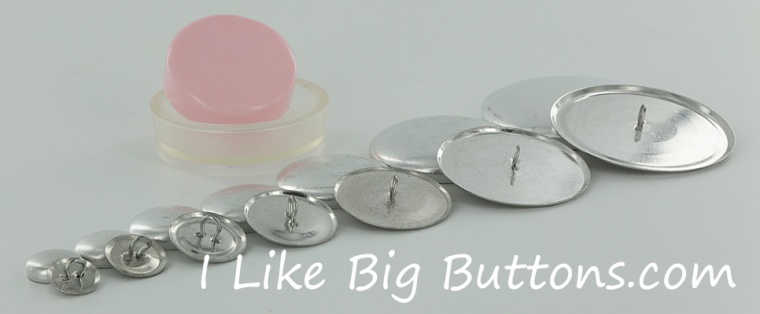
Here are the 7 sizes we carry. From 1/2", which is about as small as your pinky nail, all the way up to 1 7/8" in diameter, about the size of the round side of a kiwi fruit. We carry them in both flat back (glueable) and wire back (sewable).
- Size 20 (1/2 inch / 12 mm)
- Size 24 (5/8 inch / 15 mm)
- Size 30 (3/4 inch / 19 mm)
- Size 36 (7/8 inch / 23 mm)
- Size 45 (1 1/8 inch / 28 mm)
- Size 60 (1 1/2 inch / 38 mm)
- Size 75 (1 7/8 inch / 48 mm)
Assembling fabric Cover Buttons is fast and simple. In just seconds, you will have a button ready for your latest craft project.
See our pictorial below:

How to Make Fabric Cover Buttons:
Cover Buttons are easy to assemble:
- Cut your fabric scrap. You will want a circle that is about twice the diameter of your button blank.
- Put your fabric piece in the larger assembly tool piece (RIGHT SIDE DOWN). When you look into the tool you want to see the back of the fabric.
- Place the button front (the domed piece) on top of the fabric. Leave the fabric edges hanging out.
- Press the cover button edges down into the tool.
- Place the back cover button piece on top of your fabric and button front. If the cover button will be subject to repeated tugging from the back, you may want to add a little e6000 adhesive before attaching the back.
- Take the smaller piece of the assembly tool and with the open side down place it on the button back.
- Press down. You may hear a pop when the last bit of the button back slips into place. If you take the tool out and the button is not completely secured, just put it back in and press down again.
- When you take the small assembly tool piece off, the fabric edges will be secured underneath the button back.
- Remove the button from the larger assembly tool piece.
- Tada!