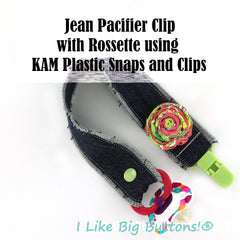
Jean Pacifier Clip with Fabric Rosette using KAM Plastic Snaps and a KAM Plastic Pacifier Clip
 |
 |
 |
 |
 |
 |
 |
 |
 |
 |
 |
|
 |
 |
 |
 |
 |
 |
 |
 |
 |
 |
 |
 |
Supplies for a Recycled Jean Pacifier Clip with Fabric Rosette:
- 1 Pair of Holey Jeans
- 1 1/2" to 2" x 24" long strip of Fabric
- 1 KAM Plastic Pacifier Clip
- 1 KAM Snap Sets
- KAM Snap Pliers and Awl
- Sewing Clips
- Standard Sewing Machine
- Hot Glue Gun
- Fabri-Tac - Fabric Adhesive
Instructions:
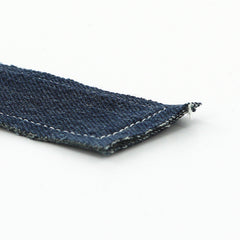
- Using an old, holey pair of Jeans cut two 1 1/2" x 14" strips of material.
- Use Sewing Clips to hold the material, wrong sides together, right sides facing out.
- Stitch around the strip of fabric about a 1/4 to 3/8" in all the way around making sure to backstitch at the start and end.
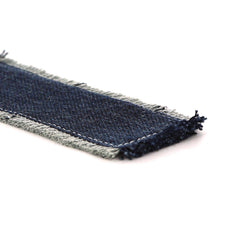
- Pull on the edges to fray the jean material up to the stitch you made. I used a crafty child :) with a cutting board and a fork. It will also fray over time but I was going for this look.
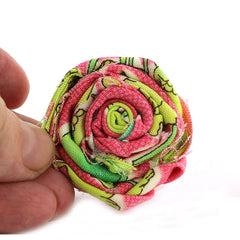
- To make the Fabric Rosette, fold the fabric in half, wrong sides together, two times. You will end up with about 1/2" or less strip of fabric 24" long. I used an iron to fold it, not so much that it was completely flat, just enough that it held its shape. Start at one end and hot glue the first bit of it back against itself.
- Continue this ever so often so that the 'bud' stays together.
- Make the bud or center of the rose about 1/2" in diameter. Add one last drop of hot glue.
- Now twist the fabric 360 degrees, so that the bottom becomes the top. Tack it with a small bead of hot glue and repeat.
- Continue twisting and gluing until you run out of fabric or until you reach the desired size of your rosette.
- It will look like this when you are finished.
- Glue the last bit of fabric on the underside of the Rosette securely with hot glue.
- For a more finished look, I added a circle of felt to the bottom with Fabri-Tac.
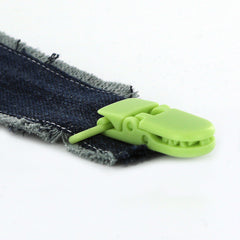
- Put the KAM Plastic Pacifier Clip on the Fabric strip about 1″ in.
- Fold back 1″ of the strip back onto itself.
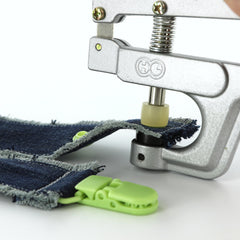
- Straight stitch across the fabric strip just behind the KAM Plastic Pacifier Clip. Make sure to set the stitch.
- Make sure that the internal snap in a comfortable distance to accommodate the width of the handle, I spaced my KAM Snaps about 2″ apart using the Pacifier I have with the biggest handle.
- Now on the side where the Pacifier will be attached, I installed a Cap and Socket about 1/2″ from the edge. I used Size 20 snaps for this tutorial but either Size 20 or Size 16 will work great.
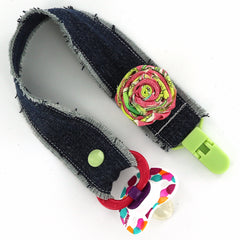
- Add Fabric Rosette with Fabri-Tac to the Pacifier Clip just above the clip.
- Now snap the Pacifier in place, attach to your child’s outfit and go.
- Tada! Okay, I think I am in love. Super cute! Happy Snapping!!! To see our other great Pacifier Clip Tutorial and KAM Plastic Snap Ideas and buy these supplies visit I Like Big Buttons.com.
Disclaimer: Keep in mind that although I have rough tested these I in no way recommend you leave your baby alone with these as there are small pieces and if not done properly they may come apart and become a choking hazard. I would recommend these clips under adult supervision only. The maker and/or parent assumes full responsibility when using these pacifier clips.