News
Monday Humor @ ILikeBigButtons.com November 15 2021

😳 I am so Creative these days! 🤪
Our Silver (B45) KAM Plastic Snap is one of my favorite metallics, it is the perfect silver for any project. If you are not into Silver, we carry 6 metallic KAM Plastic Snap shades and 130+ unique colors of snaps.
Which KAM® snap color would you pick? @ILikeBigButtons.com November 10 2021

Which KAM® snap color would you pick?
We carry so many great colors in KAM® plastic snaps, making it both easy and hard to pick a favorite snap for a project. Which would you pick?
❤️ G83 - Raspberry
❤️ G92 - Off White
❤️ G119 - Chestnut
Or do you have another from our 130+ colors that you would lean towards?
See our color chart!
New! KAM Snap Combos in Lights, Mids, and Darks! @ ILikeBigButtons.com November 05 2021

Monday Humor @ ILikeBigButtons.com November 01 2021

 So, this is my plan today. How about you?
Our Crimson (B54) KAM Plastic Snap is the beautiful deep red and reminds me of hot apple cider and cozy winter days. If you are not into Crimson, we carry 9 other shades of red, 15 shades of pink, and 130+ unique colors of snaps.
Friday Humor @ ILikeBigButtons.com October 22 2021

🎃 Our Pumpkin (B40) KAM Plastic Snap reminds me of sunny fall days, Halloween fun, and of my handsome son who does his best to wear orange every day of the week. 🥰
If you are not into Pumpkin, we carry 13 other shades of orange and 130+ unique colors of snaps.
🥰 This feedback made my day! @ ILikeBigButtons.com October 21 2021
🥰 This feedback made my day! As a Mompreneur 😊, some days I really need these thoughtful reviews to let me know that the time, energy, and sacrifices I make for my customers are seen and appreciated.
⭐️⭐️⭐️⭐️⭐️
Perfect transaction. Seller was super-responsive, fast to deliver, and incredibly helpful with information about her products and questions I had about my specific project. I bought from her BECAUSE of how she responded to me and my questions. Great seller!
-- Jeri

KAM Plastic Snap Quick Ordering Chart makes ordering a Snap @ ILikeBigButtons.com October 20 2021
Have you taken a moment to check out our easy-to-navigate KAM Snap Quick Ordering Chart !?!

Simply click on any color, enter quantity, click add to cart, and repeat!

You can narrow down your search by Size/Shape, Color, Prong Length, and Finish, as always, to make ordering easier.
We added a new category for our bargain shoppers, there is now a SALE tab so you can search the * On Sale * items exclusively. All items in the SALE drop-down menu will show the discounted price you will receive when ordering.

Right now, a large selection of Size 16 KAM plastic snaps are on sale. Check them out in the SALE tab or by looking for the colors with the Size 16 * On Sale * labeled pink bubble.

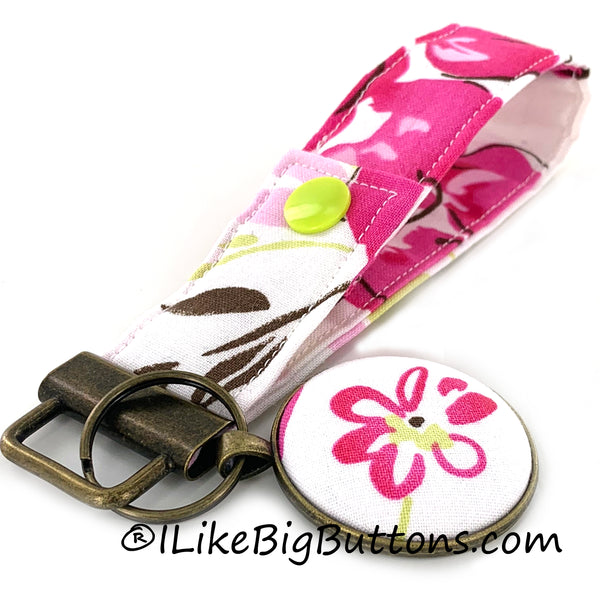
Key Fob Wristlet with KAM® Plastic Snaps Tutorial @ ILikeBigButtons.com October 18 2021

Thanks to my I Like Big Buttons! Facebook group for help deciding on which color KAM® snap to use on my latest project. I went with G90 - Bright Celery because I love the pop of color that it adds to the project.
I have been wanting to make a Key Fob Wristlet for a while with a KAM® Plastic Snap accent. Not only does the KAM® Plastic Snap add a bit of pizzazz to my project but it is also functional. I can wear the wristlet on my wrist or snap it to my purse strap for safekeeping. No more digging around in my purse to find my keys.
Supplies:
- 12" x 5" Fabric of your Choosing
- 12″ x 1" Piece of Fusible Fleece or 12" x 5" Fusible Interfacing
- 1 Key Fob Hardware and Split Ring
- Key Fob Hardware Pliers
- Sewing Clips
- Standard Sewing Machine
- Fray Check
- KAM® Plastic Snap
- KAM® Hand Pliers & Awl
- Pendant Bezel Trays in 23 mm (Size 36) or 38 mm (Size 60)
- 1 Completed Flat Back Fabric Cover Button (Attach size 36 (7/8" - 23 mm) or size 60 (1 1/2" - 38 mm) flat back cover buttons.)
- E6000 or comparable adhesive

1. Cut a 12" x 5" section of Fabric of your choosing and 12" x 1" Fusible Fleece.
2. Fold and iron the Fabric in half with the wrong sides together.
3. Unfold and iron the Fabric in half again long sides to the center. Iron Fusible Fleece to the left or right center column of the fabric, depending on how you want to fold it.
4. Fold over and iron about 1/2" of the fabric in on each of the ends so that when you sew your way around the strip you will create a finished edge at each end.
5. Use your Sewing Clips to pin the Wristlet flat. It will look like this when you get done.
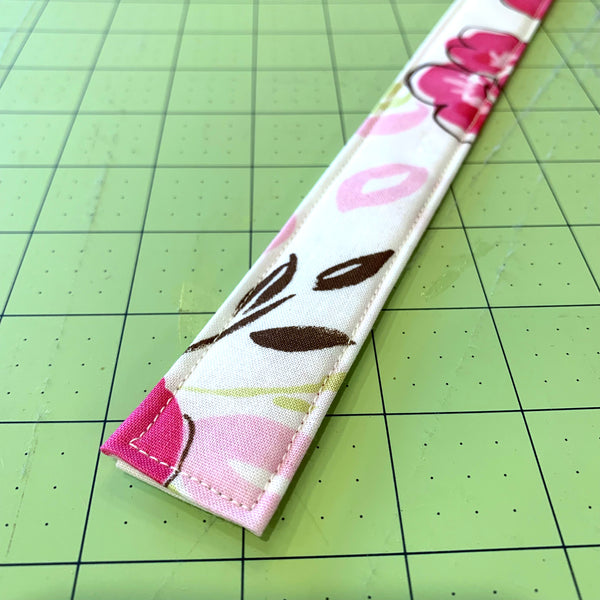
6. Stitch along the edge of your Fabric strip, I stitched 1/8" in. Remove the Sewing Clips as you go. Work slowly, keeping close to the edge and as straight of a line as possible.
7. Continue all the way around the band, stitching 1/8" from the edge.

8. Using the Awl, poke a hole through for the snap about 1/2" in from the edge. Do this at each end.


9. Install the KAM plastic snap cap and socket on one end and the other KAM plastic snap cap and stud at the other end. One will be facing up, and one will be facing down so that when they snap together they look like the above picture.

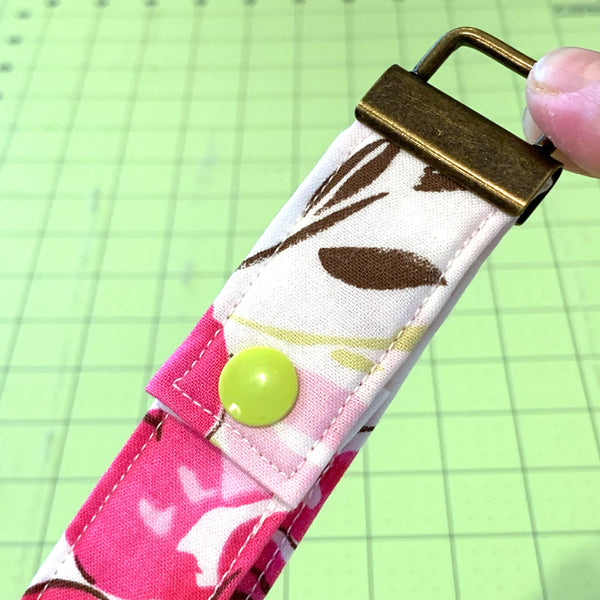
10. Snap KAM plastic snap together and decide where you want the snap on the wristlet. I decided I wanted it to be closer to the Key Fob Hardware than not.
11. Make sure that the Fabric Wristlet is centered. Using Key Fob Hardware Pliers squeeze the Key Fob Hardware closed with gentle pressure. Sometimes, I go back and forth from left to right added a little bit of pressure to each side until it eases together. Our Key Fob Hardware Pliers make this easy to do.
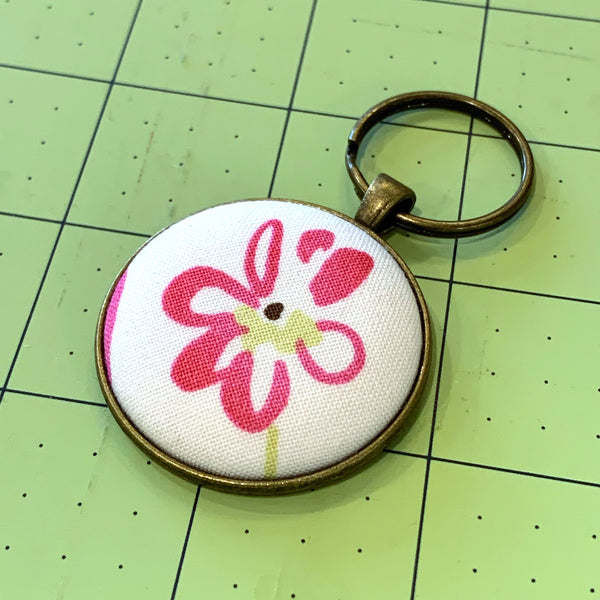
12. I wanted to add an extra bit of embellishment to my Key Fob Wristlet, so I made a quick Cover Button Pendant. Follow these instructions to make Flat Back Fabric Covered Buttons.
13. Carefully apply E6000 to the inside edges of the Pendant Bezel.
14. Press the assembled Fabric Cover Button into place.
15. Let dry for the recommended time, add a necklace or cord as we did, and enjoy.

To see other great Crafty Inspiration ideas, visit our DIY Project section here.
Wednesday Humor @ ILikeBigButtons.com October 13 2021

😂🤣😂
Our Sunset Yellow (B10) KAM Plastic Snap reminds me of brisk, but sunny Fall days and colorful Fall leaves.
If you are not into Sunset Yellow, we carry 9 other shades of yellow and 130+ unique colors of snaps.
Customer Love @ ILikeBigButtons.com October 12 2021

⭐️⭐️⭐️⭐️⭐️
This item arrived quickly and works perfectly. It's easy to use and the snaps hold strong, there is a nice variety of colors and the included tool is heavy and sturdy.
--Catherine
Shop KAM Plastic Snaps @ ILikeBigButtons.com
Which KAM® snap color would you pick? @ILikeBigButtons.com October 11 2021

Which KAM® snap color would you pick?
We carry so many great colors in KAM® plastic snaps, making it both easy and hard to pick a favorite snap for a project. Which would you pick?
❤️ G122 - Fuchsia
❤️ G90 - Bright Celery
❤️ B57 - Medium Pink
Or do you have another from our 130+ colors that you would lean towards?
See our color chart!
Top DIY Craft Project Picks @ ILikeBigButtons.com October 08 2021

😍 These Marvel Key Fob Wristlets are a favorite in the I Like Big Buttons! household. 😍
ILikeBigButtons.com Supply List:

Quick and Easy Gift Idea @ ILikeBigButtons.com October 07 2021
Make these adorable Snap Barrettes to match or accent your loved ones favorite outfit or dress up their favorite t-shirt and jeans for an afternoon outing. Enjoy!
Supplies:
- 1-2 Completed Flat Back Fabric Cover Button (Choose your size, Size 20 through Size 36 all work great, size depends on the statement you want to make)
- 2 Snap Barrettes
- E6000 or comparable adhesive


Steps:
1. Follow these instructions to make Flat Back Fabric Covered Buttons.

2. Lightly scuff the back of the Cover Button so the glue will adhere better (not essential but recommended).
3. Clean both surfaces of dust.
4. Apply E6000 to back of Cover Button.

5. Press Snap Barrette into place and remove any extra Adhesive. On smaller sized Cover buttons center on the glue pad, as they increase in size adjust glue pad accordingly.

6. Let dry and enjoy.
7. Tada!

To see other great Cover Button ideas, visit our DIY Project section here.
Monday Humor @ ILikeBigButtons.com October 04 2021

🤪🥺😭
Our Kiwi (G101) KAM Plastic Snap reminds me of crisp fall apples and brisk days. If you are not into Kiwi, we carry 16 other shades of green and 130+ unique colors of snaps.
We carry a tool for that! It is my favorite tool hands down, especially when my dyslexic brain outsmarts me. 🤪
Tuesday Humor @ ILikeBigButtons.com September 14 2021

 🧶 ✂️ Yesterday at Hobby Lobby, my daughter and I rescued some beautiful chenille yarn! 🧶 ✂️
Our Light Navy (B58) KAM Plastic Snap is our most popular true blues, great for Fall and Christmas alike. 😍 If you are not into Light Navy, we carry 22 other shades of blue and 130+ unique colors of snaps.
KAM Plastic Snap Love Video @ ILikeBigButtons.com September 13 2021
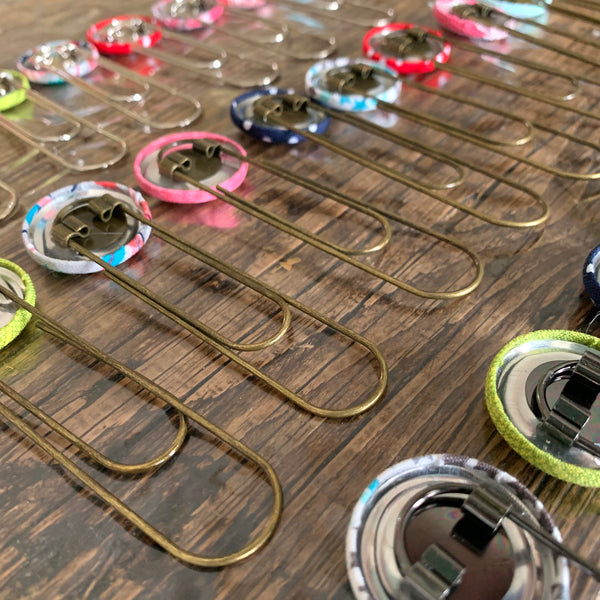
I am busy updating the ILikeBigButtons.com product images and couldn't help making a short video of the KAM plastic snaps all lined up. ![]()
![]()
![]() All the colors
All the colors ![]() make me so happy!
make me so happy! ![]()
KAM Plastic Snap Love Video
ILikeBigButtons.com carries a rainbow of KAM plastic snap colors in Size 20 (Most Popular Size for Craft Projects) and Size 16 (Doll/Ribbon Projects) and much more.
Visit our KAM plastic snaps page to see our full selections of KAM plastic snaps and KAM tools.
Check out our KAM Snap Inspiration Board to find a plethora of Tutorials and Ideas for how to use KAM plastic snaps in your crafty projects.
Have a great crafty day,
The Crew @ ILikeBigButtons.com
Wednesday Humor @ ILikeBigButtons.com September 08 2021

No housework for me today! 😜
Our Purple (B35) KAM Plastic Snaps reminds me of Fall and snuggly sweaters.
If you are not into Purple, we carry 16 other shades of purple and 130+ unique colors of snaps.
So many 😍 Key Fob Wristlets @ ILikeBigButtons.com September 01 2021

So many 😍 Key Fob Wristlets.
ILikeBigButtons.com Supply List:
To see other great Key Fob Hardware, Pendant Bezel, and Cover Button ideas, visit our DIY Project section here.
Monday Humor @ ILikeBigButtons.com August 30 2021

Yep! I'll admit it. 😜
Our Pale Pink (B21) KAM Plastic Snap is delicate pink and reminds me of all things girly and precious. If you are not into Pale Pink, we carry 9 other shades of red, 15 shades of pink, and 130+ unique colors of snaps.
🤓 What are you working on today!?! 🤓 August 27 2021

School Must-Haves @ ILikeBigButtons.com August 24 2021

With the school year starting back up, I couldn't resist. 😄
Shop Cover Buttons @ ILikeBigButtons.com
Shop Jumbo Paper Clips @ ILikeBigButtons.com
To see other great Cover Button and Jumbo Paper Clip ideas, visit our DIY Project section here.
Fabric Cover Buttons - Easy Peasy, Beautiful Impact! @ ILikeBigButtons.com August 19 2021

These aren't your grandma's Cover Buttons!!! Well, actually they are 😉 only better, with so many, many great uses for them.
💜 Flat Backs are used for crafts where you would like to glue a cover button: jewelry, bracelets, rings, earrings, necklaces, bobby pins and barrettes, scrapbooking, and much more.
💙 Wire Backs are used for fabric cover buttons in sewing, shoes, clothing, ponytail holders and much, much more.
Here are the 7 sizes we carry. From 1/2", which is about as small as your pinky nail, all the way up to 1 7/8" in diameter, about the size of the round side of a kiwi fruit.
We carry them in both flat back (glueable) and wire back (sewable).
• Size 20 (1/2 inch / 12 mm)
• Size 24 (5/8 inch / 15 mm)
• Size 30 (3/4 inch / 19 mm)
• Size 36 (7/8 inch / 23 mm)
• Size 45 (1 1/8 inch / 28 mm)
• Size 60 (1 1/2 inch / 38 mm)
• Size 75 (1 7/8 inch / 48 mm)
Assembling fabric Cover Buttons is fast and simple. In just seconds, you will have a button ready for your latest craft project.
Inspiration Board: Fabric Cover Buttons
Monday Humor @ ILikeBigButtons.com August 16 2021

It is sweet torture! 😅😳😍
Our Play Pink (G82) KAM Plastic Snap is soft orangish pink and reminds me of all things girly and delicate. If you are not into Play Pink, we carry 9 other shades of red, 15 shades of pink, and 130+ unique colors of snaps.
Great Value KAM® Starter Kit @ ILikeBigButtons.com August 13 2021

KAM® Snap Pliers, Awl, and 50 sets of White KAM® Plastic Snaps (Glossy):
- KAM® Plastic Snap Setting Pliers
- 2 Metal Setting Rods (the installed rod sets snap sizes 14, 16, and 20; the wider rod sets size 19 and 22 snaps)
- Cap Dies (for setting size 16, 19, 20, 22, heart and star shaped snaps)
- Screwdriver (for changing cap dies)
- Awl (for creating holes in fabric)
Glossy WHITE KAM® plastic snap sets in size 20 (0.5" - 12.4 mm).
Size 20 snaps are our most popular size and can be used for most general projects like baby diapers and clothing. Size 20 snaps have the largest color variety, have a good strong hold, and are a good size for most projects.
Brand New! Hearts & Stars & Flowers! Oh my! @ ILikeBigButtons.com August 10 2021

Brand New! Hearts & Stars & Flowers! Oh my!
Check out I Like Big Buttons! Key Fob Hardware with shaped split rings!!!
Fabric Cover Button Jumbo Paper Clips @ ILikeBigButtons.com July 13 2021
 I'm in
  with Jumbo Paper Clips and Cover Buttons.
Quick & easy craft with stunning results!

Upcycled Messenger Bag/Purse Tutorial @ ILikeBigButtons.com July 08 2021

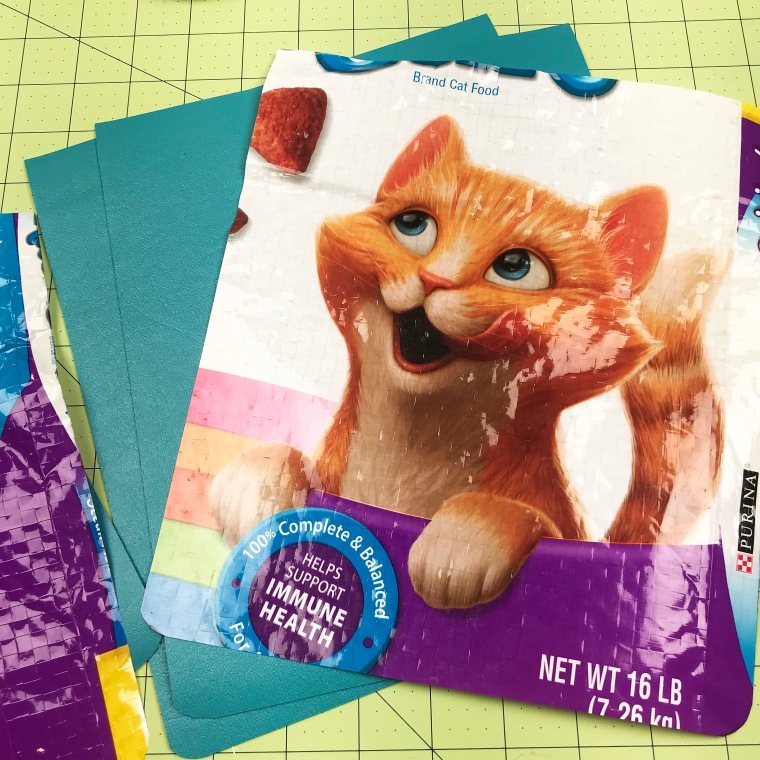
We are a cat-loving family here at I Like Big Buttons! As such, we have a few fluffy friends scurrying around. A while back, my husband picked up a few bags of cat food that were made of a more durable material than the paper bags ones and had cute kitty images on them. I couldn't resist turning them into some cute messenger bags for a couple of my little cat lovers. 🙂 🐈
How to make an Upcycled/Recycled Messenger Bag/Purse with KAM Snaps and Pet Food Bag
Supplies:
- Pet Food Bag of your choice (Look for the ones made of woven plastic)
- Marine Vinyl or a material of your choice
- 2 KAM Snap Sets (Depending on the thickness of the material you may want Long Prong)
- KAM Snap Pliers and Awl
- 1″ Cotton Webbing
- Scissors/Rotary Blade
- Standard Sewing Machine

1. Cut the bag along the seams. I plan on making 2 bags with it. For this project, I am focusing on making each bag with a kitty image front and center. Use a damp cloth to wipe the leftover cat food crumbs from the interior of the bags and let air dry. This doesn't take more than a few minutes.

2. Decide on your shape. I like to craft off the cuff. This lid of a storage container was just the right size and shape to showcase the kitty image. Trace around it with a marker.

3. I picked the height based on the image. I left a 1" above each kitty image. *If I did it again, I might do 2" or 3" instead. As you will see later, the flap of the bag covers some of the image. If I had dropped it another inch I think it would have looked slightly better when snapped closed.

4. Cut 2 pieces of Marine Vinyl or material of your choice the same size at the kitty images. I had some vinyl left over from a summer chair reupholstering product. I love it because the color goes nicely with the kitty image and it is durable.

5. Cut two flaps for the messenger bags. I cut them the same width as the bags and longer than I thought I would need so I could adjust on the fly.

6. Using a 1/2" seam sew the kitty image to the front piece of Marine Vinyl, right sides together. I chose to put the Marine Vinyl front to the front so that the interior of the bag was uniform, but you could turn the right side of the Marine Vinyl inward so that it was to the inside of the bag. Sewer's choice. :)

7. Fold the sewed seam flat and smooth. Then, fold it until the kitty image is right side out. Smooth the sewed seam and Marine Vinyl.


8. Sew 1/4" seam along the top of the finished edge.
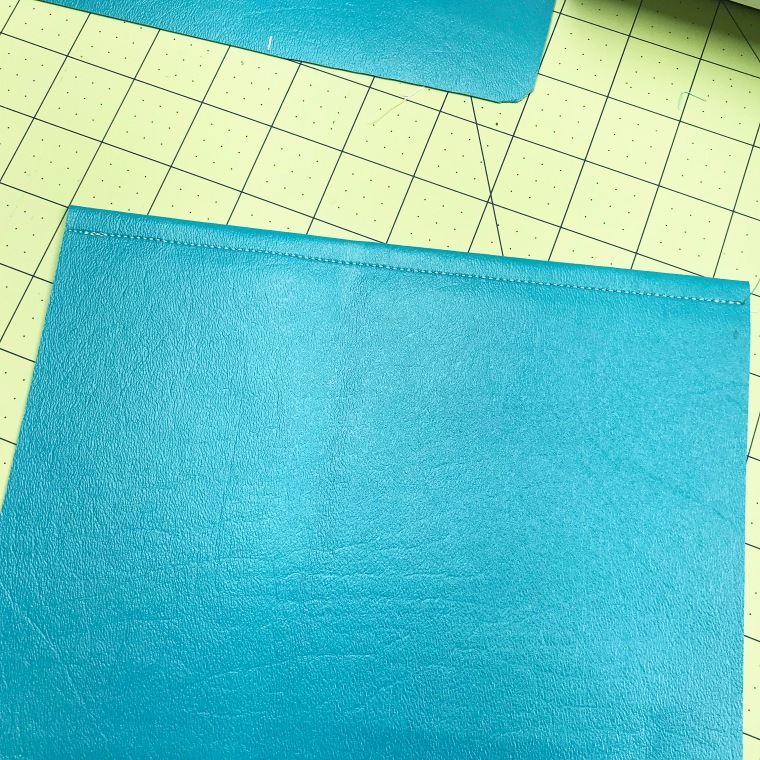
9. Fold the top edge of the back piece of the bag over a 1/2". Sew 1/4" seam along the edge, creating a finished edge.

10. For the top flap, I created a simple square with three finished edges. Marine Vinyl is durable and the raw edges hold up nicely. If using another material, you will have to give consideration to the material you are using and adjust accordingly. The messenger bag/purse will be about 8" wide when finished so I made the flaps slightly smaller at 7.75". *If I did it again, I might have shaved off a little bit more to give the shoulder strap more room to fill.

11. I, then, cut the height of the flap down to 3" because I wanted to see as much of the kitty image as I could after the KAM plastic snap was installed.


12. Align and use a zigzag stitch to attach the flap to the back piece of the purse. Make sure to center it.

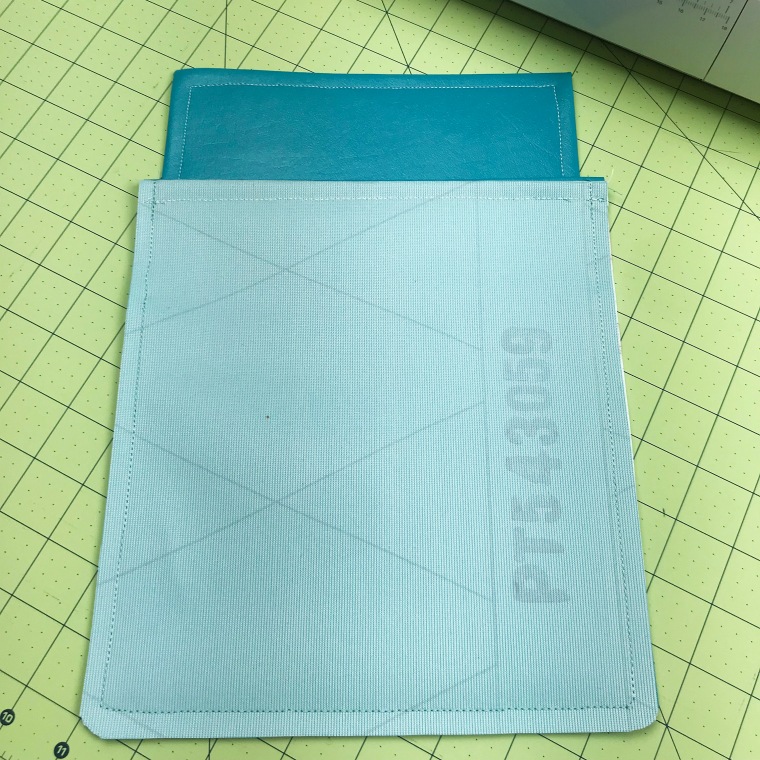
13. Put right sides together and sew the 2 sides and bottom of the purse with a 3/8" to 1/2" seam. Make sure to use a Stay Stitch the beginning and end of your sewing so that the stitches stay put.


14. Turn the bags right side out and square the corners as much as possible. I used the backside of a Sharpie marker to help square the corners. Remember I slightly rounded them so they won't be perfectly square. Smooth bags flat.

15. Measure the center of the flap and use a KAM awl to poke a hole for the KAM plastic snap that you will adding. I am only going through 1 layer of Marine Vinyl so a Standard Prong snap will work. If you are using thicker material or multiple layers, I would recommend our Long Prong KAM plastic snaps.

16. Install KAM plastic snap (Cap and Socket).

17. Repeat in front of the bag, where KAM plastic snap lines up. I poked the hole through both layers at once so that I had a point of reference. Then I widened the hole after double-checking the placement of the internal hole. Install KAM plastic snap (Cap and Stud).


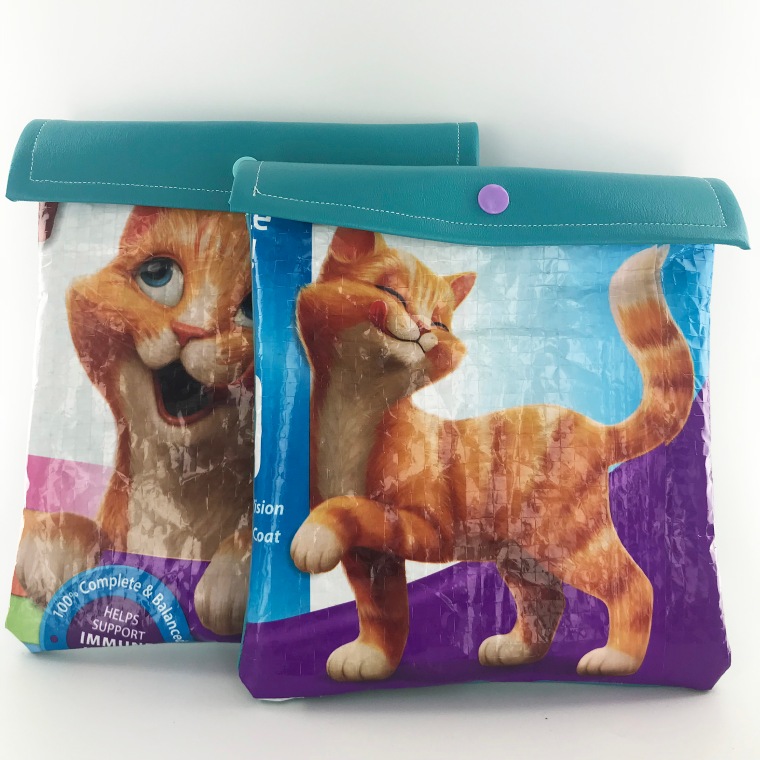
18. I think they turned out super cute! Now to add shoulder straps.

19. For the sake of time and my sanity, I simply attached the shoulder straps with a half of a KAM snap set (Cap and Socket). I used the snap like a rivet. I also used Long Prong KAM plastic snaps for this piece because I was working with the thickness of the Marine Vinyl and Cotton Webbing. *I doubled the edge of the Cotton Webbing over on itself and sewed a straight line back and forth across it a half dozen times so it doesn't unravel. With Polyester Webbing, you could melt the edge to secure it.


20. Tada!!! I think they turned out great, it took less than 2 hours to make both of them, and my little cat lovers are ecstatic. They have a new place to store their treasures.
😻 😻 😻
Button Enclosure Conversion to Sweatpants Pocket with KAM Plastic Snaps @ ILikeBigButtons.com July 02 2021

I love my slouchy sweatpants for getting work done around the house, but their comfortable pockets are useless when for holding onto my phone when I am active. KAM plastic snaps to the rescue! I turned my useless slouchy pocket into a secure button enclosed, phone holding pocket in just a few seconds with KAM plastic snaps.
Supplies:

I used some fun colored snaps from the KAM plastic snaps Grab Bag making bucket.

Easy peasy, I wore my phone around all day while I cleaned and worked. It was secure the whole time and with a quick unsnapping on hand when I needed it. KAM plastic snaps are the BEST!

Tada! I can now get my list of projects done without fearing my phone will take a tumble from my pocket while I am moving.
To see other great KAM Plastic Snap ideas, visit our DIY Project section here.
Thursday Humor @ ILikeBigButtons.com June 24 2021

This one really spoke to me. "You're welcome, dear children of mine!" 😂🤣😂
Our Pineapple Chiffon (G130) KAM Plastic Snap is the perfect pale yellow. If you are not into Pineapple Chiffon, we carry 9 other shades of yellow and 130+ unique colors of snaps.
Water Bottle Charm Markers @ ILikeBigButtons.com June 15 2021

Congratulations, Class of 2021!!! We had a graduate this year. We are still trying to wrap our mind around it, given that we just brought her home from the hospital not so long ago, but now we are celebrating her like she is a Rockstar!
We were able to throw her a celebration with our family and closest friends. To make the "Whose Water Bottle is Whose?" game more manageable, we raided our Pacifier Supplies inventory and used O-Ring Pacifier Adapters in all 14 colors to mark the water bottles, so they were unique.
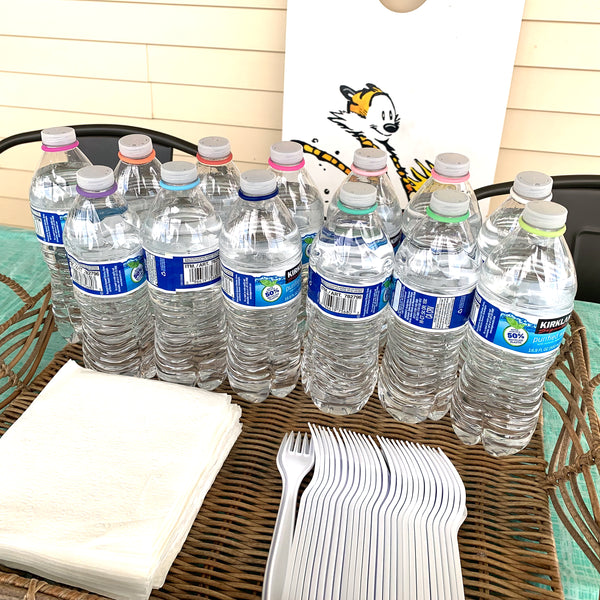
It is as simple as placing an O-Ring over the bottle cap. The O-Rings nestle snuggly just under the rim and can be slipped back off and washed for reuse.


To see this tutorial and other I Like Big Buttons! Crafty Ideas visit our Craft Inspiration Boards here.
Hands-free Water Bottle Holder @ ILikeBigButtons.com June 11 2021

My oldest is headed off on a class trip to Silverwood Theme Park. Rollercoaster rides, caramel apples, sunshine, and lots of laughter. A hands-free Water Bottle, so she can keep moving and not worry about keeping hydrated, is a must.
I made a couple of quick water bottle holders from ILikeBigButtons.com craft supplies.

Here is what you will need:
- MAM Rings
- KAM Plastic Snaps & Pliers
- A Piece of Ribbon

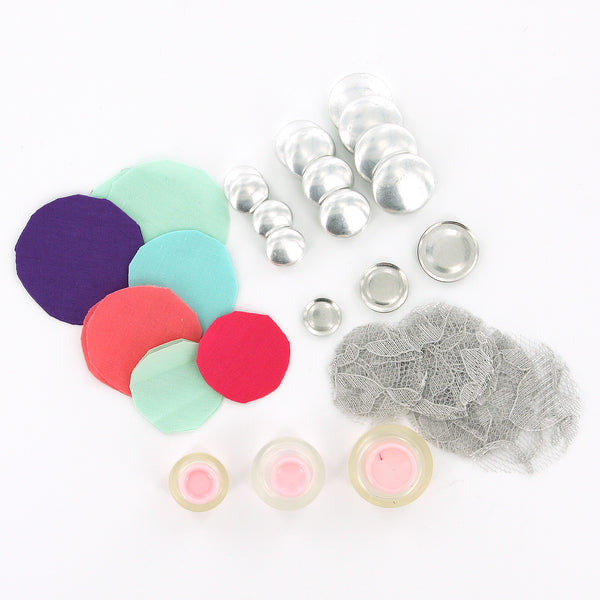
Making Lace & Fabric Cover Button Earrings @ ILikeBigButtons.com June 09 2021
Supplies:
- Flat Back Cover Buttons (I used Size 24, Size 30, and Size 36 Cover Buttons)
- Cover Button Assembly Tools
- Cover Button Templates
- Fabric Scraps
- Lace Scraps
- E6000 Adhesive or Hot Glue
- Sharpie Permanent Marker
- Surgical Stainless Steel Earring Posts and Backs


Instructions:
1. Cut your fabric scrap. You will want a circle that is about twice the diameter of your button blank or use one of our handy Plastic Cover Button Templates.

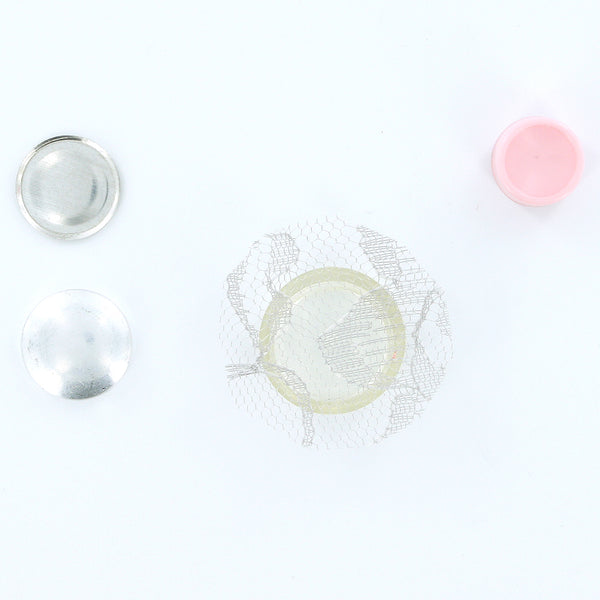

2. Put your lace piece in the larger assembly tool piece (RIGHT SIDE DOWN). Then, put your fabric piece in the larger assembly tool piece (RIGHT SIDE DOWN). When you look into the tool you want to see the back of the fabric.

3. Place the button front (the domed piece) on top of the fabric. Leave the fabric edges hanging out.

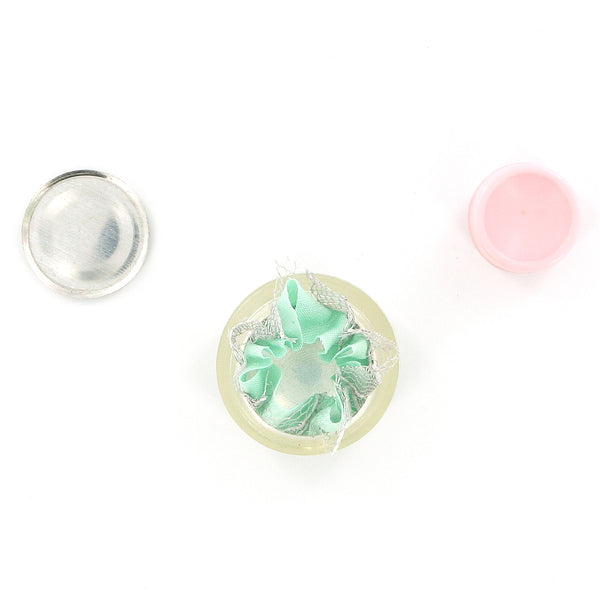

4. Press the Cover Button edges down into the tool.

5. Place the back cover button piece on top of your fabric and button front. If the cover button will be subject to repeated tugging from the back, you may want to add a little e6000 adhesive before attaching the back.

6. Take the smaller piece of the assembly tool and with the open side down place it on the button back.
7. Press down. You may hear a pop when the last bit of the button back slips into place. If you take the tool out and the button is not completely secured, just put it back in and press down again.

8. When you take the small assembly tool piece off, the fabric edges will be secured underneath the button back.


9. Remove the button from the larger assembly tool piece.

10. Tada! First step complete.


11. Lightly scuff the back of the Cover Button so the glue will adhere better (not essential but recommended).

12. Clean both surfaces of dust. I used rubbing alcohol and a cotton swab.

13. Apply E6000 to back of Cover Button or Earring Post.

14. Press Earring Post into place and remove any extra Adhesive. On smaller sized Cover Buttons center the post, as they increase in size adjust post towards top.

15. Let dry, add Earring Backing/Nut, and enjoy.

16. Tada! Lace and Fabric Cover Button Earrings are great a gifts or as products for your shop.

Wednesday Humor @ ILikeBigButtons.com May 26 2021

Today is a looking for my scissors kind of day! 
Our Light Blue (G88) KAM Plastic Snap is one of our most popular light teals. It works great for both girls and boys alike and is a great all-around color.  If you are not into Light Blue, we carry 22 other shades of blue and 130+ unique colors of snaps.
Thursday Humor @ ILikeBigButtons.com May 20 2021

Hello, Spring! 🥰
Our Wisteria (G129) KAM Plastic Snaps reminds me of Spring blooms and cotton candy.
If you are not into Wisteria, we carry 16 other shades of purple and 130+ unique colors of snaps.
How To Make A Needle Minder/Magnetic Pin Cushion @ ILikeBigButtons.com May 19 2021

I have been working on a lot of crafty projects recently and I needed a few new handy sewing accessories: Fabric Cover Button Needle Minder/Pin Cushion. I love the splash of color they add to my sewing station and their usefulness!
Supplies:
- 1 Completed Size 75 (1 7/8 inch / 48 mm) Fabric Cover Button
- Fabric Of Your Choice
- 1x Standard Round Magnet (Approximately 3/4" Round)
- E6000, Hot Glue, or comparable adhesive
I Like Big Buttons! - Picture Tutorial Below:

1. Cut your fabric scrap. You will want a circle that is about twice the diameter of your button blank. *TIP* Our All-In-One Cover Button Template makes creating the right size circle of fabric a breeze.
2. Put your fabric piece in the larger assembly tool piece (RIGHT SIDE DOWN). When you look into the tool you want to see the back of the fabric.

3. Glue the magnet inside the back of the Cover Button with Hot Glue or E6000.

4. Place the button front (the domed piece) on top of the fabric. Leave the fabric edges hanging out.
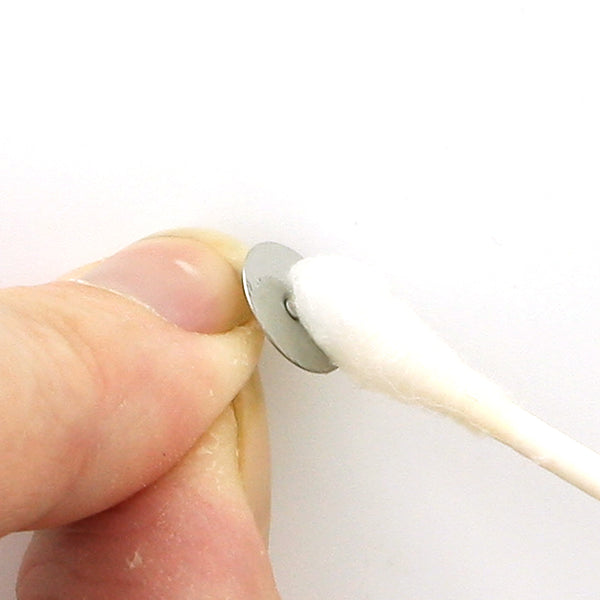
5. Press the cover button edges down into the tool. *TIP* To make it easier on my fingers, I use a sharpie marker to apply pressure.
6. Place the back cover button piece on top of your fabric and button front. *TIP* If the cover button will be subject to repeated tugging from the back, you may want to add a little e6000 adhesive before attaching the back.
7. Take the smaller piece of the assembly tool and with the open side down place it on the button back.
8. Press down. You may hear a pop when the last bit of the button back slips into place. If you take the tool out and the button is not completely secured, just put it back in and press down again. *TIP* I often use a flat piece of wood to apply pressure, again to save my fingers. It also helps to avoid the button back going in at an angle.

9. When you take the small assembly tool piece off, the fabric edges will be secured underneath the button back.
9. Remove the button from the larger assembly tool piece.
10. Tada! Now you have an attractive Pin Cushion/Needle Holder for your sewing room.

