News
Crafty Friday - Key Fob Wristlet and Key Chain @ ILikeBigButtons.com May 14 2021

😍 Made a WSU Key Fob Wristlet and Key Chain for a friend's daughter today using ILikeBigButtons.com supplies. I love how they turned out! 😍
ILikeBigButtons.com Supply List:
- Key Fob Hardware
- Pendant Bezels (Size 36 and Size 60)
- Cover Buttons (Size 36 and Size 60)
- Lobster Clasps

For more Crafty Inspiration, visit our Key Fob Hardware Inspiration Boards.
Making a Key Fob Lip Balm Holder @ ILikeBigButtons.com May 12 2021

Supplies:
- 15.5" x 2.25" of Cotton Fabric
- 15.5" x 2.25" piece of Fusible Interfacing
- 1.25" Key Fob Hardware with Split Rings
- Key Fob Pliers
- Sewing Clips
- Standard Sewing Machine
- Iron and Ironing Board
- Scissors
Instructions:
- Cut a 15.5" x 2.25" piece of Cotton Fabric and Fusible Interfacing. These measurements will work for a standard Lip Balm Tube and a standard Blistex Tube. You may need to adjust measures for your favorite lip product.
- Iron the Fusible Interfacing to the wrong side of your fabric.
- Fold right sides together width-wise and sew both long sides with a 1/4" seam. Do not sew short sides.
- Turn the tube right side out through the open side, iron flat, and sew the open short side closed with a zig-zag stitch.
- Fold zig-zag side back on itself 1 1/4". Sew straight stitch 1/2" from the top, and again at 5/8" from the top. This is what it will look like from the back.
- Here is how the front turned out. This will be the front of the pocket on the Lip Balm Holder.
- Fold the tab that will be the front of the pocket at 2 3/4". Make sure the zig-zag stitch is hidden. Use Sewing Clips to hold the front pocket in place while sewing. Stitch at 1/4" seam around the whole holder. And again at 1/8". Start and finish at the top edge so that your start and finish stitches will be hidden.
- Center the 1.25" Key Fob Hardware on the top edge of the Lip Balm Holder.
- Using Key Fob Hardware Pliers squeeze the Key Fob Hardware closed with gentle pressure. Sometimes, I go back and forth from left to right added a little bit of pressure to each side until it eases together. Our Key Fob Hardware Pliers make this easy to do. Make sure the teeth in the Key Fob Hardware are sunk securely into the fabric.
- Tada! These little Lip Balm Holders were easy to make and are great as a quick thoughtful gift for a loved one who hates chapped lips.
- Hang them on your keychain, the outside of your purse, or anywhere you need for quick access.
Monday Humor @ ILikeBigButtons.com May 10 2021

Hello, Monday! 
Our Candy Pink (G77) KAM Plastic Snap is beautiful deep pink and reminds me of all things girly and hot Spring days that make me wish for Summer to be here. If you are not into Candy Pink, we carry 9 other shades of red, 15 shades of pink, and 130+ unique colors of snaps.
Monday Humor @ ILikeBigButtons.com April 26 2021

Our Melon Orange (B17) KAM Plastic Snap is a fun spring Coral Orange.  If you are not into Melon Orange, we carry 13 other shades of orange and 130+ unique colors of snaps.
Jumbo Paper Clip Finishes April 14 2021

Our Jumbo Paper Clips come in three great finishes:
- Silver
- Antique Brass
- Gunmetal
Jumbo Paper Clips are 3 1/2" in length with 5/8" diameter glue pads.
Jumbo Paper clips are commonly used to make bookmarks:
- Attach size 36 (7/8" - 23 mm), size 45 (1 1/8" - 28 mm), or size 60 (1 1/2" - 38 mm) flat back cover buttons.
- Glue on flat beads, paper punches, charms, gemstones, cabochons, silk flowers, and much more!
- An adhesive such as E-6000 works great for attaching your crafty items.
Use your imagination, there are so many possibilities!


Courtesy of craftycjaeger Flower Embellished Jumbo Paper Clips

Monday Humor @ ILikeBigButtons.com April 12 2021

So Prepared! 
Our Butter (G76) KAM Plastic Snap is the perfect pastel yellow for everything Spring. If you are not into Butter, we carry 9 other shades of yellow and 130+ unique colors of snaps.
Jumbo Paper Clip Size Comparison April 08 2021

From Left to Right - Standard (1.25 Inch), Large (2 Inch), and Jumbo (3.5 Inch)
- Attach size 36 (7/8" - 23 mm), size 45 (1 1/8" - 28 mm), or size 60 (1 1/2" - 38 mm) flat back cover buttons.
- Glue on flat beads, paper punches, charms, gemstones, cabochons, silk flowers, and much more!
- An adhesive such as E-6000 works great for attaching your crafty items.
Courtesy of craftycjaeger Flower Embellished Jumbo Paper Clips
Wednesday Humor @ ILikeBigButtons.com April 07 2021

😍😍😍
Our Meadow Green (G105) KAM Plastic Snap reminds me of crisp but sunny days, new growth, and gardening.
If you are not into Meadow Green, we carry 16 other shades of green and 130+ unique colors of snaps.
Long Prong vs Standard Prong Customer Review @ ILikeBigButtons.com April 06 2021

LOVE these long prong KAM buttons. They work wonders with thicker fabric, such as double layer leather like fabric you often use in projects like “hand sanitizer bottle holders”, “key fogs “, and others .
Until I bought these I had managed to press the standard size 20 prong length Kam snaps in by carefully cutting a layer out (a small circle) using sharp manicure scissors -but it was far from ideal.
Now I simply use these size 20 LONGER prong buttons with leather like double layer fabrics, so much neater!!
DELIVERY was very fast & CUSTOMER support is excellent.
Highly recommend this product & this seller. Won’t hesitate to buy more here.
❤ this review! It is very detailed. Rejane even took the time to include a picture of the way she used to work around when using Standard Prong on thicker material versus how easy and clean it looks using Long Prong on her project. Thank you, Rejane, for the thoughtful review and share!
Shop Long Prong KAM Plastic Snaps @ ILikeBigButtons.com
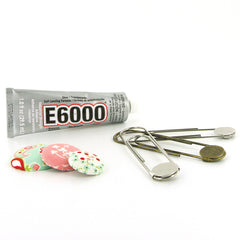
Making Cover Button Paper Clip Bookmarks @ ILikeBigButtons.com April 05 2021
 |
 |
 |
 |
How To Make Fabric Cover Button Jumbo Paper Clip Bookmarks:
Supplies:
- 1 Completed Flat Back Fabric Cover Button (Attach size 36 (7/8" - 23 mm), size 45 (1 1/8" - 28 mm), or size 60 (1 1/2" - 38 mm) flat back cover buttons.)
- 1 Jumbo Paper Clip
- E6000 or comparable adhesive
Instructions:
- Follow these instructions to make Flat Back Fabric Covered Buttons.
- Make sure the surfaces of the Cover Button back and Paper Clip gluepad are clean and free of oil.
- Apply E6000 to the back of the Cover Button.
- Press into place over the glue pad on the Paper clip at the desired height and remove any extra Adhesive. The bigger the Cover Button the higher you will want to center the cover button.
- Let dry and enjoy.
- Tada!
You are done! Use these adorable Paper Clips to hold your place in your favorite book or cookbook. Enjoy!
Monday Humor @ ILikeBigButtons.com March 29 2021

😂🤣😂
Our Seaspray (G85) KAM Plastic Snap is one of our most popular light teals. It works great for both girls and boys alike and is a great all-around color. 😍 If you are not into Seaspray, we carry 22 other shades of blue and 130+ unique colors of snaps.
KAM Plastic Snap Removal Pliers @ ILikeBigButtons.com March 24 2021

KAM Plastic Snap Removal Pliers may be my favorite tool. They make removing a broken or miss-set snap a breeze. (See video below for demonstration.)
Only $19.95 (Originally $29.95)
No Coupon Necessary (Good thru 3/31/21)
These pliers are the most effective and simplest way to remove a snap. They are gentle on the fabric. Only the hole from the removed prong remains. They also in many cases leave the socket or stud intact and reusable.
KAM Plastic Snap Removal Pliers:
- KAM Plastic Snap Removal Pliers
- Size 20 Socket Removal Die (works fine with Size 14, 16, and 19)
- Size 20 Stud Removal Die (works fine with Size 14, 16, and 19)
- Additional Rubber Head
- Screwdriver (for changing removal dies)
If you need to remove a plastic snap, this is by far the easiest means for removing it. If you would prefer to remove a snap with tools you may already have, we do have videos on how to do that here.
Tuesday Humor @ ILikeBigButtons.com March 23 2021

My happy place! 🥰
Our Lavender (G79) KAM Plastic Snaps reminds me of Easter eggs, cotton candy, and sweet hugs from my girls.
If you are not into Lavender, we carry 16 other shades of purple and 130+ unique colors of snaps.
Monday Humor @ ILikeBigButtons.com March 15 2021

🍀 St. Patrick's Day Emerald KAM Press Package Giveaway @ ILikeBigButtons.com 🍀 ($110 Value)
--> ENDS Wednesday, March 17th!
⬇️ Enter with Rafflecopter (Giveaway Rules in Rafflecopter) ⬇️:
http://www.rafflecopter.com/rafl/display/b4eb68a057/?
Our Kelly Green (B51) KAM Plastic Snap reminds me of beautiful green grass and St. Patrick's Day.
If you are not into Kelly Green, we carry 16 other shades of green and 130+ unique colors of snaps.
Wednesday Humor @ ILikeBigButtons.com March 03 2021

✂️🧵 I need some therapeutic craft time, for sure! ✂️🧵
Our Medium Pink (B57) KAM Plastic Snap is a great classic pink and reminds me of cotton candy, which is my all-time favorite fair food. Can I call cotton candy food? 😜
If you are not into Medium Pink, we carry 18 other shades of pink and 130+ unique colors of snaps.
Making a Fabric Cover Button Metal Pacifier Clip @ ILikeBigButtons.com February 26 2021
 |
 |
 |
 |
 |
 |
 |
 |
 |
 |
 |
 |
 |
 |
 |
 |
 |
 |
 |
 |
 |
 |
 |
 |
 |
||
Supplies:
- 2 KAM Snap Sets
- KAM Snap Pliers and Awl
- Round Faced Metal Clips or Enamel Pacifier Clips
- 1 Size 36 Flat Back Cover Button
- Size 36 Assembly Tool
- Size 36 Template
- Fabric Scraps
- E6000 Adhesive
- Pre-made Pacifier Clips (see Pacifier Clip and Supply Tutorials)
Instructions:
- Using our Pacifier Clip and Supply Tutorials make either Ribbon or Fabric Pacifier Clips.
- Cut your fabric scrap. You will want a circle that is about twice the diameter of your button blank. I cut out a Piece of Fabric using my Size 36 Template.
- Put your fabric piece in the larger assembly tool piece (RIGHT SIDE DOWN). When you look into the tool you want to see the back of the fabric.
- Place the button front (the domed piece) on top of the fabric. Leave the fabric edges hanging out. Double check the transparent underside to see if your print is how you would like it. Then press the cover button fabric edges down into the tool.
- Add a dab of E6000 Adhesive to the middle of the cover button cap before installing the Flat Back.
- Place the back cover button piece on top of your fabric and button front.
- Take the smaller piece of the assembly tool and with the open side down place it on the button back.
- Press down. You may hear a pop when the last bit of the button back slips into place. If you take the tool out and the button is not completely secured, just put it back in and press down again.
- When you take the small assembly tool piece off, the fabric edges will be secured underneath the button back.
- Remove the button from the larger assembly tool piece. Tada! My Cover Button is ready to be adhered to a Round Faced Metal Clip.
- Here are the Cover Buttons I made in just a few minutes. Seriously easy, fun and so cute!
- Now take the E6000 Adhesive and put a medium size dab of glue on the back of the cover button about 1/2 of what would fill the back area of the back. This glue is great to work with so don't overly worry about getting the amount right. I was able to cleanly wipe of any excess off when I put on too much and I was also able to remove the button and add a little more when I under did it. This glue is very forgiving.
- Now place the Cover Button over the Round Faced Metal Pacifier Clips and straighten and center your button.
- Press firmly and let set to dry and cure 24-72 hours as recommended by the manufacturer (E6000).
- These are my finished products. I love them and think they turned out beautifully. Below are my examples, completed and installed on Pacifier Clips.
-
Tada!!!
Disclaimer: Keep in mind that although I have rough tested these I in no way recommend you leave your baby alone with these as there are small pieces and if not done properly they may come apart and become a choking hazard. I would recommend these clips under adult supervision only. The maker and/or parent assumes full responsibility when using these pacifier clips.
Making A Fabric Cover Button Full-Size Clothespin @ ILikeBigButtons.com February 23 2021
 |
 |
 |
 |
 |
 |
 |
 |
 |
How to Make Cover Button Bobby Full-Size Clothespins:
Supplies:
- 1 Completed Flat Back Fabric Cover Button (Attach Size 30 (3/4 inch / 19 mm), Size 36 (7/8 inch / 23 mm), or Size 45 (1 1/8 inch / 28 mm) flat back cover buttons.)
- 1x Full-Size Wooden Clothespin
- 1x Medium Plain Button
- E6000, Hot Glue, or comparable adhesive
Instructions:
- Cut your fabric scrap. You will want a circle that is about twice the diameter of your button blank.
- Put your fabric piece in the larger assembly tool piece (RIGHT SIDE DOWN). When you look into the tool you want to see the back of the fabric.
- Place the button front (the domed piece) on top of the fabric. Leave the fabric edges hanging out.
- Press the cover button edges down into the tool. *TIP* To make it easier on my fingers, I use a sharpie marker to apply pressure.
- Place the back cover button piece on top of your fabric and button front. *TIP* If the cover button will be subject to repeated tugging from the back, you may want to add a little e6000 adhesive before attaching the back.
- Take the smaller piece of the assembly tool and with the open side down place it on the button back.
- Press down. You may hear a pop when the last bit of the button back slips into place. If you take the tool out and the button is not completely secured, just put it back in and press down again. *TIP* I often use a flat piece of wood to apply pressure, again to save my fingers. It also helps to avoid the button back going in at an angle.
- When you take the small assembly tool piece off, the fabric edges will be secured underneath the button back.
- Remove the button from the larger assembly tool piece.
- Tada! Now to attach it to the Clothespin.
- Use Hot Glue or E6000 to adhere a small plain button to the underside of the Cover Button. This is to fill the space between the back and the edges. You can also use felt or some other small object. You just need it to be sturdy enough to offer support. A small plastic button works great for this. You will see that the button is now flush across the bottom. I cut off the little nubs of glue that leaked through the button holes.
- Now adhere the finished Cover Button to the Clothespin. Press into place and center it until you are pleased with the alignment. Set aside to dry.
- Tada! Additional uses:
- Add a thin magnet to the back and use on your magnetic board.
- Add a push pin to the back and use on your cork board.
How To Make A Fabric Cover Button Mini Clothespin
To see other great Fabric Cover Button ideas, visit our DIY Project section here.
Making Fabric Cover Button Bobby Pins @ ILikeBigButtons.com February 19 2021
 |
 |
 |
 |
How to Make Cover Button Bobby Pins:
Supplies:
- 1 Completed Flat Back Fabric Cover Button (Choose your size, Size 20 through Size 45 all work great, size depends on the statement you want to make)
- 1 Bobby Pin
- E6000 or comparable adhesive
Steps:
- Follow these instructions to make Flat Back Fabric Covered Buttons.
- Apply E6000 to back of Cover Button.
- Press Bobby Pin into place and remove any extra Adhesive. On smaller sized Cover buttons center the glue pad, as they increase in size adjust accordingly.
- Let dry and enjoy.
- Tada!
You are done! Wear these adorable Bobby Pins to match or accent your favorite outfit or dress up your favorite t-shirt and jeans for an afternoon outing. Enjoy!
Thursday Humor @ ILikeBigButtons.com February 18 2021

Making Fabric Cover Button Earrings @ ILikeBigButtons.com February 16 2021
 |
 |
|
 |
 |
|
 |
 |
|
How to Make Cover Button Earrings:
Supplies:
- 2 Completed Flat Back Fabric Cover Button (Choose your size, Size 20 through Size 60 all work great, size depends on the statement you want to make)
- 1 set of Earring Post & Backs
- E6000 or comparable adhesive
Steps:
- Follow these instructions to make Flat Back Fabric Covered Buttons.
- Apply E6000 to the back of the Cover Button.
- Press Earring Post into place and remove any extra Adhesive. On smaller sized Cover buttons center the post, as they increase in size adjust the post towards the top.
- Let dry, add Earring Backing/Nut, and enjoy.
- Tada!
You are done! Wear these adorable Earrings to match or accent your favorite outfit or dress up your favorite t-shirt and jeans for an afternoon outing. Enjoy!
Valentine's Day Fabric Cover Button Barrettes @ ILikeBigButtons.com February 11 2021
 |
 |
 |
 |
 |
How to Make Valentine's Day Cover Button Snap Barrettes:
Supplies:
- 1-2 Completed Flat Back Fabric Cover Button (Choose your size, Size 20 through Size 36 all work great, size depends on the statement you want to make)
- 2 Snap Barrettes
- E6000 or comparable adhesive
Steps:
- Follow these instructions to make Flat Back Fabric Covered Buttons.
- Lightly scuff the back of the Cover Button so the glue will adhere better (not essential but recommended).
- Clean both surfaces of dust.
- Apply E6000 to back of Cover Button.
- Press Snap Barrette into place and remove any extra Adhesive. On smaller sized Cover buttons center on the glue pad, as they increase in size adjust glue pad accordingly.
- Let dry and enjoy.
- Tada!
You are done! Wear these adorable Snap Barrettes to match or accent your favorite outfit for Valentine's Day or dress up your favorite t-shirt and jeans for an afternoon outing. Enjoy!
Valentine's Cover Button Jumbo Paper Clip Bookmarks @ ILikeBigButtons.com February 10 2021
 |
 |
 |
 |
 |
 |
 |
|
Valentine's Day Fabric Cover Button Jumbo Paper Clip Bookmarks:
Supplies:
- 1 Completed Flat Back Fabric Cover Button (Attach size 36 (7/8" - 23 mm), size 45 (1 1/8" - 28 mm), or size 60 (1 1/2" - 38 mm) flat back cover buttons.)
- 1 Jumbo Paper Clip
- 1 6" Piece of Ribbon
- E6000 or comparable adhesive
Steps:
- Follow these instructions to make Flat Back Fabric Covered Buttons.
- Make sure the surfaces of the Cover Button back and Paper Clip gluepad are clean and free of oil.
- Apply E6000 to the back of the Cover Button.
- Press into place over the glue pad on the Paper clip at the desired height and remove any extra Adhesive. The bigger the Cover Button the higher you will want to center the cover button.
- Cut a 6" piece of Ribbon and knot it on the side of the Paper Clip. Slide it up against the Cover Button. Straighten and cut ends at an angle at the desired length.
- Let dry and enjoy.
- Tada!
You are done! Use these adorable Paper Clips to accent a Valentine for your special loved one or hold your place in your favorite book or cookbook. Enjoy!
Making Magnetic Pin Cushion/Needle Holder @ ILikeBigButtons.com February 08 2021

Supplies:
- 1 Completed Size 75 (1 7/8 inch / 48 mm) Fabric Cover Button
- Fabric Of Your Choice
- 1x Standard Round Magnet (Approximately 3/4" Round)
- E6000, Hot Glue, or comparable adhesive
I Like Big Buttons! - Picture Tutorial Below:

1. Cut your fabric scrap. You will want a circle that is about twice the diameter of your button blank. *TIP* Our All-In-One Cover Button Template makes creating the right size circle of fabric a breeze.

2. Put your fabric piece in the larger assembly tool piece (RIGHT SIDE DOWN). When you look into the tool you want to see the back of the fabric.

3. Glue the magnet inside the back of the Cover Button with Hot Glue or E6000.

4. Place the button front (the domed piece) on top of the fabric. Leave the fabric edges hanging out.

5. Press the cover button edges down into the tool. *TIP* To make it easier on my fingers, I use a sharpie marker to apply pressure.

6. Place the back cover button piece on top of your fabric and button front. *TIP* If the cover button will be subject to repeated tugging from the back, you may want to add a little e6000 adhesive before attaching the back.
7. Take the smaller piece of the assembly tool and with the open side down place it on the button back.
8. Press down. You may hear a pop when the last bit of the button back slips into place. If you take the tool out and the button is not completely secured, just put it back in and press down again. *TIP* I often use a flat piece of wood to apply pressure, again to save my fingers. It also helps to avoid the button back going in at an angle.
9. When you take the small assembly tool piece off, the fabric edges will be secured underneath the button back.

9. Remove the button from the larger assembly tool piece.
10. Tada! Now you have an attractive Pin Cushion/Needle Holder for your sewing room.
To see other great Fabric Cover Button ideas, visit our DIY Project section here.
Thursday Humor @ ILikeBigButtons.com February 04 2021

Our Lemon Drop (G110) KAM Plastic Snap reminds me
If you are not into Lemon Drop, we carry 9 other shades of yellow and 130+ unique colors of snaps.
How to Make Fabric Cover Buttons @ ILikeBigButtons.com February 02 2021
 |
 |
 |
 |
 |
 |
 |
 |
 |
 |
 |
 |
 |
 |
 |
How to Make Fabric Cover Buttons:
Cover Buttons are easy to assemble:
- Cut your fabric scrap. You will want a circle that is about twice the diameter of your button blank.
- Put your fabric piece in the larger assembly tool piece (RIGHT SIDE DOWN). When you look into the tool you want to see the back of the fabric.
- Place the button front (the domed piece) on top of the fabric. Leave the fabric edges hanging out.
- Press the cover button edges down into the tool.
- Place the back cover button piece on top of your fabric and button front. If the cover button will be subject to repeated tugging from the back, you may want to add a little e6000 adhesive before attaching the back.
- Take the smaller piece of the assembly tool and with the open side down place it on the button back.
- Press down. You may hear a pop when the last bit of the button back slips into place. If you take the tool out and the button is not completely secured, just put it back in and press down again.
- When you take the small assembly tool piece off, the fabric edges will be secured underneath the button back.
- Remove the button from the larger assembly tool piece.
- Tada!
To see other great Fabric Cover Button ideas, visit our DIY Project section here.
Free Stay Dry Drooler Bib Pattern January 27 2021

Robin H. shared this free pattern/tutorial a while back. It is still a great one, especially for those drooly babies in your life.
"I got a starter set of Kam Snaps and Hand and Pliers to use for the bib closure. This not only solved my velcro nightmares, it also made the bibs more difficult for my little guy to pull off."
See other great KAM Plastic Snap Tutorial and Ideas on our website.
Shop KAM Plastic Snaps @ ILikeBigButtons.com

Monday Humor @ ILikeBigButtons.com January 25 2021

Welcome to crazy Monday!!! 🤪🙃😉
If you are not into Apple Green, we carry 16 other shades of green and 130+ unique colors of snaps.
Monday Humor @ ILikeBigButtons.com January 18 2021

Yes!!! ![]()
K1 KAM Plastic Snap Pliers Versus K2 ILBB Plastic Snap Pliers January 08 2021
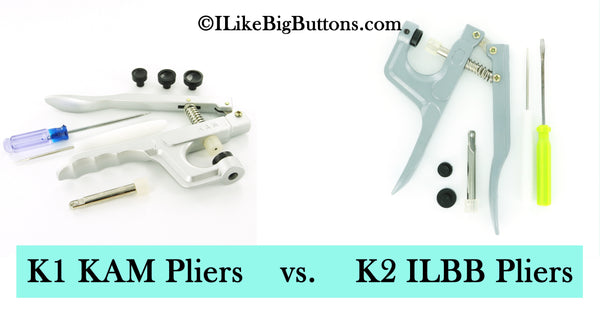
We get a lot of questions about the difference between K1 and K2 plastic snap pliers. Both K1 and K2 pliers work great for applying plastic snaps. They are lightweight, portable, and easy to use.
The K1 pliers are KAM® branded pliers, the same quality brand as the snaps we carry. They come with four (4) dies:
The K2 pliers are manufactured for our I Like Big Buttons!® brand. They are a more economical option for those who aren't looking to do all that many snaps. They come with three (3) dies:
K1 are sturdier and have more robust dies than K2. If you are just doing a few snaps, the K2 is not a bad choice, and some people like them better for Size 16 snaps. The K1 pliers do a nicer job on Size 20 snaps and work great on Size 16.

K1 pliers form the snaps creating a small rounded dome in the socket and stud center. K2 pliers form more of a flat pancake with a bullseye impression that some like for Size 16 snaps, as it can make them snap together a little easier.
If grip strength is an issue, K2 pliers require less force to sufficiently set snaps.
In general, we recommend K1 over K2, but both work great.
The Anatomy Of A KAM Plastic Snap @ ILikeBigButtons.com January 07 2021

KAM plastic snaps are wonderful. They are a SNAP to install and much easier and durable than a standard metal snap or sewable button. They come in a multitude of colors and sizes. Which one is right for you?
Here is a simple tutorial on the anatomy of a plastic snap set. There are 4 parts to a set:
- 2 Caps (Before installation they resemble a tack with a Round, Heart, or Star shaped head. They give a neat finished look to your snap.)
- 1 Socket (The female part with the larger raised circle that the stud (male part) fits into)
- 1 Stud (The male part with the smaller raised circle that fits inside the socket (female part))
SIZE 20:

- Size 20 (0.5" - 12.4 mm) snaps can be used for most general projects like baby diapers and clothing. They are our most popular plastic snap size, have the largest color variety, and have a good strong hold. We carry them in all 130 colors and clear.
- Standard Size 20 snaps have a 5.6mm prong length. Prong length refers to the length of the shaft on the backside of the Cap. When formed, the prong will compress and form a 'mushroom' shape to hold the Cap and Socket or Stud together.
- We also offer Long Prong Size 20 (0.5" - 12.4 mm) in a rainbow of colors. They are great for embroidered key fobs using Marine or Glitter Vinyl as well as other projects where you need just a little more prong length. Long Prong Size 20 snaps have a 6.2mm prong length.
SIZE 16:

- Size 16 (0.4" - 10.2 mm) snaps are most commonly used for baby and toddler clothing, pacifier clips, mama pads, and small crafts. We carry them in our first 60 ("B") colors and clear.
- Size 16 snaps have a 4.2mm prong length. Prong length refers to the length of the shaft on the backside of the Cap. When formed, the prong will compress and form a 'mushroom' shape to hold the Cap and Socket or Stud together.
- The Size 16 Socket and Stud are less noticeably different. Many first time users don't immediately see the distinction. The Socket's raised circle is the larger of the two pictured, and the Stud's raised circle is smaller and inserts into the Socket (female) side.
SIZE 14:

- Our Size 14 (0.35" - 9.7 mm) snaps can be used in most applications where Size 16 snaps are used. We carry them in White and Black at this time.
- Our Size 14 snaps have a 5.0mm prong length. Prong length refers to the length of the shaft on the backside of the Cap. When formed, the prong will compress and form a 'mushroom' shape to hold the Cap and Socket or Stud together.
- As with the Size 16, the Size 14 Socket and Stud are less noticeably different. The Socket's circle is the larger of the two pictured. The Stud's circle is smaller and inserts into the Socket (female) side. Size 16 and Size 14 Sockets and Studs are the same; only the cap differs.
SIZE 19:

- Size 19 (0.475" - 12 mm) snaps are used for heavy-duty applications requiring a strong grip. They are often used with tote bags, coats, tarps, and upholstery. We carry them in White and Black at this time.
- Size 19 snaps have a 6.9mm prong length. Prong length refers to the length of the shaft on the backside of the Cap. When formed, the prong will compress and form a 'mushroom' shape to hold the Cap and Socket or Stud together.
- The Size 19 Socket and Studs are larger, but similar in appearance to Size 20 Sockets and Studs.
SIZE 22:

- Size 22 (0.55" - 14.1 mm) snaps are used for heavy-duty applications requiring a strong grip. They are often used with tote bags, coats, tarps, and upholstery. We carry them in White and Black at this time.
- Size 22 snaps have a 6.9mm prong length. Prong length refers to the length of the shaft on the backside of the Cap. When formed, the prong will compress and form a 'mushroom' shape to hold the Cap and Socket or Stud together.
- The Size 22 Socket and Studs are larger, but similar in appearance to Size 20 Sockets and Studs.
Wednesday Humor @ ILikeBigButtons.com January 06 2021

Just for today! 😜
Our Dazzle (G95) KAM Plastic Snaps reminds me of grape popsicles, mermaids 🧜♀️, and childhood imagination.
If you are not into Dazzle, we carry 16 other shades of purple and 130+ unique colors of snaps.
Christmas Gift Idea: Lace & Fabric Cover Button Earrings December 08 2020


Supplies:
- Flat Back Cover Buttons (I used Size 24, Size 30, and Size 36 Cover Buttons)
- Cover Button Assembly Tools
- Cover Button Templates
- Fabric Scraps
- Lace Scraps
- E6000 Adhesive or Hot Glue
- Sharpie Permanent Marker
- Stainless Steel Earring Posts and Backs
Instructions:
- Cut your fabric scrap. You will want a circle that is about twice the diameter of your button blank or use one of our handy Plastic Cover Button Templates.
- Put your lace piece in the larger assembly tool piece (RIGHT SIDE DOWN). Then, put your fabric piece in the larger assembly tool piece (RIGHT SIDE DOWN). When you look into the tool you want to see the back of the fabric.
- Place the button front (the domed piece) on top of the fabric. Leave the fabric edges hanging out.
- Press the Cover Button edges down into the tool.
- Place the back cover button piece on top of your fabric and button front. If the cover button will be subject to repeated tugging from the back, you may want to add a little e6000 adhesive before attaching the back.
- Take the smaller piece of the assembly tool and with the open side down place it on the button back.
- Press down. You may hear a pop when the last bit of the button back slips into place. If you take the tool out and the button is not completely secured, just put it back in and press down again.
- When you take the small assembly tool piece off, the fabric edges will be secured underneath the button back.
- Remove the button from the larger assembly tool piece.
- Tada! First step complete.
- Lightly scuff the back of the Cover Button so the glue will adhere better (not essential but recommended).
- Clean both surfaces of dust. I used rubbing alcohol and a cotton swab.
- Apply e6000 to back of Cover Button or Earring Post.
- Press Earring Post into place and remove any extra Adhesive. On smaller sized Cover Buttons center the post, as they increase in size adjust post towards top.
- Let dry, add Earring Backing/Nut and enjoy.
- Tada! You could also make the Cover Button Clip Ons Earrings and these are great a gifts or as products for your shop.
Tuesday Humor @ ILikeBigButtons.com November 10 2020

Especially this time of year!!! 😊😜😁
Our Violet (B41) KAM Plastic Snap is one of our most popular colors and a favorite of mine. If you are not into Violet, we carry 16 other shades of purple and 130+ unique colors of snaps.
Monday Humor @ ILikeBigButtons.com November 02 2020

Sigh! Hello, Monday. 🙃😜
If you are not into Copper, we carry 6 metallic KAM Plastic Snap shades and 130+ unique colors of snaps.
Fabric Key Fob Hardware Wristlets by ILikeBigButtons.com October 27 2020


Supplies:
- 11" x 5" Fabric of your Choosing
- 11″ x 2.5" Piece of Fusible Fleece or 10" x 5" Fusible Interfacing
- 1 Key Fob Hardware and Split Ring
- Key Fob Hardware Pliers
- Sewing Clips
- Standard Sewing Machine
- Fray Check
Instructions:
- Cut a 11" x 5" section of Fabric of your choosing and 11" x 2.5" Fusible Fleece.
- Iron Fusible Fleece to the center of the fabric. Fold and iron the Fabric in half with the wrong sides together.
- Unfold and iron the Fabric in half again long sides to the center.
- It will look like this when you get done.
- Use your Sewing Clips to pin the Wristlet flat.
- Stitch along the edge of your Fabric strip, I stitched 1/4" in. Remove the Sewing Clips as you go. Work slowly, keeping close to the edge and as straight of a line as possible.
- Repeat 1/4" stitching along the opposing edge.
- Fold the Fabric Wristlet Strip in half, right sides facing out and match up the ends.
- Stitch the ends together with a zig zag stitch. I went back and forth a few times to ensure it held.
- Trim any loose threads. Use Fray Check to seal the end of the exposed Fabric edge.
- Tuck the sewn seam ends into the Key Fob Hardware, making sure that the Fabric Wristlet is centered.
- Using Key Fob Hardware Pliers squeeze the Key Fob Hardware closed with gentle pressure. Sometimes, I go back and forth from left to right added a little bit of pressure to each side until it eases together. Our Key Fob Hardware Pliers make this easy to do.
- Note the adjustable screw set to the distance I want the pliers to go to.
- Add the Split Ring and Yay!!!
- I love them and now I have a few sets to share!!!
🌺 Cabochon Push Pin Kits and Cover Button Push Pin Kits 🌺 @ ILikeBigButtons.com September 01 2020

DIY Cherry Blossom Cabochons Push Pins/Thumb Tacks KIT (22 mm) - Makes 10

DIY Size 30 (3/4" (19 mm) Covered Button Push Pins/Thumb Tacks KIT - Makes 10
If you are looking for a super easy, fun, and impactful craft project, these decorative push pins are for you and just in time for the beginning of school.
Using our Cabochon DIY Push Pin Kit or Cover Button DIY Push Pin Kit, you can make these message or corkboard accessories that are super cute and well-received without much effort.
Place a small dab of E-6000 or a comparable adhesive on the metal circle glue pad on the push pins. Then simply press the flower cabochon or completed cover button into place and center it. Allow to dry for the recommended amount of time per adhesive's directions and enjoy!
The hardest part is waiting for the glue to dry. 😜