News
Making Fabric Cover Button Bobby Pins @ ILikeBigButtons.com February 19 2021
 |
 |
 |
 |
How to Make Cover Button Bobby Pins:
Supplies:
- 1 Completed Flat Back Fabric Cover Button (Choose your size, Size 20 through Size 45 all work great, size depends on the statement you want to make)
- 1 Bobby Pin
- E6000 or comparable adhesive
Steps:
- Follow these instructions to make Flat Back Fabric Covered Buttons.
- Apply E6000 to back of Cover Button.
- Press Bobby Pin into place and remove any extra Adhesive. On smaller sized Cover buttons center the glue pad, as they increase in size adjust accordingly.
- Let dry and enjoy.
- Tada!
You are done! Wear these adorable Bobby Pins to match or accent your favorite outfit or dress up your favorite t-shirt and jeans for an afternoon outing. Enjoy!
Valentine's Day Fabric Cover Button Barrettes @ ILikeBigButtons.com February 11 2021
 |
 |
 |
 |
 |
How to Make Valentine's Day Cover Button Snap Barrettes:
Supplies:
- 1-2 Completed Flat Back Fabric Cover Button (Choose your size, Size 20 through Size 36 all work great, size depends on the statement you want to make)
- 2 Snap Barrettes
- E6000 or comparable adhesive
Steps:
- Follow these instructions to make Flat Back Fabric Covered Buttons.
- Lightly scuff the back of the Cover Button so the glue will adhere better (not essential but recommended).
- Clean both surfaces of dust.
- Apply E6000 to back of Cover Button.
- Press Snap Barrette into place and remove any extra Adhesive. On smaller sized Cover buttons center on the glue pad, as they increase in size adjust glue pad accordingly.
- Let dry and enjoy.
- Tada!
You are done! Wear these adorable Snap Barrettes to match or accent your favorite outfit for Valentine's Day or dress up your favorite t-shirt and jeans for an afternoon outing. Enjoy!
Valentine's Cover Button Jumbo Paper Clip Bookmarks @ ILikeBigButtons.com February 10 2021
 |
 |
 |
 |
 |
 |
 |
|
Valentine's Day Fabric Cover Button Jumbo Paper Clip Bookmarks:
Supplies:
- 1 Completed Flat Back Fabric Cover Button (Attach size 36 (7/8" - 23 mm), size 45 (1 1/8" - 28 mm), or size 60 (1 1/2" - 38 mm) flat back cover buttons.)
- 1 Jumbo Paper Clip
- 1 6" Piece of Ribbon
- E6000 or comparable adhesive
Steps:
- Follow these instructions to make Flat Back Fabric Covered Buttons.
- Make sure the surfaces of the Cover Button back and Paper Clip gluepad are clean and free of oil.
- Apply E6000 to the back of the Cover Button.
- Press into place over the glue pad on the Paper clip at the desired height and remove any extra Adhesive. The bigger the Cover Button the higher you will want to center the cover button.
- Cut a 6" piece of Ribbon and knot it on the side of the Paper Clip. Slide it up against the Cover Button. Straighten and cut ends at an angle at the desired length.
- Let dry and enjoy.
- Tada!
You are done! Use these adorable Paper Clips to accent a Valentine for your special loved one or hold your place in your favorite book or cookbook. Enjoy!
Making Magnetic Pin Cushion/Needle Holder @ ILikeBigButtons.com February 08 2021

Supplies:
- 1 Completed Size 75 (1 7/8 inch / 48 mm) Fabric Cover Button
- Fabric Of Your Choice
- 1x Standard Round Magnet (Approximately 3/4" Round)
- E6000, Hot Glue, or comparable adhesive
I Like Big Buttons! - Picture Tutorial Below:

1. Cut your fabric scrap. You will want a circle that is about twice the diameter of your button blank. *TIP* Our All-In-One Cover Button Template makes creating the right size circle of fabric a breeze.

2. Put your fabric piece in the larger assembly tool piece (RIGHT SIDE DOWN). When you look into the tool you want to see the back of the fabric.

3. Glue the magnet inside the back of the Cover Button with Hot Glue or E6000.

4. Place the button front (the domed piece) on top of the fabric. Leave the fabric edges hanging out.

5. Press the cover button edges down into the tool. *TIP* To make it easier on my fingers, I use a sharpie marker to apply pressure.

6. Place the back cover button piece on top of your fabric and button front. *TIP* If the cover button will be subject to repeated tugging from the back, you may want to add a little e6000 adhesive before attaching the back.
7. Take the smaller piece of the assembly tool and with the open side down place it on the button back.
8. Press down. You may hear a pop when the last bit of the button back slips into place. If you take the tool out and the button is not completely secured, just put it back in and press down again. *TIP* I often use a flat piece of wood to apply pressure, again to save my fingers. It also helps to avoid the button back going in at an angle.
9. When you take the small assembly tool piece off, the fabric edges will be secured underneath the button back.

9. Remove the button from the larger assembly tool piece.
10. Tada! Now you have an attractive Pin Cushion/Needle Holder for your sewing room.
To see other great Fabric Cover Button ideas, visit our DIY Project section here.
How to Make Fabric Cover Buttons @ ILikeBigButtons.com February 02 2021
 |
 |
 |
 |
 |
 |
 |
 |
 |
 |
 |
 |
 |
 |
 |
How to Make Fabric Cover Buttons:
Cover Buttons are easy to assemble:
- Cut your fabric scrap. You will want a circle that is about twice the diameter of your button blank.
- Put your fabric piece in the larger assembly tool piece (RIGHT SIDE DOWN). When you look into the tool you want to see the back of the fabric.
- Place the button front (the domed piece) on top of the fabric. Leave the fabric edges hanging out.
- Press the cover button edges down into the tool.
- Place the back cover button piece on top of your fabric and button front. If the cover button will be subject to repeated tugging from the back, you may want to add a little e6000 adhesive before attaching the back.
- Take the smaller piece of the assembly tool and with the open side down place it on the button back.
- Press down. You may hear a pop when the last bit of the button back slips into place. If you take the tool out and the button is not completely secured, just put it back in and press down again.
- When you take the small assembly tool piece off, the fabric edges will be secured underneath the button back.
- Remove the button from the larger assembly tool piece.
- Tada!
To see other great Fabric Cover Button ideas, visit our DIY Project section here.
Wednesday Humor @ ILikeBigButtons.com January 06 2021

Just for today! 😜
Our Dazzle (G95) KAM Plastic Snaps reminds me of grape popsicles, mermaids 🧜♀️, and childhood imagination.
If you are not into Dazzle, we carry 16 other shades of purple and 130+ unique colors of snaps.
Tuesday Humor @ ILikeBigButtons.com November 10 2020

Especially this time of year!!! 😊😜😁
Our Violet (B41) KAM Plastic Snap is one of our most popular colors and a favorite of mine. If you are not into Violet, we carry 16 other shades of purple and 130+ unique colors of snaps.
Fabric Key Fob Hardware Wristlets by ILikeBigButtons.com October 27 2020


Supplies:
- 11" x 5" Fabric of your Choosing
- 11″ x 2.5" Piece of Fusible Fleece or 10" x 5" Fusible Interfacing
- 1 Key Fob Hardware and Split Ring
- Key Fob Hardware Pliers
- Sewing Clips
- Standard Sewing Machine
- Fray Check
Instructions:
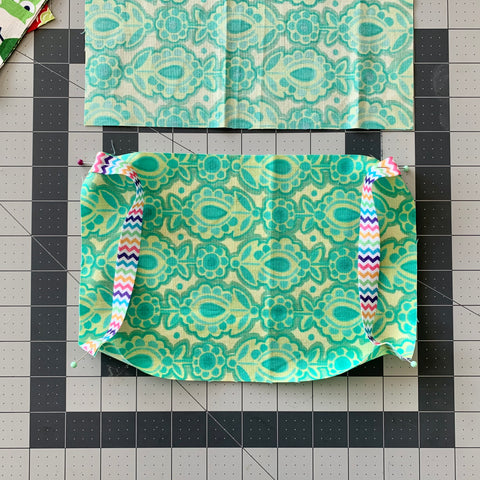
- Cut a 11" x 5" section of Fabric of your choosing and 11" x 2.5" Fusible Fleece.
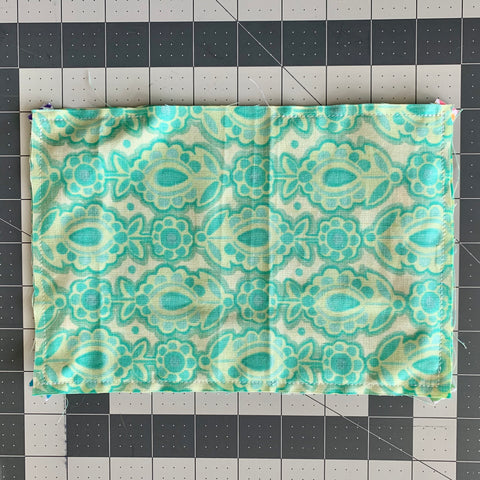
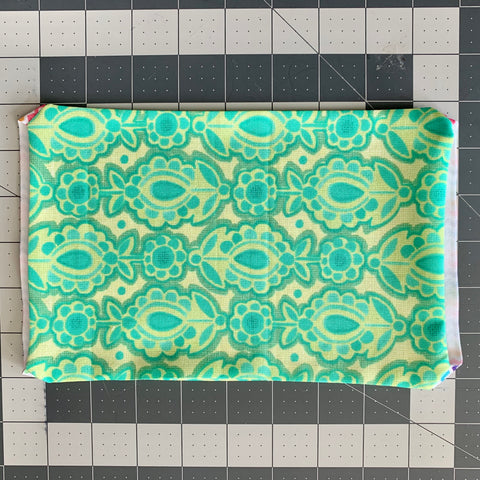
- Iron Fusible Fleece to the center of the fabric. Fold and iron the Fabric in half with the wrong sides together.
- Unfold and iron the Fabric in half again long sides to the center.
- It will look like this when you get done.
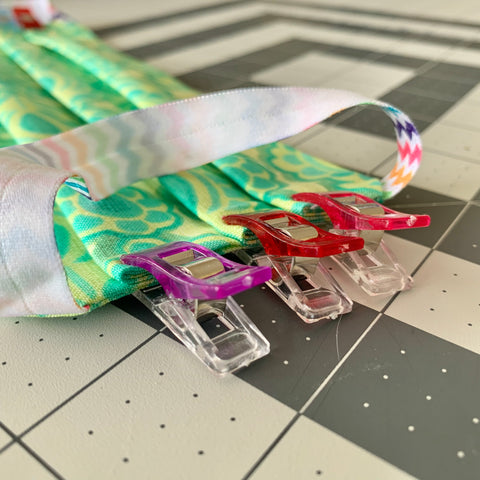
- Use your Sewing Clips to pin the Wristlet flat.
- Stitch along the edge of your Fabric strip, I stitched 1/4" in. Remove the Sewing Clips as you go. Work slowly, keeping close to the edge and as straight of a line as possible.
- Repeat 1/4" stitching along the opposing edge.
- Fold the Fabric Wristlet Strip in half, right sides facing out and match up the ends.
- Stitch the ends together with a zig zag stitch. I went back and forth a few times to ensure it held.
- Trim any loose threads. Use Fray Check to seal the end of the exposed Fabric edge.
- Tuck the sewn seam ends into the Key Fob Hardware, making sure that the Fabric Wristlet is centered.
- Using Key Fob Hardware Pliers squeeze the Key Fob Hardware closed with gentle pressure. Sometimes, I go back and forth from left to right added a little bit of pressure to each side until it eases together. Our Key Fob Hardware Pliers make this easy to do.
- Note the adjustable screw set to the distance I want the pliers to go to.
- Add the Split Ring and Yay!!!
- I love them and now I have a few sets to share!!!
I Like Big Buttons! Crew Is Going On Vacation! July 28 2020

Just ahead up, for the first time in sixteen years, our I Like Big Buttons! family is going on vacation. Not a three-day over a holiday weekend kinda one. Nope. A REAL vacation with our kiddos! It has been a long time coming.
As small business owners, it is hard to take a break because well, customers need questions answered, orders need shipping, and there is no one to hand it off to when you want to push pause.
After sixteen years, we decided to push PAUSE, just for a week, so that we can spend some real time with our kids outside of our normal routine. A week where the business doesn't consume our time and energies.
So here's the heads up, if you have been putting off an order, now is the time to make it. We will be accepting orders and shipping until August 4th at 3pm PT and won't reopen until August 13th. Any and all orders made between the evening of August 4th through August 13th will ship out August 14th.
We also will be off Social Media and out of internet range for most of the week, meaning any product or order questions you have won't be answered until we return on August 13th, as we responsibly "social distance vacation" as a family.
Thank you for understanding as we give our patient kiddos some much deserved Dad/Mom attention and time.
Gena and the I Like Big Buttons! Crew

Craft Humor: You never know what you have until you clean your craft room. June 22 2020

🧵✂️🧵 Craft room next!!! 🧵✂️🧵
Craft Quote Of The Day June 03 2020
😉
#kamsnaps #keyfobs #coverbuttons #metalfindings #jumbopaperclips #pacifiersupplies #somanysupplies #craftsanity #humor #craftquotes #mamaboss #mompreneur #craftstore #ilikebigbuttons #shopilikebigbuttons #craftcurator #craftsupplycollection #extensivecraftsupplycollection
I Like Big Buttons! 📎📎📎 Jumbo Paper Clips 📎📎📎 June 01 2020

Jumbo Paper Clips & Jumbo Paper Clip DIY Kits are 10% OFF
No Coupon Necessary
Time to Stock Up!
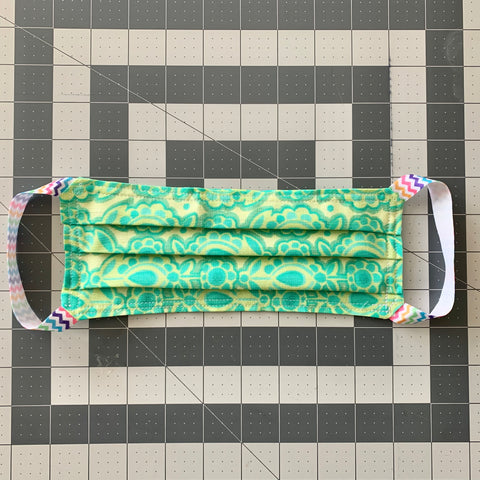
Face Mask with Ribbon Using Sewing Clips Tutorial by ILikeBigButton.com April 13 2020

As a precaution, I have been making our family some face masks. Nothing fancy, I was limited to what supplies I had on hand. I made a mask with Elastic earlier, this one will be with ribbon ties.
So with some fabric scraps, ribbon (they mentioned you could use shoelaces as an option), sewing clips, and my trusting sewing machine, I found a set of instructions and struck out.
Here is the first version I made:


Supplies:
- Face Mask Instructions (I used these as general guidelines)
- 2x 9.5" x 6.5" pieces of Fabric
- 4x 18" of Ribbon or brand new Shoelaces (this is a good average size, but may need to be adjusted if you are a smaller person)
- Sewing Clips
- Sewing Machine
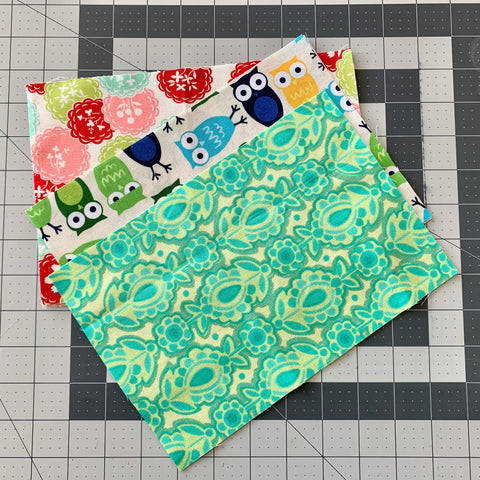
1. Cut out 2x 9.5" x 6.5" fabric rectangles.

2. With right side of 9.5" x 6.5" fabric facing up, pin a piece of 18" ribbon in each corner. Like so.
3. Pin the second piece of 9.5" x 6.5" fabric facing down to the fabric with the ribbon pinned to it. Make sure the tails of the ribbon don't get caught in the edges while sewing. I tied the ribbon into loose loops to keep them from finding their way into the edge seam.
4. Sew a 1/4" seam starting about 1/2 way on the long side. Go all the way around the perimeter, stopping when you have about 1.5" to 2" left. Make sure to go back and forth at each of the corners to anchor the ribbon. Leave that gap so that you can turn the face mask right side out.

5. Turn the mask right side out and iron it flat.


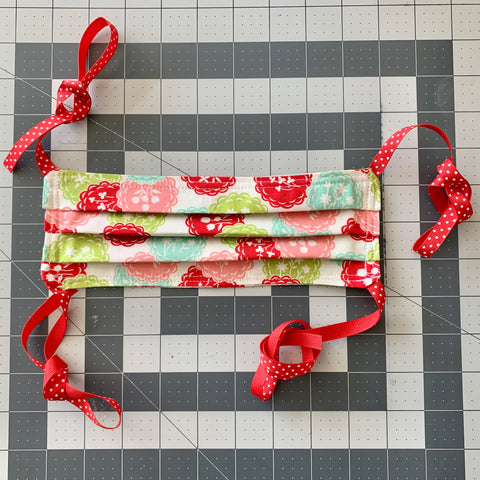
6. Make three pleats lengthwise, like you are folding a paper fan. I eyed it and used the sewing clip width as my pleat measurer, but if I was making more than a handful of these, I would make myself a template to make this part easier. The pleats help the mask form around the wearer’s face. Secure each pre-sewn pleat with a sewing clip as pictured above.
7. Now sew a 1/4" stitch around the outer perimeter of the mask face, going back and forward over the corners to add more stability to the ribbon.
8. Then, top stitch a second time around the outer edge about 1/4" in from the first round of stitching.
9. Tada! You have a finished face mask.
*Afterthoughts, my kiddos will need smaller masks, this one seems best sized for teens to adults.
Face Mask with Elastic Using Sewing Clips Tutorial by ILikeBigButton.com April 08 2020

We have been home now for close to a month, only leaving our home when we need supplies. What a change to our lives this last month has been. I am now a full-time teacher/chef/working mom. My sweet husband, who just started working from home because our kiddos were all in school, is now experiencing daily band concerts, 6 feet from his office, and the whirling dervishes that are our active kiddos being on top of us all day every day.
More than ever we have to watch what we touch, who we come into contact with, and when we have to go out, we have to protect ourselves from unknowing coming into contact with germs. It is a lot to take in.
As a precaution, I decided to make our family some face masks. Nothing fancy, I was limited to what supplies I had on hand. You will be surprised to know that I have a limited supply of fabric. A few years ago, I had so much fabric I didn't know what to do with it all, but I have finally whittled did down to scraps while making baby blankets for the babies who have joined our extended family and friends and gifting it to church projects to bless others.
So with some fabric scraps, headband elastic (it's all I had), sewing clips, and my trusting sewing machine, I found a set of instructions and struck out.
Here is the first version I made:


Supplies:
- Face Mask Instructions (I used these as general guidelines)
- 2x 9.5" x 6.5" pieces of Fabric
- 2x 7" of Elastic (this is a good average size, but may need to be adjusted if you are a smaller person)
- Sewing Clips
- Sewing Machine

1. Cut out 2x 9.5" x 6.5" fabric rectangles.
2. With right side of 9.5" x 6.5" fabric facing up, pin a piece of 7" elastic from left bottom looped to left top. Pin a piece of 7" elastic from right bottom looped to right top. Like so.
3. Pin the second piece of 9.5" x 6.5" fabric facing down to the fabric with the elastic pinned to it.
4. Sew a 1/4" seam starting about 1/2 way on the long side. Go all the way around the perimeter, stopping when you have about 1.5" to 2" left. Make sure to go back and forth at each of the corners to anchor the elastic. Leave that gap so that you can turn the face mask right side out.
5. Turn the mask right side out and iron it flat.

6. Make three pleats lengthwise, like you are folding a paper fan. I eyed it and used the sewing clip width as my pleat measurer, but if I was making more of these, I would make myself a template to make this part easier. The pleats help the mask form around the wearer’s face. Secure each pre-sewn pleat with a sewing clip as pictured above.
7. Now sew a 1/4" stitch around the outer perimeter of the mask face, going back and forward over the corners to add more stability to the elastic.
8. Then, top stitch a second time around the outer edge about 1/4" in from the first round of stitching.
9. Tada! You have a finished face mask.
*Afterthoughts, this mask was the perfect size for my husband, but I would probably make the elastic a 1/2" to 1" shorter for women. I will have to play with it to see what size works best for me. And of course, my kiddos will need smaller masks, this one seems best sized for teens to adults.
Yes, ILikeBigButtons.com OPEN and Shipping! March 18 2020

Yes, I Like Buttons! OPEN and Shipping!
We have gotten a few questions about if we are open and shipping during this time. The answer is YES! We are all healthy and safely tucked at home as we practice social distancing.
I Like Big Buttons! is a completely e-commerce based, family-run business. Since we don't have a physical storefront, we are able to continue our operations as usual. All our items are in stock and ready to ship. Items purchased before 3 pm PT will go out the next business day via our USPS scheduled morning pickup.
My presence on social media may slow, and I ask for your patience with that. I have just become a full-time homeschooling mom for the next 6 weeks, on top of my responsibilities at I Like Big Buttons!, being a full-time wife, and a full-time momma. As many of you know, I am a momma of many, which means lots of "Mom, Mom, Mom!" as the day goes long. Lots of "How do I do this?" and "What am I supposed to do next?" Our school district has been amazing and was able to send all my kiddos home with lots of work, both online and in packet form, to keep them active.
For support or product questions, please contact us at support@ilikebigbuttons.com. We check our email support constantly, but may only get to our social media pages a few times a day. Facebook doesn't always notify us that you have asked a question, so we may not see it in a timely manner.
Thank you,
Gena
ILikeBigButtons.com
Size 24 (5/8 inch / 15 mm) Self Cover Buttons by ILikeBigButtons.com February 26 2020

We love our Cover Buttons! Easy to make and versatile they are one of my favorite go-to craft supplies.
We carry them in 7 great sizes. The second smallest, Size 24 (5/8"), is just slightly larger in diameter than a Skittle or M&M and available in both Wire Back (sewable) and Flat Back (glueable).
Size 24 (5/8 inch / 15 mm)

Size Reference

I Like Big Buttons! 💘 Cover Button Love Sale 💘
Cover Button Sets and Cover Button DIY Kits are 10% OFF | No Coupon Necessary
Size 24 Cover Buttons are great for smaller projects:
Lace & Fabric Cover Button Earrings

Fabric Cover Button Mini Clothespins

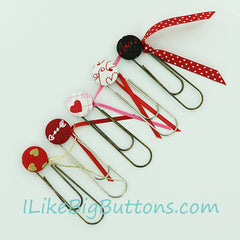
Fabric Cover Button Bobby Pins

Fabric Cover Buttons for your favorite outfit


To see other great Fabric Cover Button ideas, visit our DIY Project section here.
How To Make A Self Fabric Cover Button: 7 Fabric Cover Button Sizes February 21 2020
Easy Peasy! So Much Fun!
Cover Button Tips:
- The size of the fabric circle for each Cover Button size should be approximately twice the diameter of your button blank. If you would like a matching sized reusable plastic circle template, simply choose "Add Template" from the drop-down menu and the correct sized tool will be added to your order.
- When the circle of fabric and Cover Button Cap are snugly situated in the clear base of the Cover Button tool, flip the tool over and double-check the positioning of your fabric. If it has a pattern, you will see a preview of how the button will form and can make adjustments to the fabric before you install the back.
- You may want to add a dab of E6000 or comparable adhesive before installing the Cover Button Back as a precaution to ensure a permanent hold.
- Save your fingers: Tip #1 - Use the backside of a permanent marker or comparable item on the smaller sized Cover Button Caps to press them into the clear base of the Cover Button tool.
- Save your fingers: Tip #2 - Take a flat piece of wood and use it to apply even downward pressure on the pink plunger of the Cover Button installation tool when installing the back. Not so much pressure that you flatten the button, just until it pops into place.
- To remove the Cover Button from the clear base once it has been formed, bend the mold slightly and push up from the bottom to pop out the button.
Size 20 (1/2 inch / 12 mm) Self Cover Buttons by ILikeBigButtons.com February 20 2020
We love our Cover Buttons! Easy to make and versatile they are one of my favorite go-to craft supplies.
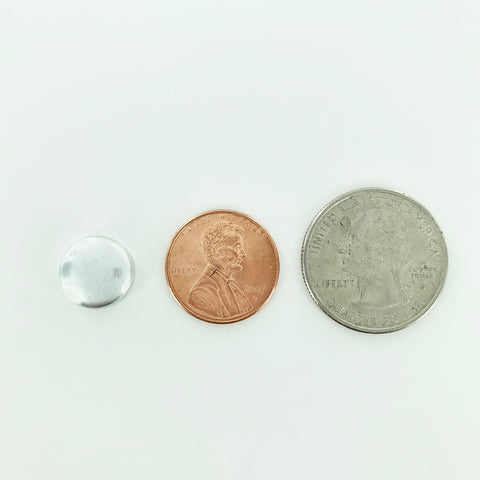
We carry them in 7 great sizes. The smallest, Size 20 (1/2"), is about the size of your pinky nail in both Wire Back (sewable) and Flat Back (glueable).
Size 20 (1/2 inch / 12 mm)

Size Reference
I Like Big Buttons! 💘 Cover Button Love Sale 💘
Cover Button Sets and Cover Button DIY Kits are 10% OFF | No Coupon Necessary
Size 20 Cover Buttons are great for small projects:
Stud-sized Fabric Cover Button Earrings


Fabric Cover Button Bobby Pins
Fabric Cover Buttons for your favorite outfit
To see other great Fabric Cover Button ideas, visit our DIY Project section here.
Let the record show that I went into the craft store for ONE thing. February 18 2020
😍🤗😂 Every time! 😍🤗😂
"No Sew" Valentine's Day Craft Ideas from ILikeBigButtons.com February 13 2019
 |
 |
 |
 |
 |
 |
I can't believe Valentine's Day snuck up on us so fast, let's look at some fun and easy "No Sew" Cover Button crafts we can make for those we love!
Don't forget our DIY Kits are on sale on our website through 2/15/19, no coupon necessary.
Valentine's Day Fabric Cover Button Barrettes
Wear these adorable Snap Barrettes to match or accent your favorite outfit for Valentine's Day or dress up your favorite t-shirt and jeans for an afternoon outing. Enjoy!
Supplies:
- 1-2 Completed Flat Back Fabric Cover Button (Choose your size, Size 20 through Size 36 all work great, size depends on the statement you want to make)
- 2 Snap Barrettes
- E6000 or comparable adhesive ... See More

Valentine's Day Fabric Cover Button Jumbo Paper Clip Bookmarks
Use these adorable Paper Clip Bookmarks to accent a Valentine for your special loved one or hold your place in your favorite book or cookbook Enjoy!
Supplies:
- 1 Completed Flat Back Fabric Cover Button (Attach size 36 (7/8" - 23 mm), size 45 (1 1/8" - 28 mm), or size 60 (1 1/2" - 38 mm) flat back cover buttons.)
- 1 Jumbo Paper Clip
- 1 6" Piece of Ribbon
- E6000 or comparable adhesive
- Sand Paper ... See More

Valentine's Day Fabric Cover Button Badge Reels
Use these adorable Valentine's Day Badge Reels to hold your ID for work, school, or play. Enjoy!
Supplies:
- 1 Completed Flat Back Fabric Cover Button (Size 45 sits on top of Badge Reel, Size 60 rest over Badge Reel)
- 1 Badge Reel
- E6000 or comparable adhesive
- Sand Paper ... See More

Lace & Fabric Cover Button Earrings
Give these cute Lace & Fabric Cover Button Earrings as Valentine gift for your best friend or loved ones. Enjoy!
Supplies:
- Flat Back Cover Buttons (I used Size 24, Size 30, and Size 36 Cover Buttons)
- Cover Button Assembly Tools
- Cover Button Templates
- Fabric Scraps
- Lace Scraps
- E6000 Adhesive or Hot Glue
- Sharpie Permanent Marker
- Surgical Stainless Steel Earring Posts and Backs ... See More

Fabric Cover Button Bracelet Tutorial
Give this charming Cover Button Bracelet as Valentine gift for your best friend or loved ones. Enjoy!
Supplies:
- 11 to 13 - Completed Size 20 Flat Back Fabric Cover Buttons
- 1 Disk and Loop Bracelet (We have two sizes available 7.2" or 8.25")
- 11 to 13 - 1/2" x 1/2" Felt squares
- E6000 or comparable adhesive ... See More

Give these adorable Cover Button Bobby Pins as Valentine gifts for your best friend or loved ones. Enjoy!
Supplies:
- 1 Completed Flat Back Fabric Cover Button (Choose your size, Size 20 through Size 45 all work great, size depends on the statement you want to make)
- 1 Bobby Pin
- E6000 or comparable adhesive ... See More

- Previous
- Page 4 of 4