News
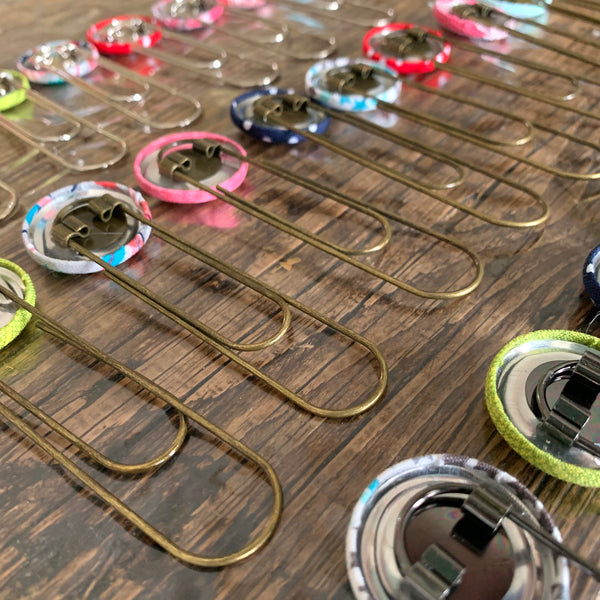
How to make Cover Button Badge Reels with I Like Big Buttons! DIY Kit March 10 2022
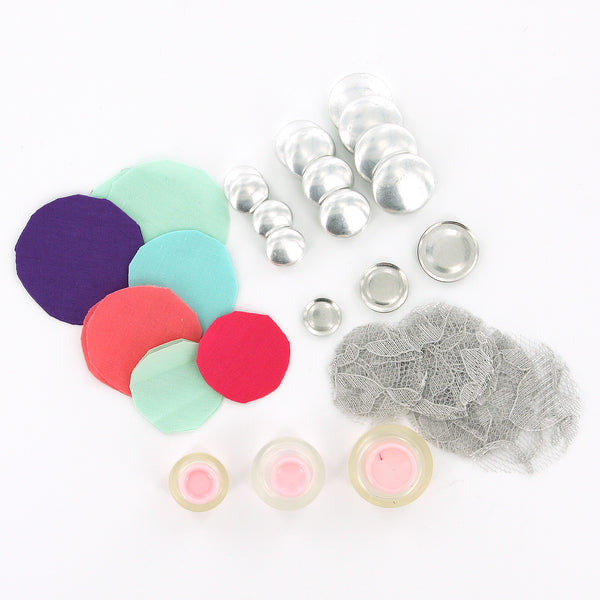
Here is what you will receive a DIY Cover Button Badge Reel KIT from ILikeBigButtons.com. Just a few quick steps to make a fun accent for any nurse, teacher, or work ID or gift for a loved one!
Pack An Order With Us @ ILikeBigButtons.com January 31 2022
I thought you might enjoy a glimpse inside the order preparation and shipping process at ILikeBigButtons.com -- This order was a fun one! 50+ crafty items in a variety of finishes and sizes. Cover Button DIY Kits, Badge Reels, Flat Back Cover Buttons, Template & Tools, Key Fob Hardware, Barrettes & Bobby Pins, & Wire Back Cover Buttons! Oh My! You all like to keep me on my toes!
Shop with confidence!
Where to find us:
- Join our Facebook group!
- Like us on Facebook.
- Visit us on our YouTube Channel.
- Follow us on Pinterest.
- Follow us on Instagram.
- Follow us on Twitter.
Thank you for your interest! Have a great crafty week!
I Like Big Buttons and crew!
How To Make Fabric Cover Button Earrings @ ILikeBigButtons.com January 10 2022
Assembling fabric covered buttons is easy and fun! ILikeBigButtons.com carries 7 sizes of fabric cover buttons. Our buttons range from 1/2 inch to 1 7/8 inches in diameter. We offer them in both flat back (glueable) and wire back (sewable).
Visit our Cover Button page to see our full selections of Fabric Cover Buttons and tools.
Visit our Earring Supplies page to see our full selection of Earring Posts and Backs.
Check out our Inspiration Board to find a plethora of Tutorials and Ideas for how to use Cover Buttons and Earring Supplies in your crafty projects.
Have a great crafty day,
ILikeBigButtons.com
So many 😍 Key Fob Wristlets @ ILikeBigButtons.com September 01 2021

So many 😍 Key Fob Wristlets.
ILikeBigButtons.com Supply List:
To see other great Key Fob Hardware, Pendant Bezel, and Cover Button ideas, visit our DIY Project section here.
School Must-Haves @ ILikeBigButtons.com August 24 2021

With the school year starting back up, I couldn't resist. 😄
Shop Cover Buttons @ ILikeBigButtons.com
Shop Jumbo Paper Clips @ ILikeBigButtons.com
To see other great Cover Button and Jumbo Paper Clip ideas, visit our DIY Project section here.
Fabric Cover Buttons - Easy Peasy, Beautiful Impact! @ ILikeBigButtons.com August 19 2021

These aren't your grandma's Cover Buttons!!! Well, actually they are 😉 only better, with so many, many great uses for them.
💜 Flat Backs are used for crafts where you would like to glue a cover button: jewelry, bracelets, rings, earrings, necklaces, bobby pins and barrettes, scrapbooking, and much more.
💙 Wire Backs are used for fabric cover buttons in sewing, shoes, clothing, ponytail holders and much, much more.
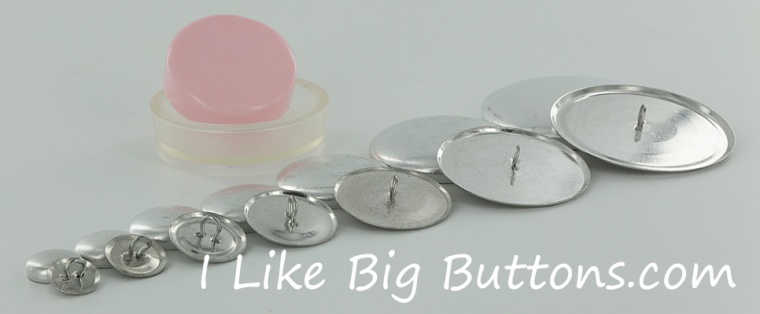
Here are the 7 sizes we carry. From 1/2", which is about as small as your pinky nail, all the way up to 1 7/8" in diameter, about the size of the round side of a kiwi fruit.
We carry them in both flat back (glueable) and wire back (sewable).
• Size 20 (1/2 inch / 12 mm)
• Size 24 (5/8 inch / 15 mm)
• Size 30 (3/4 inch / 19 mm)
• Size 36 (7/8 inch / 23 mm)
• Size 45 (1 1/8 inch / 28 mm)
• Size 60 (1 1/2 inch / 38 mm)
• Size 75 (1 7/8 inch / 48 mm)
Assembling fabric Cover Buttons is fast and simple. In just seconds, you will have a button ready for your latest craft project.
Inspiration Board: Fabric Cover Buttons
Fabric Cover Button Jumbo Paper Clips @ ILikeBigButtons.com July 13 2021
 I'm in
  with Jumbo Paper Clips and Cover Buttons.
Quick & easy craft with stunning results!

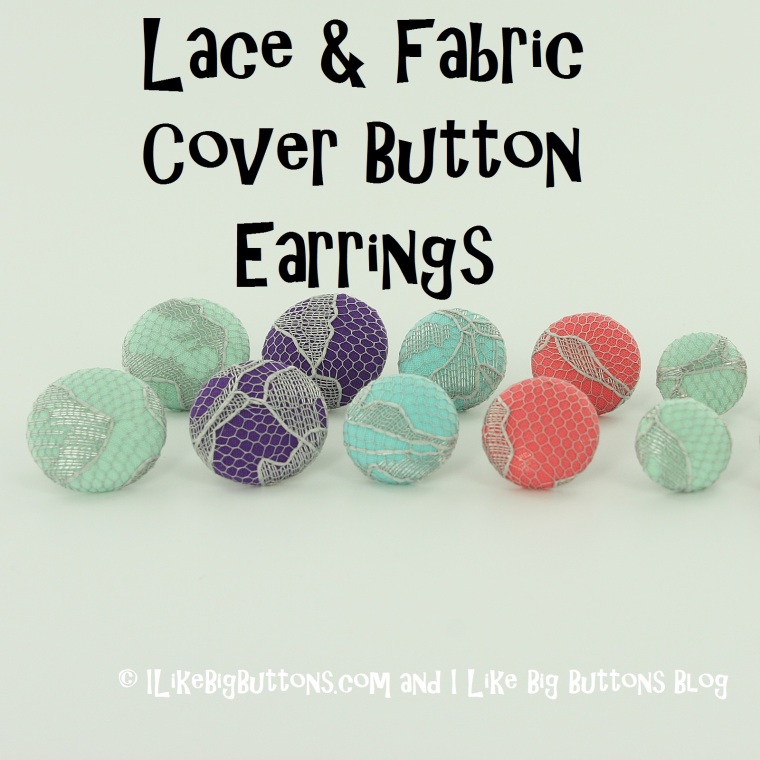
Making Lace & Fabric Cover Button Earrings @ ILikeBigButtons.com June 09 2021
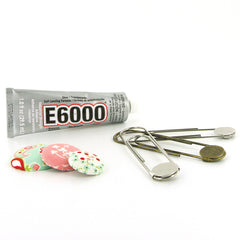
Supplies:
- Flat Back Cover Buttons (I used Size 24, Size 30, and Size 36 Cover Buttons)
- Cover Button Assembly Tools
- Cover Button Templates
- Fabric Scraps
- Lace Scraps
- E6000 Adhesive or Hot Glue
- Sharpie Permanent Marker
- Surgical Stainless Steel Earring Posts and Backs


Instructions:
1. Cut your fabric scrap. You will want a circle that is about twice the diameter of your button blank or use one of our handy Plastic Cover Button Templates.

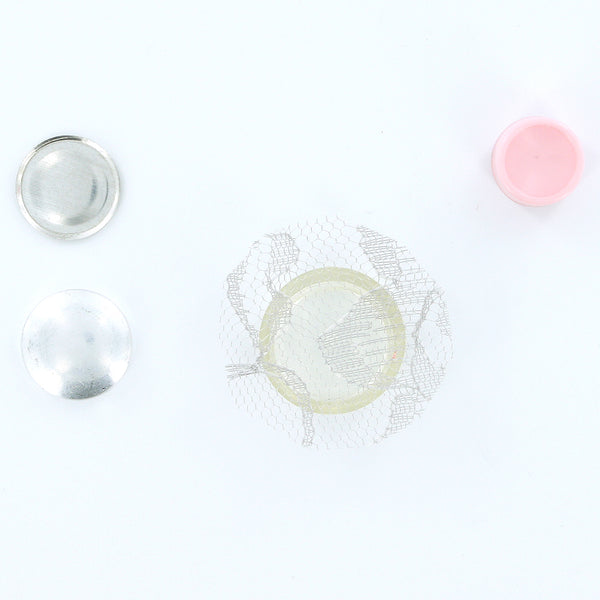

2. Put your lace piece in the larger assembly tool piece (RIGHT SIDE DOWN). Then, put your fabric piece in the larger assembly tool piece (RIGHT SIDE DOWN). When you look into the tool you want to see the back of the fabric.

3. Place the button front (the domed piece) on top of the fabric. Leave the fabric edges hanging out.


4. Press the Cover Button edges down into the tool.

5. Place the back cover button piece on top of your fabric and button front. If the cover button will be subject to repeated tugging from the back, you may want to add a little e6000 adhesive before attaching the back.

6. Take the smaller piece of the assembly tool and with the open side down place it on the button back.
7. Press down. You may hear a pop when the last bit of the button back slips into place. If you take the tool out and the button is not completely secured, just put it back in and press down again.

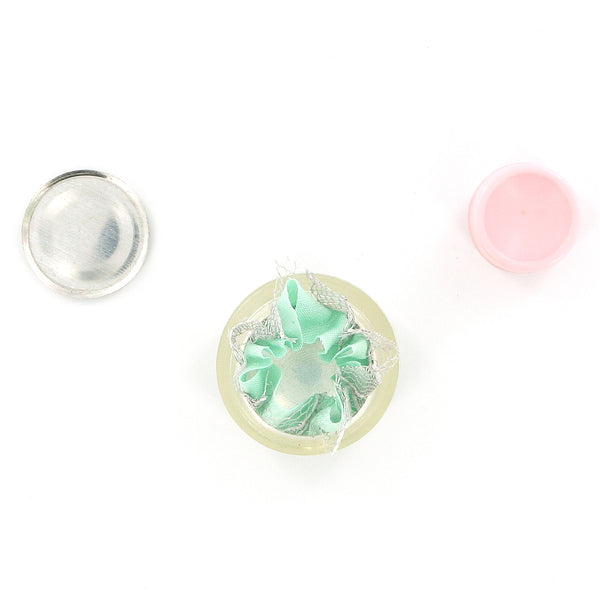
8. When you take the small assembly tool piece off, the fabric edges will be secured underneath the button back.


9. Remove the button from the larger assembly tool piece.

10. Tada! First step complete.


11. Lightly scuff the back of the Cover Button so the glue will adhere better (not essential but recommended).

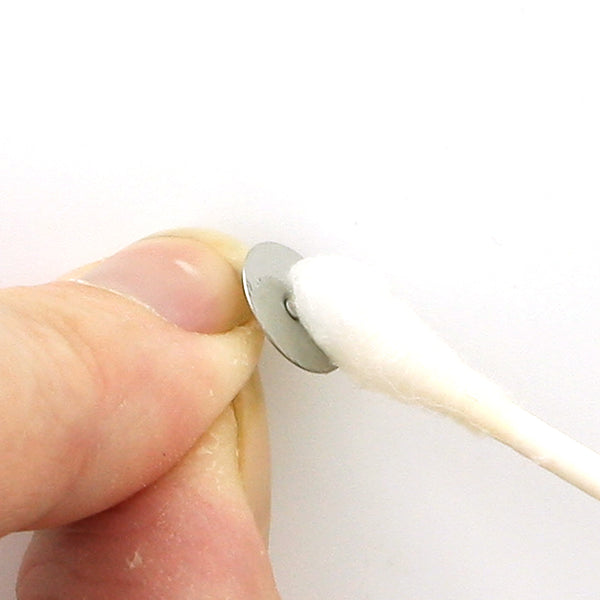
12. Clean both surfaces of dust. I used rubbing alcohol and a cotton swab.

13. Apply E6000 to back of Cover Button or Earring Post.

14. Press Earring Post into place and remove any extra Adhesive. On smaller sized Cover Buttons center the post, as they increase in size adjust post towards top.

15. Let dry, add Earring Backing/Nut, and enjoy.

16. Tada! Lace and Fabric Cover Button Earrings are great a gifts or as products for your shop.
Making Cover Button Paper Clip Bookmarks @ ILikeBigButtons.com April 05 2021
 |
 |
 |
 |
How To Make Fabric Cover Button Jumbo Paper Clip Bookmarks:
Supplies:
- 1 Completed Flat Back Fabric Cover Button (Attach size 36 (7/8" - 23 mm), size 45 (1 1/8" - 28 mm), or size 60 (1 1/2" - 38 mm) flat back cover buttons.)
- 1 Jumbo Paper Clip
- E6000 or comparable adhesive
Instructions:
- Follow these instructions to make Flat Back Fabric Covered Buttons.
- Make sure the surfaces of the Cover Button back and Paper Clip gluepad are clean and free of oil.
- Apply E6000 to the back of the Cover Button.
- Press into place over the glue pad on the Paper clip at the desired height and remove any extra Adhesive. The bigger the Cover Button the higher you will want to center the cover button.
- Let dry and enjoy.
- Tada!
You are done! Use these adorable Paper Clips to hold your place in your favorite book or cookbook. Enjoy!
Making A Fabric Cover Button Full-Size Clothespin @ ILikeBigButtons.com February 23 2021
 |
 |
 |
 |
 |
 |
 |
 |
 |
How to Make Cover Button Bobby Full-Size Clothespins:
Supplies:
- 1 Completed Flat Back Fabric Cover Button (Attach Size 30 (3/4 inch / 19 mm), Size 36 (7/8 inch / 23 mm), or Size 45 (1 1/8 inch / 28 mm) flat back cover buttons.)
- 1x Full-Size Wooden Clothespin
- 1x Medium Plain Button
- E6000, Hot Glue, or comparable adhesive
Instructions:
- Cut your fabric scrap. You will want a circle that is about twice the diameter of your button blank.
- Put your fabric piece in the larger assembly tool piece (RIGHT SIDE DOWN). When you look into the tool you want to see the back of the fabric.
- Place the button front (the domed piece) on top of the fabric. Leave the fabric edges hanging out.
- Press the cover button edges down into the tool. *TIP* To make it easier on my fingers, I use a sharpie marker to apply pressure.
- Place the back cover button piece on top of your fabric and button front. *TIP* If the cover button will be subject to repeated tugging from the back, you may want to add a little e6000 adhesive before attaching the back.
- Take the smaller piece of the assembly tool and with the open side down place it on the button back.
- Press down. You may hear a pop when the last bit of the button back slips into place. If you take the tool out and the button is not completely secured, just put it back in and press down again. *TIP* I often use a flat piece of wood to apply pressure, again to save my fingers. It also helps to avoid the button back going in at an angle.
- When you take the small assembly tool piece off, the fabric edges will be secured underneath the button back.
- Remove the button from the larger assembly tool piece.
- Tada! Now to attach it to the Clothespin.
- Use Hot Glue or E6000 to adhere a small plain button to the underside of the Cover Button. This is to fill the space between the back and the edges. You can also use felt or some other small object. You just need it to be sturdy enough to offer support. A small plastic button works great for this. You will see that the button is now flush across the bottom. I cut off the little nubs of glue that leaked through the button holes.
- Now adhere the finished Cover Button to the Clothespin. Press into place and center it until you are pleased with the alignment. Set aside to dry.
- Tada! Additional uses:
- Add a thin magnet to the back and use on your magnetic board.
- Add a push pin to the back and use on your cork board.
How To Make A Fabric Cover Button Mini Clothespin
To see other great Fabric Cover Button ideas, visit our DIY Project section here.
Making Fabric Cover Button Bobby Pins @ ILikeBigButtons.com February 19 2021
 |
 |
 |
 |
How to Make Cover Button Bobby Pins:
Supplies:
- 1 Completed Flat Back Fabric Cover Button (Choose your size, Size 20 through Size 45 all work great, size depends on the statement you want to make)
- 1 Bobby Pin
- E6000 or comparable adhesive
Steps:
- Follow these instructions to make Flat Back Fabric Covered Buttons.
- Apply E6000 to back of Cover Button.
- Press Bobby Pin into place and remove any extra Adhesive. On smaller sized Cover buttons center the glue pad, as they increase in size adjust accordingly.
- Let dry and enjoy.
- Tada!
You are done! Wear these adorable Bobby Pins to match or accent your favorite outfit or dress up your favorite t-shirt and jeans for an afternoon outing. Enjoy!
Making Fabric Cover Button Earrings @ ILikeBigButtons.com February 16 2021
 |
 |
|
 |
 |
|
 |
 |
|
How to Make Cover Button Earrings:
Supplies:
- 2 Completed Flat Back Fabric Cover Button (Choose your size, Size 20 through Size 60 all work great, size depends on the statement you want to make)
- 1 set of Earring Post & Backs
- E6000 or comparable adhesive
Steps:
- Follow these instructions to make Flat Back Fabric Covered Buttons.
- Apply E6000 to the back of the Cover Button.
- Press Earring Post into place and remove any extra Adhesive. On smaller sized Cover buttons center the post, as they increase in size adjust the post towards the top.
- Let dry, add Earring Backing/Nut, and enjoy.
- Tada!
You are done! Wear these adorable Earrings to match or accent your favorite outfit or dress up your favorite t-shirt and jeans for an afternoon outing. Enjoy!
Valentine's Day Fabric Cover Button Barrettes @ ILikeBigButtons.com February 11 2021
 |
 |
 |
 |
 |
How to Make Valentine's Day Cover Button Snap Barrettes:
Supplies:
- 1-2 Completed Flat Back Fabric Cover Button (Choose your size, Size 20 through Size 36 all work great, size depends on the statement you want to make)
- 2 Snap Barrettes
- E6000 or comparable adhesive
Steps:
- Follow these instructions to make Flat Back Fabric Covered Buttons.
- Lightly scuff the back of the Cover Button so the glue will adhere better (not essential but recommended).
- Clean both surfaces of dust.
- Apply E6000 to back of Cover Button.
- Press Snap Barrette into place and remove any extra Adhesive. On smaller sized Cover buttons center on the glue pad, as they increase in size adjust glue pad accordingly.
- Let dry and enjoy.
- Tada!
You are done! Wear these adorable Snap Barrettes to match or accent your favorite outfit for Valentine's Day or dress up your favorite t-shirt and jeans for an afternoon outing. Enjoy!
Valentine's Cover Button Jumbo Paper Clip Bookmarks @ ILikeBigButtons.com February 10 2021
 |
 |
 |
 |
 |
 |
 |
|
Valentine's Day Fabric Cover Button Jumbo Paper Clip Bookmarks:
Supplies:
- 1 Completed Flat Back Fabric Cover Button (Attach size 36 (7/8" - 23 mm), size 45 (1 1/8" - 28 mm), or size 60 (1 1/2" - 38 mm) flat back cover buttons.)
- 1 Jumbo Paper Clip
- 1 6" Piece of Ribbon
- E6000 or comparable adhesive
Steps:
- Follow these instructions to make Flat Back Fabric Covered Buttons.
- Make sure the surfaces of the Cover Button back and Paper Clip gluepad are clean and free of oil.
- Apply E6000 to the back of the Cover Button.
- Press into place over the glue pad on the Paper clip at the desired height and remove any extra Adhesive. The bigger the Cover Button the higher you will want to center the cover button.
- Cut a 6" piece of Ribbon and knot it on the side of the Paper Clip. Slide it up against the Cover Button. Straighten and cut ends at an angle at the desired length.
- Let dry and enjoy.
- Tada!
You are done! Use these adorable Paper Clips to accent a Valentine for your special loved one or hold your place in your favorite book or cookbook. Enjoy!
Making Magnetic Pin Cushion/Needle Holder @ ILikeBigButtons.com February 08 2021

Supplies:
- 1 Completed Size 75 (1 7/8 inch / 48 mm) Fabric Cover Button
- Fabric Of Your Choice
- 1x Standard Round Magnet (Approximately 3/4" Round)
- E6000, Hot Glue, or comparable adhesive
I Like Big Buttons! - Picture Tutorial Below:

1. Cut your fabric scrap. You will want a circle that is about twice the diameter of your button blank. *TIP* Our All-In-One Cover Button Template makes creating the right size circle of fabric a breeze.

2. Put your fabric piece in the larger assembly tool piece (RIGHT SIDE DOWN). When you look into the tool you want to see the back of the fabric.

3. Glue the magnet inside the back of the Cover Button with Hot Glue or E6000.

4. Place the button front (the domed piece) on top of the fabric. Leave the fabric edges hanging out.

5. Press the cover button edges down into the tool. *TIP* To make it easier on my fingers, I use a sharpie marker to apply pressure.

6. Place the back cover button piece on top of your fabric and button front. *TIP* If the cover button will be subject to repeated tugging from the back, you may want to add a little e6000 adhesive before attaching the back.
7. Take the smaller piece of the assembly tool and with the open side down place it on the button back.
8. Press down. You may hear a pop when the last bit of the button back slips into place. If you take the tool out and the button is not completely secured, just put it back in and press down again. *TIP* I often use a flat piece of wood to apply pressure, again to save my fingers. It also helps to avoid the button back going in at an angle.
9. When you take the small assembly tool piece off, the fabric edges will be secured underneath the button back.

9. Remove the button from the larger assembly tool piece.
10. Tada! Now you have an attractive Pin Cushion/Needle Holder for your sewing room.
To see other great Fabric Cover Button ideas, visit our DIY Project section here.
How to Make Fabric Cover Buttons @ ILikeBigButtons.com February 02 2021
 |
 |
 |
 |
 |
 |
 |
 |
 |
 |
 |
 |
 |
 |
 |
How to Make Fabric Cover Buttons:
Cover Buttons are easy to assemble:
- Cut your fabric scrap. You will want a circle that is about twice the diameter of your button blank.
- Put your fabric piece in the larger assembly tool piece (RIGHT SIDE DOWN). When you look into the tool you want to see the back of the fabric.
- Place the button front (the domed piece) on top of the fabric. Leave the fabric edges hanging out.
- Press the cover button edges down into the tool.
- Place the back cover button piece on top of your fabric and button front. If the cover button will be subject to repeated tugging from the back, you may want to add a little e6000 adhesive before attaching the back.
- Take the smaller piece of the assembly tool and with the open side down place it on the button back.
- Press down. You may hear a pop when the last bit of the button back slips into place. If you take the tool out and the button is not completely secured, just put it back in and press down again.
- When you take the small assembly tool piece off, the fabric edges will be secured underneath the button back.
- Remove the button from the larger assembly tool piece.
- Tada!
To see other great Fabric Cover Button ideas, visit our DIY Project section here.
Size 24 (5/8 inch / 15 mm) Self Cover Buttons by ILikeBigButtons.com February 26 2020

We love our Cover Buttons! Easy to make and versatile they are one of my favorite go-to craft supplies.
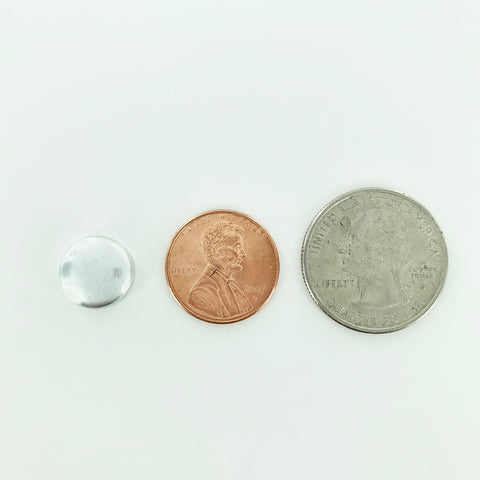
We carry them in 7 great sizes. The second smallest, Size 24 (5/8"), is just slightly larger in diameter than a Skittle or M&M and available in both Wire Back (sewable) and Flat Back (glueable).
Size 24 (5/8 inch / 15 mm)

Size Reference

I Like Big Buttons! 💘 Cover Button Love Sale 💘
Cover Button Sets and Cover Button DIY Kits are 10% OFF | No Coupon Necessary
Size 24 Cover Buttons are great for smaller projects:
Lace & Fabric Cover Button Earrings

Fabric Cover Button Mini Clothespins

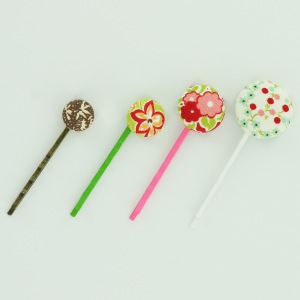
Fabric Cover Button Bobby Pins

Fabric Cover Buttons for your favorite outfit


To see other great Fabric Cover Button ideas, visit our DIY Project section here.
How To Make A Self Fabric Cover Button: 7 Fabric Cover Button Sizes February 21 2020
Easy Peasy! So Much Fun!
Cover Button Tips:
- The size of the fabric circle for each Cover Button size should be approximately twice the diameter of your button blank. If you would like a matching sized reusable plastic circle template, simply choose "Add Template" from the drop-down menu and the correct sized tool will be added to your order.
- When the circle of fabric and Cover Button Cap are snugly situated in the clear base of the Cover Button tool, flip the tool over and double-check the positioning of your fabric. If it has a pattern, you will see a preview of how the button will form and can make adjustments to the fabric before you install the back.
- You may want to add a dab of E6000 or comparable adhesive before installing the Cover Button Back as a precaution to ensure a permanent hold.
- Save your fingers: Tip #1 - Use the backside of a permanent marker or comparable item on the smaller sized Cover Button Caps to press them into the clear base of the Cover Button tool.
- Save your fingers: Tip #2 - Take a flat piece of wood and use it to apply even downward pressure on the pink plunger of the Cover Button installation tool when installing the back. Not so much pressure that you flatten the button, just until it pops into place.
- To remove the Cover Button from the clear base once it has been formed, bend the mold slightly and push up from the bottom to pop out the button.
Size 20 (1/2 inch / 12 mm) Self Cover Buttons by ILikeBigButtons.com February 20 2020
We love our Cover Buttons! Easy to make and versatile they are one of my favorite go-to craft supplies.
We carry them in 7 great sizes. The smallest, Size 20 (1/2"), is about the size of your pinky nail in both Wire Back (sewable) and Flat Back (glueable).
Size 20 (1/2 inch / 12 mm)

Size Reference
I Like Big Buttons! 💘 Cover Button Love Sale 💘
Cover Button Sets and Cover Button DIY Kits are 10% OFF | No Coupon Necessary
Size 20 Cover Buttons are great for small projects:
Stud-sized Fabric Cover Button Earrings


Fabric Cover Button Bobby Pins
Fabric Cover Buttons for your favorite outfit
To see other great Fabric Cover Button ideas, visit our DIY Project section here.
Fabric Cover Buttons - Easy To Make, Great Impact! @ ILikeBigButtons.com February 06 2020
These aren't your grandma's Cover Buttons!!! Well, actually they are ;) only better, with so many many great uses for them.
Flat Backs are used for crafts where you would like to glue a cover button: jewelry, bracelets, rings, earrings, necklaces, bobby pins and barrettes, scrapbooking, and much more.
Wire Backs are used for fabric cover buttons in sewing, shoes, clothing, ponytail holders and much, much more.
Here are the 7 sizes we carry. From 1/2", which is about as small as your pinky nail, all the way up to 1 7/8" in diameter, about the size of the round side of a kiwi fruit. We carry them in both flat back (glueable) and wire back (sewable).
- Size 20 (1/2 inch / 12 mm)
- Size 24 (5/8 inch / 15 mm)
- Size 30 (3/4 inch / 19 mm)
- Size 36 (7/8 inch / 23 mm)
- Size 45 (1 1/8 inch / 28 mm)
- Size 60 (1 1/2 inch / 38 mm)
- Size 75 (1 7/8 inch / 48 mm)
Assembling fabric Cover Buttons is fast and simple. In just seconds, you will have a button ready for your latest craft project.
Our I Like Big Buttons! 💘 Cover Button Love Sale 💘
Cover Button Sets and Cover Button DIY Kits are 10% OFF
No Coupon Necessary | Good Through February 29, 2020.
See our pictorial below:

How to Make Fabric Cover Buttons:
Cover Buttons are easy to assemble:
- Cut your fabric scrap. You will want a circle that is about twice the diameter of your button blank.
- Put your fabric piece in the larger assembly tool piece (RIGHT SIDE DOWN). When you look into the tool you want to see the back of the fabric.
- Place the button front (the domed piece) on top of the fabric. Leave the fabric edges hanging out.
- Press the cover button edges down into the tool.
- Place the back cover button piece on top of your fabric and button front. If the cover button will be subject to repeated tugging from the back, you may want to add a little e6000 adhesive before attaching the back.
- Take the smaller piece of the assembly tool and with the open side down place it on the button back.
- Press down. You may hear a pop when the last bit of the button back slips into place. If you take the tool out and the button is not completely secured, just put it back in and press down again.
- When you take the small assembly tool piece off, the fabric edges will be secured underneath the button back.
- Remove the button from the larger assembly tool piece.
- Tada!
To see other great Fabric Cover Button ideas, visit our DIY Project section here.
How To Wrap Cover Buttons With Paper by ILikeBigButtons.com January 31 2019

I recently had a customer, Annie, ask if Cover Buttons could be wrapped in paper. I knew of a few customers who had success doing so but had never attempted it myself. Here is a tutorial on how to make Paper Wrapped Cover Buttons and some tips that Annie and I discovered and used.
I love how they turned out. Being an avid reader, I think they are the perfect touch for that special bookworm in your life.


How to Make Paper Wrapped Cover Buttons:
Cover Buttons are easy to assemble:
1. Cut your paper scrap. You will want a circle that is about twice the diameter of your button blank. We used book pages, children's books, and scrapbook paper and they all worked great. You may need to experiment and find what works best for you.
2. Cut a square of wax paper or piece of parchment paper slightly larger than your paper circle. You should be able to reuse it a number of times. I found that the parchment paper held up best.
3. Mist your paper circle on both sides and blot dry. This will help the paper to mold more smoothly to the rounded surface of the cover button front.

4. Layer the wax/parchment paper, then your paper circle on the larger assembly tool mold piece (RIGHT SIDE DOWN). When you look into the underside of the tool you want to see the back of the fabric.
5. Place the button front (the domed piece) on top of the paper and press into the mold. This will require firm pressure. Leave the paper edges hanging out.
6. Press the paper edges down into the backside of the button front.

7. Place the back cover button piece on top of your paper and button front. If the cover button will be subject to repeated tugging from the back, you may want to add a little e6000 adhesive before attaching the back.
8. Take the smaller piece of the assembly tool and with the open side down place it on the button back.
9. Press down firmly. You may hear a pop when the last bit of the button back slips into place. If you take the tool out and the button is not completely secured, just put it back in and press down again.
10. When you take the small assembly tool piece off, the paper edges will be secured underneath the button back.

11. Remove the button from the larger assembly tool piece carefully using the wax/parchment paper to ease the button free.


12. If desired, you can clear coat the completed button with Modge Podge or some equivalent sealer. It will extend the life of the Paper Wrapped Cover Button and give it a glossy finish.


13. Tada! I am particularly in love with the Word Cover Buttons, it was fun picking the words I wanted centered and highlighted.
To see other great Cover Button ideas, visit our DIY Project section here.
I Like Big Buttons! - Fabric Cover Buttons - Easy To Make, Great Impact! October 09 2018
These aren't your grandma's Cover Buttons!!! Well, actually they are ;) only better, with so many many great uses for them.
Flat Backs are used for crafts where you would like to glue a cover button: jewelry, bracelets, rings, earrings, necklaces, bobby pins and barrettes, scrapbooking, and much more.
Wire Backs are used for fabric cover buttons in sewing, shoes, clothing, ponytail holders and much, much more.
Here are the 7 sizes we carry. From 1/2", which is about as small as your pinky nail, all the way up to 1 7/8" in diameter, about the size of the round side of a kiwi fruit. We carry them in both flat back (glueable) and wire back (sewable).
- Size 20 (1/2 inch / 12 mm)
- Size 24 (5/8 inch / 15 mm)
- Size 30 (3/4 inch / 19 mm)
- Size 36 (7/8 inch / 23 mm)
- Size 45 (1 1/8 inch / 28 mm)
- Size 60 (1 1/2 inch / 38 mm)
- Size 75 (1 7/8 inch / 48 mm)
Assembling fabric Cover Buttons is fast and simple. In just seconds, you will have a button ready for your latest craft project.
See our pictorial below:
How to Make Fabric Cover Buttons:
Cover Buttons are easy to assemble:
- Cut your fabric scrap. You will want a circle that is about twice the diameter of your button blank.
- Put your fabric piece in the larger assembly tool piece (RIGHT SIDE DOWN). When you look into the tool you want to see the back of the fabric.
- Place the button front (the domed piece) on top of the fabric. Leave the fabric edges hanging out.
- Press the cover button edges down into the tool.
- Place the back cover button piece on top of your fabric and button front. If the cover button will be subject to repeated tugging from the back, you may want to add a little e6000 adhesive before attaching the back.
- Take the smaller piece of the assembly tool and with the open side down place it on the button back.
- Press down. You may hear a pop when the last bit of the button back slips into place. If you take the tool out and the button is not completely secured, just put it back in and press down again.
- When you take the small assembly tool piece off, the fabric edges will be secured underneath the button back.
- Remove the button from the larger assembly tool piece.
- Tada!
To see other great Fabric Cover Button ideas, visit our DIY Project section here.
An I Like Big Buttons Christmas! Idea #12: How to Make Fabric Cover Button Barrettes and Bobby Pins December 12 2017
Gift Idea #12:
For the girls in your life, Fabric Cover Button Barrettes and Bobby Pins are simple to make with lots of impact.
Fabric Cover Button Barrettes
Supplies:
- 2 Completed Flat Back Fabric Cover Button (Choose your size, Size 20 through Size 36 all work great, size depends on the statement you want to make)
- 2 Snap Barrettes
- E6000 or comparable adhesive See More

Fabric Cover Button Bobby Pins
Supplies:
- 1 Completed Flat Back Fabric Cover Button (Choose your size, Size 20 through Size 45 all work great, size depends on the statement you want to make)
- 1 Bobby Pin
- E6000 or comparable adhesive See More

I Like Big Buttons! – How To Make A Fabric Cover Button Pendant October 03 2017

Fabric Cover Button Pendants are simple to make and add a stylish twist to any outfit. My oldest and I made some simple Cover Button Pendants for her to share with her dearest friends. We integrated her school colors into the design. We are in love with how they turned out. Can't wait to hear how her friends react!!!
We carry Pendant Bezel Trays in 23 mm (Size 36) and 38 mm (Size 60). They are available in three finishes: Silver, Antique Brass, and Gunmetal. We chose Size 60 for our project.
First Step:
Assembling fabric Cover Buttons is fast and simple. In just seconds, you will have a button ready for your latest craft project.
See our pictorial below:
How to Make Fabric Cover Buttons:
Cover Buttons are easy to assemble:
- Cut your fabric scrap. You will want a circle that is about twice the diameter of your button blank.
- Put your fabric piece in the larger assembly tool piece (RIGHT SIDE DOWN). When you look into the tool you want to see the back of the fabric.
- Place the button front (the domed piece) on top of the fabric. Leave the fabric edges hanging out.
- Press the cover button edges down into the tool.
- Place the back cover button piece on top of your fabric and button front. If the cover button will be subject to repeated tugging from the back, you may want to add a little e6000 adhesive before attaching the back.
- Take the smaller piece of the assembly tool and with the open side down place it on the button back.
- Press down. You may hear a pop when the last bit of the button back slips into place. If you take the tool out and the button is not completely secured, just put it back in and press down again.
- When you take the small assembly tool piece off, the fabric edges will be secured underneath the button back.
- Remove the button from the larger assembly tool piece.
- Tada!
*The only addendum to the above instructions was that we cut out small 3/4" red felt hearts to sandwich between each piece of lace and fabric. You will want to do this before placing the fabric upside down on the tool. Once you press the button cap into place, you can flip our translucent tool over and make sure the heart is placed where you want it.
Step 2:
- Carefully apply E6000 to the inside edges of the Pendant Bezel.
- Press the assembled Fabric Cover Button into place.
- Let dry for the recommended time, add necklace or cord as we did, and enjoy.
- Tada!

To see other great Fabric Cover Button ideas, visit our DIY Project section here.
Our 5 Most Popular Cover Button Tutorials - I Like Big Buttons! September 19 2017

These aren't your grandma's Cover Buttons!!! Well actually they are ;) only better, with so many many great uses for them.
Flat Backs are used for crafts were you would like to glue a cover button: jewelry, bracelets, rings, earrings, necklaces, bobby pins and barrettes, scrap booking, and much more.
Wire Backs are used for fabric cover buttons in sewing, shoes, clothing, pony tail holders and much, much more.
Here are our 5 most popular Cover Button Tutorials:
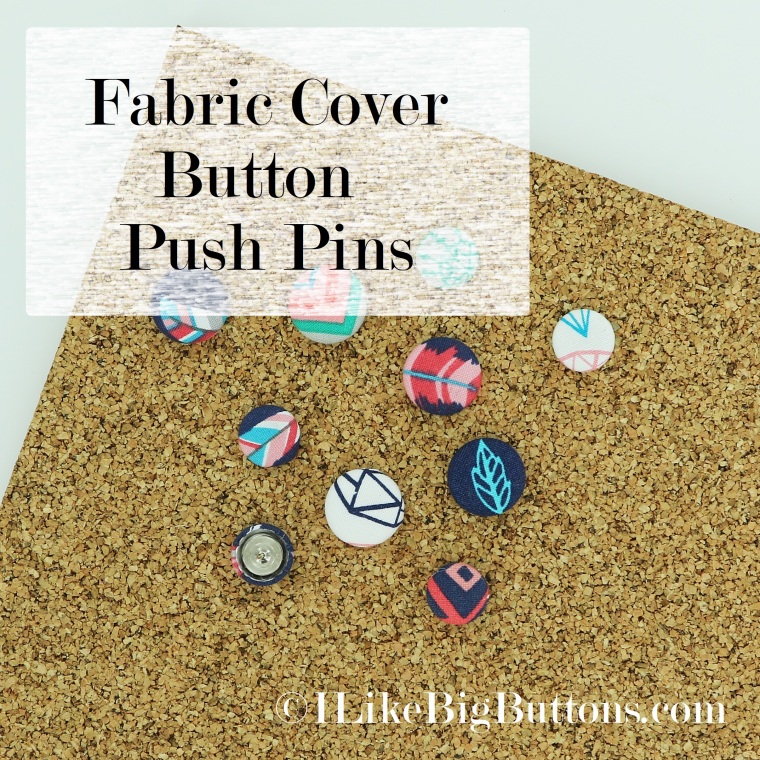
#1 - Fabric Cover Button Push Pins

#2 - Fabric Cover Button Badge Reels
![]()
#3 - Fabric Cover Button Paper Clip Bookmarks

#4 - Lace and Fabric Cover Button Earrings

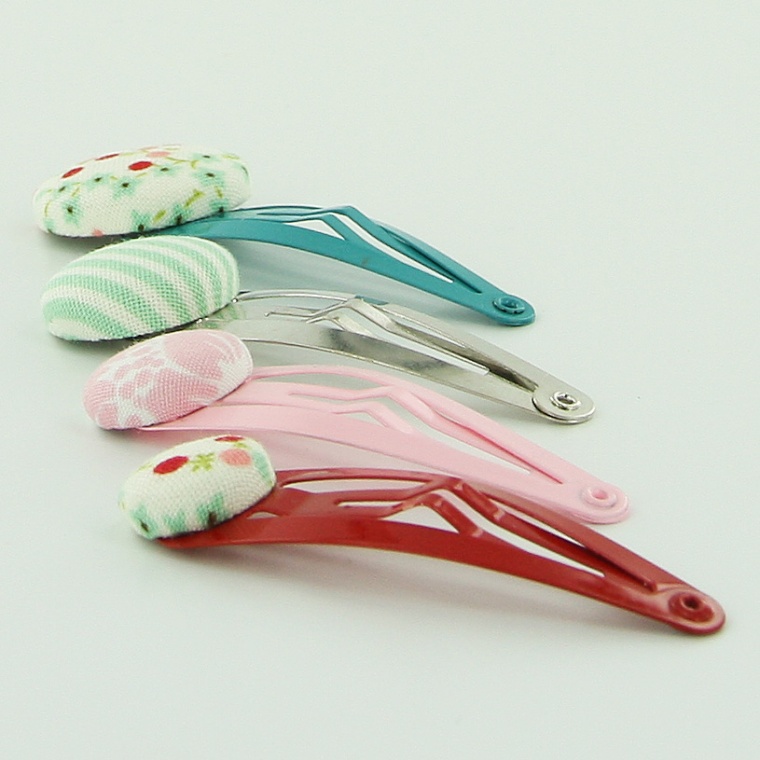
#5 - Fabric Cover Button Snap Barrettes
Fabric Cover Buttons @ I Like Big Buttons! August 07 2017
We love our Cover Buttons! Easy to make and versatile they are one of my favorite go to craft supplies.
💜💙💚💛❤️💜💙💚💛❤️💜💙💚💛❤️💜💙💚💛❤️💜💙💚💛❤️💜💙💚💛❤️💜💙💚💛❤️
Take 12% off your Cover Button order over $55 until Wednesday, August 9th with coupon code: BUTTONLOVE
💜💙💚💛❤️💜💙💚💛❤️💜💙💚💛❤️💜💙💚💛❤️💜💙💚💛❤️💜💙💚💛❤️💜💙💚💛❤️
Flat Backs are used for crafts were you would like to glue a cover button: jewelry, bracelets, rings, earrings, necklaces, bobby pins and barrettes, scrap booking, and much more.
Wire Backs are used for fabric cover buttons in sewing, shoes, clothing, pony tail holders and much, much more.
Here are the 7 sizes we carry. From 1/2", which is about as small as your pinky nail, all the way up to 1 7/8" in diameter, about the size of the round side of a kiwi fruit. We carry them in both flat back (glueable) and wire back (sewable).
- Size 20 (1/2 inch / 12 mm)
- Size 24 (5/8 inch / 15 mm)
- Size 30 (3/4 inch / 19 mm)
- Size 36 (7/8 inch / 23 mm)
- Size 45 (1 1/8 inch / 28 mm)
- Size 60 (1 1/2 inch / 38 mm)
- Size 75 (1 7/8 inch / 48 mm)
Assembling fabric Cover Buttons is fast and simple. In just seconds, you will have a button ready for your latest craft project.
See our pictorial below:
How to Make Fabric Cover Buttons:
Cover Buttons are easy to assemble:
- Cut your fabric scrap. You will want a circle that is about twice the diameter of your button blank.
- Put your fabric piece in the larger assembly tool piece (RIGHT SIDE DOWN). When you look into the tool you want to see the back of the fabric.
- Place the button front (the domed piece) on top of the fabric. Leave the fabric edges hanging out.
- Press the cover button edges down into the tool.
- Place the back cover button piece on top of your fabric and button front. If the cover button will be subject to repeated tugging from the back, you may want to add a little e6000 adhesive before attaching the back.
- Take the smaller piece of the assembly tool and with the open side down place it on the button back.
- Press down. You may hear a pop when the last bit of the button back slips into place. If you take the tool out and the button is not completely secured, just put it back in and press down again.
- When you take the small assembly tool piece off, the fabric edges will be secured underneath the button back.
- Remove the button from the larger assembly tool piece.
- Tada!
To see other great Fabric Cover Button ideas, visit our DIY Project section here.
I Like Big Buttons! - How To Make Fabric Cover Button Push Pins July 11 2017
Today I am making Fabric Cover Button Push Pins for my cork boards. I am 'trying' to get more organized with my kiddos paperwork, schedules, and notes that I need to keep track of. The cork boards are up, and now I just need some cute embellished Fabric Push Pins to jazz up my organization. :)
Supplies:
- 1 Completed Flat Back Fabric Cover Button (Attach Size 20 (1/2 inch / 12 mm), Size 24 (5/8 inch / 15 mm), Size 30 (3/4 inch / 19 mm) flat back cover buttons.)
- 1x Thumb Tack
- E6000, Hot Glue, or comparable adhesive

1. Cut your fabric scrap. You will want a circle that is about twice the diameter of your button blank. *TIP* Our All-In-One Cover Button Template makes creating the right size circle of fabric a breeze.

2. Put your fabric piece in the larger assembly tool piece (RIGHT SIDE DOWN). When you look into the tool you want to see the back of the fabric.

3. Place the button front (the domed piece) on top of the fabric. Leave the fabric edges hanging out.

4. Press the cover button edges down into the tool. *TIP* To make it easier on my fingers, I use a sharpie marker to apply pressure.

5. Place the back cover button piece on top of your fabric and button front. *TIP* If the cover button will be subject to repeated tugging from the back, you may want to add a little e6000 adhesive before attaching the back.
6. Take the smaller piece of the assembly tool and with the open side down place it on the button back.
7. Press down. You may hear a pop when the last bit of the button back slips into place. If you take the tool out and the button is not completely secured, just put it back in and press down again. *TIP* I often use a flat piece of wood to apply pressure, again to save my fingers. It also helps to avoid the button back going in at an angle.

8. When you take the small assembly tool piece off, the fabric edges will be secured underneath the button back.

9. Remove the button from the larger assembly tool piece.
10. Tada! Now to attach it to the Thumb Tack and make a Fabric Cover Button Push Pin.

11. Apply E6000 to back of Cover Button.
12. Center and press Thumb Tack into place and remove any extra Adhesive.
13. Let dry and enjoy. Tada, tada!!! So Cute!!!
To see other great Fabric Cover Button ideas, visit our DIY Project section here.
I Like Big Buttons! - How To Make A Fabric Cover Button Magnet July 06 2017

Today I would make some Fabric Cover Button Magnets. I am so tired of the random magnets my kiddos have found and slapped on our fridge. Time for some classy ones!!!
Supplies:
- 1 Completed Flat Back Fabric Cover Button (Attach either a Size 36 (7/8 inch / 23 mm), Size 45 (1 1/8 inch / 28 mm), Size 60 (1 1/2 inch / 38 mm) flat back cover buttons.)
- 1x 1" Standard Round Magnet (Approximately 3/4" Round)
- E6000, Hot Glue, or comparable adhesive

1. Cut your fabric scrap. You will want a circle that is about twice the diameter of your button blank. *TIP* Our All-In-One Cover Button Template makes creating the right size circle of fabric a breeze.

2. Put your fabric piece in the larger assembly tool piece (RIGHT SIDE DOWN). When you look into the tool you want to see the back of the fabric.

3. Place the button front (the domed piece) on top of the fabric. Leave the fabric edges hanging out.

4. Press the cover button edges down into the tool. *TIP* To make it easier on my fingers, I use a sharpie marker to apply pressure.

5. Place the back cover button piece on top of your fabric and button front. *TIP* If the cover button will be subject to repeated tugging from the back, you may want to add a little e6000 adhesive before attaching the back.
6. Take the smaller piece of the assembly tool and with the open side down place it on the button back.
7. Press down. You may hear a pop when the last bit of the button back slips into place. If you take the tool out and the button is not completely secured, just put it back in and press down again. *TIP* I often use a flat piece of wood to apply pressure, again to save my fingers. It also helps to avoid the button back going in at an angle.

8. When you take the small assembly tool piece off, the fabric edges will be secured underneath the button back.

9. Remove the button from the larger assembly tool piece.
10. Tada! Now to attach it to the Magnet and make a Fabric Cover Button Magnet.

11. Apply E6000 to back of Cover Button.

12. Center and press Magnet into place and remove any extra Adhesive if desired.

13. Let dry and enjoy. Tada!!! Now to decorate my fridge.
To see other great Fabric Cover Button ideas, visit our DIY Project section here.
I Like Big Buttons! - How To Make A Fabric Cover Button Full-Size Clothespin June 20 2017
Today, I made an adorable office or home accent: Fabric Cover Button Mini Clothespins. I am absolutely in love with their bright colors and tininess!
Supplies:
- 1 Completed Flat Back Fabric Cover Button (Attach Size 30 (3/4 inch / 19 mm), Size 36 (7/8 inch / 23 mm), or Size 45 (1 1/8 inch / 28 mm) flat back cover buttons.)
- 1x Full-Size Wooden Clothespin
- 1x Medium Plain Button
- E6000, Hot Glue, or comparable adhesive
I Like Big Buttons! - Picture Tutorial Below:

1. Cut your fabric scrap. You will want a circle that is about twice the diameter of your button blank. *TIP* Our All-In-One Cover Button Template makes creating the right size circle of fabric a breeze.

2. Put your fabric piece in the larger assembly tool piece (RIGHT SIDE DOWN). When you look into the tool you want to see the back of the fabric.
3. Place the button front (the domed piece) on top of the fabric. Leave the fabric edges hanging out.

4. Press the cover button edges down into the tool. *TIP* To make it easier on my fingers, I use a sharpie marker to apply pressure.

5. Place the back cover button piece on top of your fabric and button front. *TIP* If the cover button will be subject to repeated tugging from the back, you may want to add a little e6000 adhesive before attaching the back.
6. Take the smaller piece of the assembly tool and with the open side down place it on the button back.
7. Press down. You may hear a pop when the last bit of the button back slips into place. If you take the tool out and the button is not completely secured, just put it back in and press down again. *TIP* I often use a flat piece of wood to apply pressure, again to save my fingers. It also helps to avoid the button back going in at an angle.

8. When you take the small assembly tool piece off, the fabric edges will be secured underneath the button back.
9. Remove the button from the larger assembly tool piece.
10. Tada! Now to attach it to the Clothespin.


11. Use Hot Glue or E6000 to adhere a small plain button to the underside of the Cover Button. This is to fill the space between the back and the edges. You can also use felt or some other small object. You just need it to be sturdy enough to offer support. A small plastic button works great for this. You will see that the button is now flush across the bottom. I cut off the little nubs of glue that leaked through the button holes.


12. Now adhere the finished Cover Button to the Clothespin. Press into place and center it until you are pleased with the alignment. Set aside to dry.
13. Tada! Additional uses:
- Add a thin magnet to the back and use on your magnetic board.
- Add a push pin to the back and use on your cork board.
To see other great Fabric Cover Button ideas, visit our DIY Project section here.
I Like Big Buttons! - How To Make A Magnetic Pin Cushion/Needle Holder June 06 2017
Today, I made an handy sewing accessory: Fabric Cover Button Pin Cushion/Needle Holder. I love the splash of color they add to my sewing station and their usefulness!
Supplies:
- 1 Completed Size 75 (1 7/8 inch / 48 mm) Fabric Cover Button
- Fabric Of Your Choice
- 1x Standard Round Magnet (Approximately 3/4" Round)
- E6000, Hot Glue, or comparable adhesive
I Like Big Buttons! - Picture Tutorial Below:
1. Cut your fabric scrap. You will want a circle that is about twice the diameter of your button blank. *TIP* Our All-In-One Cover Button Template makes creating the right size circle of fabric a breeze.
2. Put your fabric piece in the larger assembly tool piece (RIGHT SIDE DOWN). When you look into the tool you want to see the back of the fabric.
3. Glue the magnet inside the back of the Cover Button with Hot Glue or E6000.
4. Place the button front (the domed piece) on top of the fabric. Leave the fabric edges hanging out.
5. Press the cover button edges down into the tool. *TIP* To make it easier on my fingers, I use a sharpie marker to apply pressure.
6. Place the back cover button piece on top of your fabric and button front. *TIP* If the cover button will be subject to repeated tugging from the back, you may want to add a little e6000 adhesive before attaching the back.
7. Take the smaller piece of the assembly tool and with the open side down place it on the button back.
8. Press down. You may hear a pop when the last bit of the button back slips into place. If you take the tool out and the button is not completely secured, just put it back in and press down again. *TIP* I often use a flat piece of wood to apply pressure, again to save my fingers. It also helps to avoid the button back going in at an angle.
9. When you take the small assembly tool piece off, the fabric edges will be secured underneath the button back.
9. Remove the button from the larger assembly tool piece.
10. Tada! Now you have an attractive Pin Cushion/Needle Holder for your sewing room.
To see other great Fabric Cover Button ideas, visit our DIY Project section here.
I Like Big Buttons! - Fabric Cover Buttons - Easy To Make, Great Impact! May 22 2017
These aren't your grandma's Cover Buttons!!! Well actually they are ;) only better, with so many many great uses for them.
Flat Backs are used for crafts were you would like to glue a cover button: jewelry, bracelets, rings, earrings, necklaces, bobby pins and barrettes, scrap booking, and much more.
Wire Backs are used for fabric cover buttons in sewing, shoes, clothing, pony tail holders and much, much more.
Here are the 7 sizes we carry. From 1/2", which is about as small as your pinky nail, all the way up to 1 7/8" in diameter, about the size of the round side of a kiwi fruit. We carry them in both flat back (glueable) and wire back (sewable).
- Size 20 (1/2 inch / 12 mm)
- Size 24 (5/8 inch / 15 mm)
- Size 30 (3/4 inch / 19 mm)
- Size 36 (7/8 inch / 23 mm)
- Size 45 (1 1/8 inch / 28 mm)
- Size 60 (1 1/2 inch / 38 mm)
- Size 75 (1 7/8 inch / 48 mm)
Assembling fabric Cover Buttons is fast and simple. In just seconds, you will have a button ready for your latest craft project.
See our pictorial below:
How to Make Fabric Cover Buttons:
Cover Buttons are easy to assemble:
- Cut your fabric scrap. You will want a circle that is about twice the diameter of your button blank.
- Put your fabric piece in the larger assembly tool piece (RIGHT SIDE DOWN). When you look into the tool you want to see the back of the fabric.
- Place the button front (the domed piece) on top of the fabric. Leave the fabric edges hanging out.
- Press the cover button edges down into the tool.
- Place the back cover button piece on top of your fabric and button front. If the cover button will be subject to repeated tugging from the back, you may want to add a little e6000 adhesive before attaching the back.
- Take the smaller piece of the assembly tool and with the open side down place it on the button back.
- Press down. You may hear a pop when the last bit of the button back slips into place. If you take the tool out and the button is not completely secured, just put it back in and press down again.
- When you take the small assembly tool piece off, the fabric edges will be secured underneath the button back.
- Remove the button from the larger assembly tool piece.
- Tada!
To see other great Fabric Cover Button ideas, visit our DIY Project section here.
I Like Big Buttons! "No Sew" Valentine's Day Craft Ideas February 03 2017

![]()


As we approach Valentine's Day, lets look at some fun and easy "No Sew" Cover Button crafts we can make for those we love!
Take 10% Off on any Cover Button order on our website through 1/10/17 with Coupon Code: NOSEWVALENTINE
Valentine's Day Fabric Cover Button Barrettes
Wear these adorable Snap Barrettes to match or accent your favorite outfit for Valentine's Day or dress up your favorite t-shirt and jeans for an afternoon outing. Enjoy!
Supplies:
- 1-2 Completed Flat Back Fabric Cover Button (Choose your size, Size 20 through Size 36 all work great, size depends on the statement you want to make)
- 2 Snap Barrettes
- E6000 or comparable adhesive ... See More

Valentine's Day Fabric Cover Button Jumbo Paper Clip Bookmarks
Use these adorable Paper Clip Bookmarks to accent a Valentine for your special loved one or hold your place in your favorite book or cook book. Enjoy!
Supplies:
- 1 Completed Flat Back Fabric Cover Button (Attach size 36 (7/8" - 23 mm), size 45 (1 1/8" - 28 mm), or size 60 (1 1/2" - 38 mm) flat back cover buttons.)
- 1 Jumbo Paper Clip
- 1 6" Piece of Ribbon
- E6000 or comparable adhesive ... See More

Valentine's Day Fabric Cover Button Badge Reels
Use these adorable Valentine's Day Badge Reels to hold your ID for work, school, or play. Enjoy!
Supplies:
- 1 Completed Flat Back Fabric Cover Button (Size 45 sits on top of Badge Reel, Size 60 rest over Badge Reel)
- 1 Badge Reel
- E6000 or comparable adhesive ... See More
![]()
Lace & Fabric Cover Button Earrings
Give these cute Lace & Fabric Cover Button Earrings as Valentine gift for your best friend or loved ones. Enjoy!
Supplies:
- Flat Back Cover Buttons (I used Size 24, Size 30, and Size 36 Cover Buttons)
- Cover Button Assembly Tools
- Cover Button Templates
- Fabric Scraps
- Lace Scraps
- E6000 Adhesive or Hot Glue
- Sharpie Permanent Marker
- Surgical Stainless Steel Earring Posts and Backs ... See More
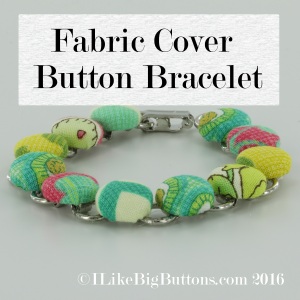
Fabric Cover Button Bracelet Tutorial
Give this charming Cover Button Bracelet as Valentine gift for your best friend or loved ones. Enjoy!
Supplies:
- 11 to 13 - Completed Size 20 Flat Back Fabric Cover Buttons
- 1 Disk and Loop Bracelet (We have two sizes available 7.2" or 8.25")
- 11 to 13 - 1/2" x 1/2" Felt squares
- E6000 or comparable adhesive ... See More

Give these adorable Cover Button Bobby Pins as Valentine gifts for your best friend or loved ones. Enjoy!
Supplies:
- 1 Completed Flat Back Fabric Cover Button (Choose your size, Size 20 through Size 45 all work great, size depends on the statement you want to make)
- 1 Bobby Pin
- E6000 or comparable adhesive ... See More
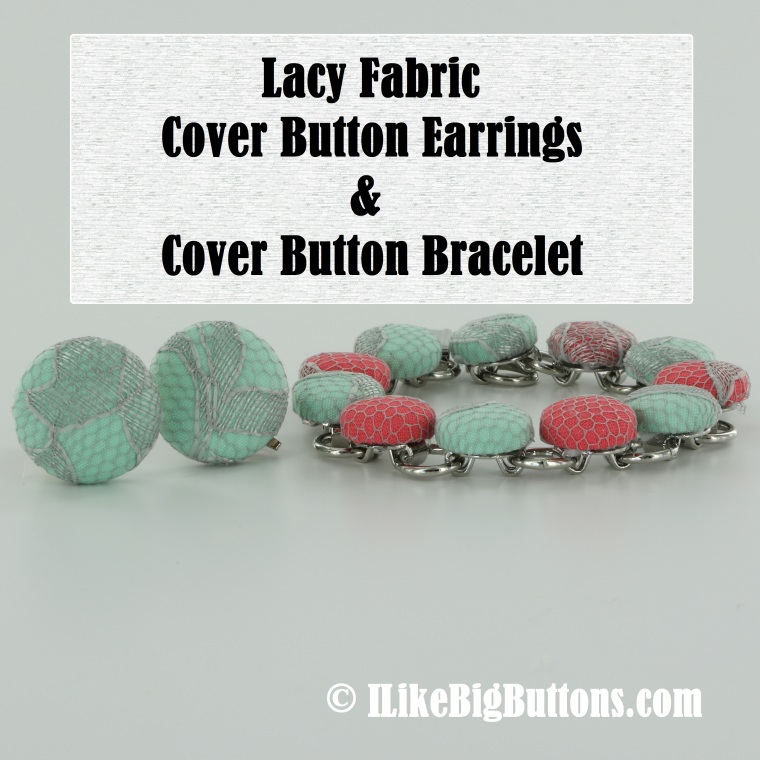
I Like Big Buttons! Lacy Fabric Cover Button Earrings and Cover Button Bracelet November 12 2016
Today I worked alongside my daughter to make her dear friend a special and one of a kind birthday gift. I think they turned out great and it was wonderful to get to work with one of my kiddos. :)
Take 10% off our Cover Buttons on our website (Good through 11/14): BUTTONLOVE
Lacy Fabric Cover Button Earring Supplies:
- Flat Back Cover Buttons (I used Size 30, but you can also use Size 24 and Size 36 Cover Buttons)
- Cover Button Assembly Tools
- Cover Button Templates
- Fabric Scraps
- Lace Scraps
- E6000 Adhesive or Hot Glue
- Sharpie Permanent Marker
- Clip On Earring Backs or Surgical Stainless Steel Earring Posts and Backs
Lacy Fabric Cover Button Bracelet Supplies:
- Size 20 Flat Back Cover Buttons
- Cover Button Assembly Tools
- Cover Button Templates
- Fabric Scraps
- Lace Scraps
- 11 to 13 - Completed Size 20 Flat Back Fabric Cover Buttons
- 1 Disk and Loop Bracelet (We have two sizes available 7.2" or 8.25")
- 11 to 13 - 1/2" x 1/2" Felt squares
- E6000 or comparable adhesive
Check out our Tutorials below.
Lacy Fabric Cover Button Earring Tutorial here.
Fabric Cover Button Bracelet Tutorial here.
To see our other great Fabric Cover button ideas, visit our DIY Project section here.
I Like Big Buttons! - 7 Fabric Cover Button Sizes October 18 2016
Assembling fabric Cover Buttons is easy and fun, here are the 7 sizes we carry. Our buttons range from 1/2" to 1 7/8" in diameter. We also carry them in both flat back (glueable) and wire back (sewable). Check out our website for more Cover Button tutorials, tips and crafty ideas.
- Size 20 (1/2 inch / 12 mm)
- Size 24 (5/8 inch / 15 mm)
- Size 30 (3/4 inch / 19 mm)
- Size 36 (7/8 inch / 23 mm)
- Size 45 (1 1/8 inch / 28 mm)
- Size 60 (1 1/2 inch / 38 mm)
- Size 75 (1 7/8 inch / 48 mm)
Try our Cover Buttons today using Coupon Code (10% off Cover Buttons on our site until 10/23/16): BUTTONLOVE
Cover Button FAQs: Wire Back vs Flat Back September 13 2016
- Assembling fabric covered buttons is easy and fun but did you know there are two distinct kinds?
- Wire Back or Shank Back, as they are sometimes called, are sew able and meant to be attached with a thread and needle to your sewing project.
- Flat Back are glue able and meant to be attached to your craft project with glue to a flat surface or glue pad.
I Like Big Buttons! - Wire Back vs Flat Back
To see other great Fabric Cover Button ideas, visit our DIY Project section here.
Cover Button FAQs: How To Convert Wire Back To Flat Back Tip #2 April 13 2016
-
Assembling fabric covered buttons is easy and fun but did you know you can convert Wire Back Cover Buttons to Flat Back Cover Buttons in 1 simple step?
- Watch how easy it is below:
I Like Big Buttons! - How To Covert Wire Back To Flat Back
To see other great Fabric Cover Button ideas, visit our DIY Project section here.
- Page 1 of 2
- Next