News
Fixing A Instrument Carrying Case For My Musician With KAM Snaps April 21 2022
"Mom, all the zippers on my flute case are broken now." My musician held up his formerly zip-able case in one hand, his flute in his other.
KAM plastic snaps to the rescue. I went for the quick fix because there is only two months of school left. We will buy a replacement case next school year if he continued with band.
Supplies:
- Long Prong KAM Snaps (4 sets)
- KAM Pliers and Awl
- Marine Vinyl
- Standard Sewing Machine

I sewed two tabs out of double-sided marine vinyl and zigzag stitched them to the top of the soft case. Then, with Long Prong Size 20 KAM plastic snaps, I attached a tab to each side of the case, so that my musician can snap and unsnap the case easily.

Because my musician is an active kiddo, a track team member and an all-round busy boy, I wanted a second layer of defense for his flute.


With the same marine vinyl, I made 4x 1" double-layered bands and zigzag stitched them to the bottom inside of the case in sets to meet across the top of the flute's hard case. Finally, I attached a Long Prong Size 20 KAM plastic snap set to each side and SNAP, his flute is secure.
Tada! Problem solved!
How To Install KAM Plastic Snaps with KAM Hand Pliers @ ILikeBigButtons.com March 29 2022
KAM® Snap Removal Pliers Sale @ ILikeBigButtons.com March 07 2022
Do you own a set of KAM® Snap Removal Pliers yet? They may be my favorite KAM tool. They take the frustration out of removing broken or miss-set snaps. And they're a Snap to use!
If you need to remove a plastic snap, this is by far the easiest means for removing it and our KAM Snap Removal Pliers are on sale right now.
KAM Plastic Snap Removal Pliers @ ILikeBigButtons.com March 24 2021

KAM Plastic Snap Removal Pliers may be my favorite tool. They make removing a broken or miss-set snap a breeze. (See video below for demonstration.)
Only $19.95 (Originally $29.95)
No Coupon Necessary (Good thru 3/31/21)
These pliers are the most effective and simplest way to remove a snap. They are gentle on the fabric. Only the hole from the removed prong remains. They also in many cases leave the socket or stud intact and reusable.
KAM Plastic Snap Removal Pliers:
- KAM Plastic Snap Removal Pliers
- Size 20 Socket Removal Die (works fine with Size 14, 16, and 19)
- Size 20 Stud Removal Die (works fine with Size 14, 16, and 19)
- Additional Rubber Head
- Screwdriver (for changing removal dies)
If you need to remove a plastic snap, this is by far the easiest means for removing it. If you would prefer to remove a snap with tools you may already have, we do have videos on how to do that here.
Making a Fabric Cover Button Metal Pacifier Clip @ ILikeBigButtons.com February 26 2021
 |
 |
 |
 |
 |
 |
 |
 |
 |
 |
 |
 |
 |
 |
 |
 |
 |
 |
 |
 |
 |
 |
 |
 |
 |
||
Supplies:
- 2 KAM Snap Sets
- KAM Snap Pliers and Awl
- Round Faced Metal Clips or Enamel Pacifier Clips
- 1 Size 36 Flat Back Cover Button
- Size 36 Assembly Tool
- Size 36 Template
- Fabric Scraps
- E6000 Adhesive
- Pre-made Pacifier Clips (see Pacifier Clip and Supply Tutorials)
Instructions:
- Using our Pacifier Clip and Supply Tutorials make either Ribbon or Fabric Pacifier Clips.
- Cut your fabric scrap. You will want a circle that is about twice the diameter of your button blank. I cut out a Piece of Fabric using my Size 36 Template.
- Put your fabric piece in the larger assembly tool piece (RIGHT SIDE DOWN). When you look into the tool you want to see the back of the fabric.
- Place the button front (the domed piece) on top of the fabric. Leave the fabric edges hanging out. Double check the transparent underside to see if your print is how you would like it. Then press the cover button fabric edges down into the tool.
- Add a dab of E6000 Adhesive to the middle of the cover button cap before installing the Flat Back.
- Place the back cover button piece on top of your fabric and button front.
- Take the smaller piece of the assembly tool and with the open side down place it on the button back.
- Press down. You may hear a pop when the last bit of the button back slips into place. If you take the tool out and the button is not completely secured, just put it back in and press down again.
- When you take the small assembly tool piece off, the fabric edges will be secured underneath the button back.
- Remove the button from the larger assembly tool piece. Tada! My Cover Button is ready to be adhered to a Round Faced Metal Clip.
- Here are the Cover Buttons I made in just a few minutes. Seriously easy, fun and so cute!
- Now take the E6000 Adhesive and put a medium size dab of glue on the back of the cover button about 1/2 of what would fill the back area of the back. This glue is great to work with so don't overly worry about getting the amount right. I was able to cleanly wipe of any excess off when I put on too much and I was also able to remove the button and add a little more when I under did it. This glue is very forgiving.
- Now place the Cover Button over the Round Faced Metal Pacifier Clips and straighten and center your button.
- Press firmly and let set to dry and cure 24-72 hours as recommended by the manufacturer (E6000).
- These are my finished products. I love them and think they turned out beautifully. Below are my examples, completed and installed on Pacifier Clips.
-
Tada!!!
Disclaimer: Keep in mind that although I have rough tested these I in no way recommend you leave your baby alone with these as there are small pieces and if not done properly they may come apart and become a choking hazard. I would recommend these clips under adult supervision only. The maker and/or parent assumes full responsibility when using these pacifier clips.
K1 KAM Plastic Snap Pliers Versus K2 ILBB Plastic Snap Pliers January 08 2021
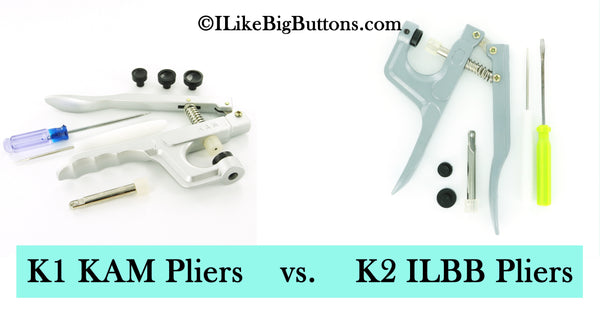
We get a lot of questions about the difference between K1 and K2 plastic snap pliers. Both K1 and K2 pliers work great for applying plastic snaps. They are lightweight, portable, and easy to use.
The K1 pliers are KAM® branded pliers, the same quality brand as the snaps we carry. They come with four (4) dies:
The K2 pliers are manufactured for our I Like Big Buttons!® brand. They are a more economical option for those who aren't looking to do all that many snaps. They come with three (3) dies:
K1 are sturdier and have more robust dies than K2. If you are just doing a few snaps, the K2 is not a bad choice, and some people like them better for Size 16 snaps. The K1 pliers do a nicer job on Size 20 snaps and work great on Size 16.

K1 pliers form the snaps creating a small rounded dome in the socket and stud center. K2 pliers form more of a flat pancake with a bullseye impression that some like for Size 16 snaps, as it can make them snap together a little easier.
If grip strength is an issue, K2 pliers require less force to sufficiently set snaps.
In general, we recommend K1 over K2, but both work great.
What are you feeling Thankful, Grateful, and Blessed about today? November 23 2020

Jean Pacifier Clip with Fabric Rosette November 16 2020


Supplies for a Recycled Jean Pacifier Clip with Fabric Rosette:
- 1 Pair of Holey Jeans
- 1 1/2" to 2" x 24" long strip of Fabric
- 1 KAM Plastic Pacifier Clip
- 1 KAM Snap Sets
- KAM Snap Pliers and Awl
- Sewing Clips
- Standard Sewing Machine
- Hot Glue Gun
- Fabri-Tac - Fabric Adhesive
Instructions:
- Using an old, holey pair of Jeans cut two 1 1/2" x 14" strips of material.
- Use Sewing Clips to hold the material, wrong sides together, right sides facing out.
- Stitch around the strip of fabric about a 1/4 to 3/8" in all the way around making sure to backstitch at the start and end.
- Pull on the edges to fray the jean material up to the stitch you made. I used a crafty child :) with a cutting board and a fork. It will also fray over time but I was going for this look.
- To make the Fabric Rosette, fold the fabric in half, wrong sides together, two times. You will end up with about 1/2" or less strip of fabric 24" long. I used an iron to fold it, not so much that it was completely flat, just enough that it held its shape. Start at one end and hot glue the first bit of it back against itself.
- Continue this ever so often so that the 'bud' stays together.
- Make the bud or center of the rose about 1/2" in diameter. Add one last drop of hot glue.
- Now twist the fabric 360 degrees, so that the bottom becomes the top. Tack it with a small bead of hot glue and repeat.
- Continue twisting and gluing until you run out of fabric or until you reach the desired size of your rosette.
- It will look like this when you are finished.
- Glue the last bit of fabric on the underside of the Rosette securely with hot glue.
- For a more finished look, I added a circle of felt to the bottom with Fabri-Tac.
- Put the KAM Plastic Pacifier Clip on the Fabric strip about 1″ in.
- Fold back 1″ of the strip back onto itself.
- Straight stitch across the fabric strip just behind the KAM Plastic Pacifier Clip. Make sure to set the stitch.
- Make sure that the internal snap in a comfortable distance to accommodate the width of the handle, I spaced my KAM Snaps about 2″ apart using the Pacifier I have with the biggest handle.
- Now on the side where the Pacifier will be attached, I installed a Cap and Socket about 1/2″ from the edge. I used Size 20 snaps for this tutorial but either Size 20 or Size 16 will work great.
- Add Fabric Rosette with Fabri-Tac to the Pacifier Clip just above the clip.
- Now snap the Pacifier in place, attach to your child’s outfit and go.
- Tada! Okay, I think I am in love. Super cute! Happy Snapping!!! To see our other great Pacifier Clip Tutorial and KAM Plastic Snap Ideas and buy these supplies visit I Like Big Buttons.com.
Disclaimer: Keep in mind that although I have rough tested these I in no way recommend you leave your baby alone with these as there are small pieces and if not done properly they may come apart and become a choking hazard. I would recommend these clips under adult supervision only. The maker and/or parent assumes full responsibility when using these pacifier clips.
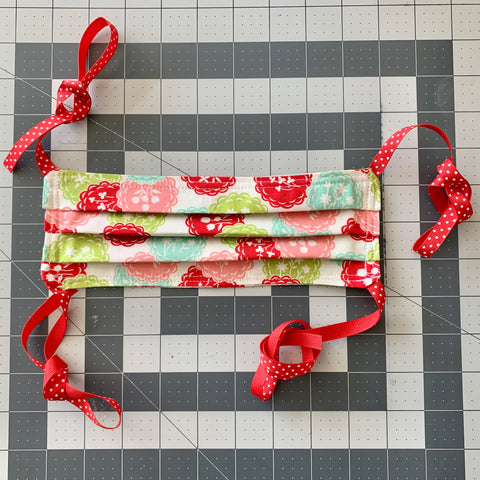
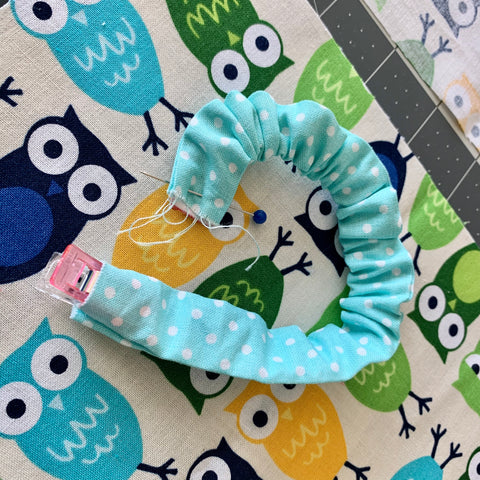
Face Mask with Scrunchy Earpieces Using KAM Plastic Snaps Tutorial by ILikeBigButton.com April 23 2020

As a precaution, I have been making our family some face masks. Nothing fancy, I was limited to what supplies I had on hand. I made a mask with Elastic earlier, this one will be with ribbon ties.
So with some fabric scraps, ribbon (they mentioned you could use shoelaces as an option), sewing clips, and my trusting sewing machine, I found a set of instructions and struck out.
Here is the #1 version and #2 version I made:


Supplies:
- Face Mask Instructions (I used these as general guidelines)
- 2x 9.5" x 6.5" pieces of Fabric
- 2x 2" x 12" pieces of Fabric
- 2x 7" of Elastic (this is a good average size, but may need to be adjusted if you are a smaller person)
- KAM Plastic Snaps
- KAM Plastic Snap Pliers
- Sewing Clips
- Sewing Machine
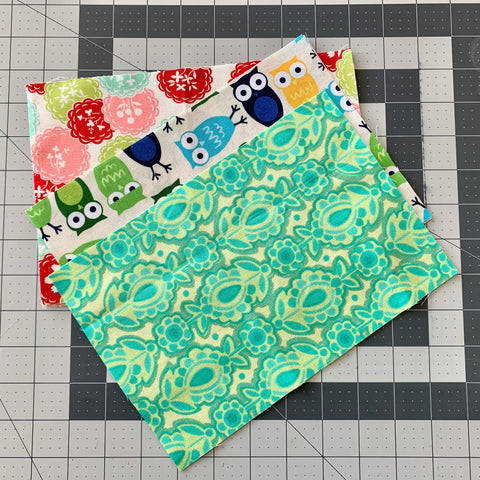
1. Cut out 2x 9.5" x 6.5" fabric rectangles and 2x 2" x 12" fabric rectangles.
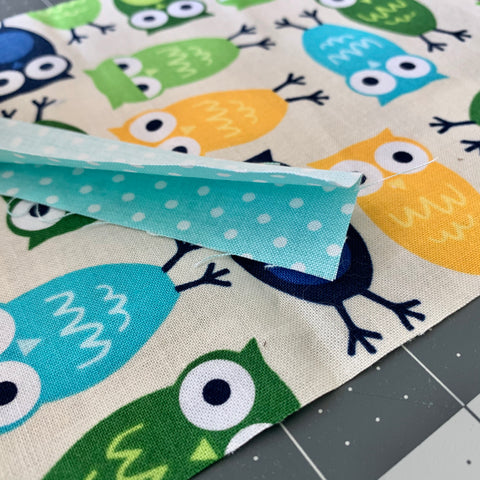
2. Iron the 2"x12" in half making a 1"x 12" fabric strip with right side facing in. Make 2.

3. Sew 1/4" seam along the long side (12" long seam) and turn then the tube right side out. Iron smooth.
4. Fish a 7" piece of elastic through the tube, I used a sewing clip to keep the back end of the elastic from getting lost in the tube. Pin the elastic level with the end of the tube. It should start to scrunch up some. The tube is 12" long and the elastic is 7" long. Tuck the fabric into the tube without losing the elastic (use a second pin to keep in place) and sew the finished end of the earpiece that will be exposed. Make 2.
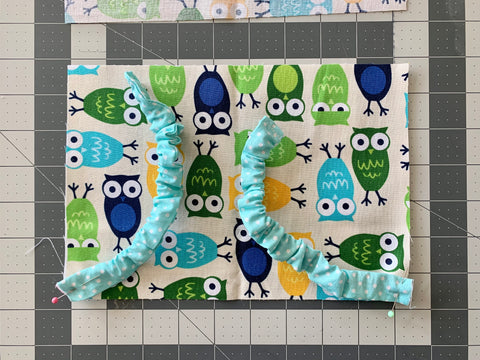
5. With the right side of 9.5" x 6.5" fabric facing up, pin the 2 fabric and elastic earpieces to the bottom corners. Like so.
6. Pin the second piece of 9.5" x 6.5" fabric facing down to the fabric with the earpieces tucked safely inside. Make sure the earpieces don't get caught in the edges while sewing.
7. Sew a 1/4" seam starting about 1/2 way on the long side. Go all the way around the perimeter, stopping when you have about 1.5" to 2" left. Make sure to go back and forth at each of the corners to anchor the ribbon. Leave that gap so that you can turn the face mask right side out.
8. Turn the mask right side out and iron it flat.
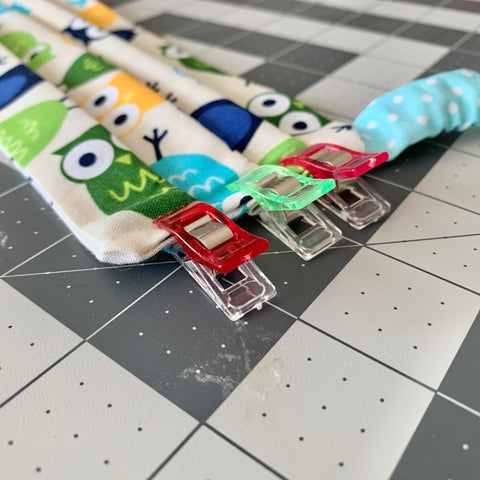
9. Make three pleats lengthwise, like you are folding a paper fan. I eyed it and used the sewing clip width as my pleat measurer, but if I was making more than a handful of these, I would make myself a template to make this part easier. The pleats help the mask form around the wearer’s face. Secure each pre-sewn pleat with a sewing clip as pictured above.
10. Now sew a 1/4" stitch around the outer perimeter of the mask face, going back and forward over the corners to add more stability to the ribbon.
11. Then, top stitch a second time around the outer edge about 1/4" in from the first round of stitching.

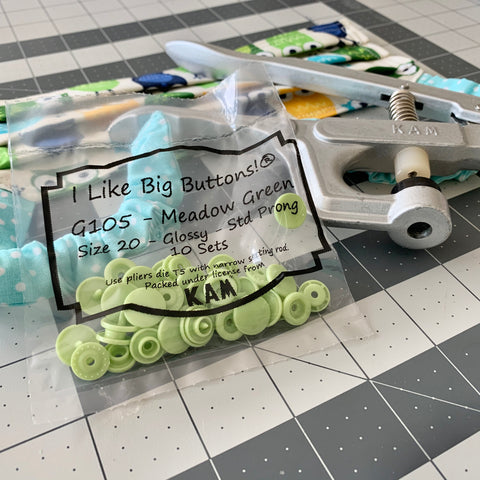
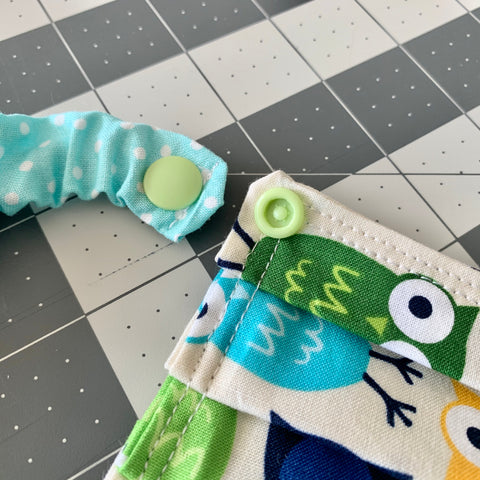
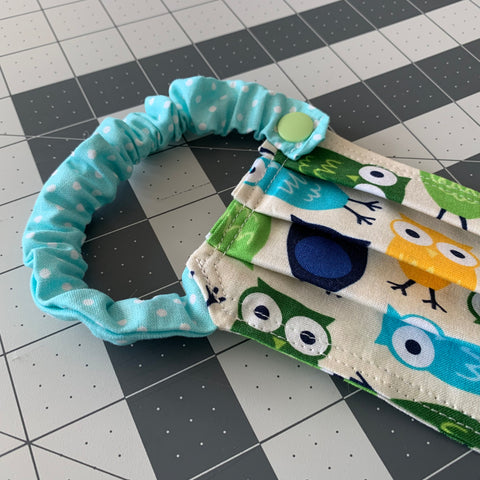
12. Using your KAM Plastic Snap Pliers and KAM Plastic Snaps add a snap to the upper edge of the mask and the end of the loose earpiece.
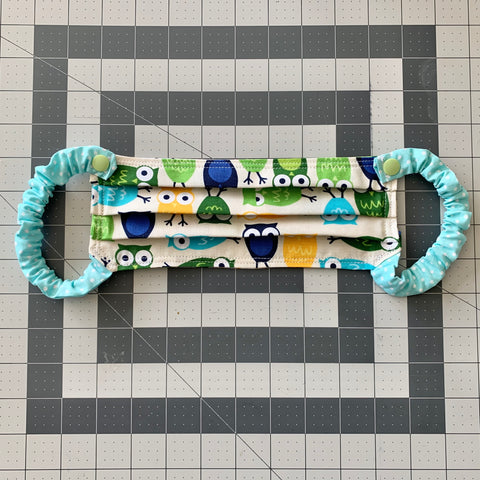
13. Tada! You have a finished face mask. This was my husband's favorite because the elastic didn't rub and pull at his ears. I added a second KAM Plastic Snap in pink to each side to make the mask work better with my face.
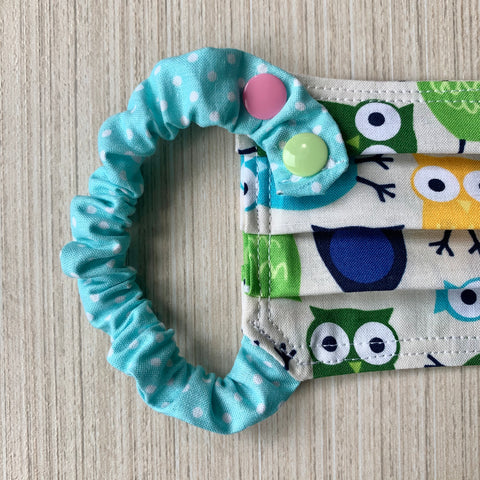
*Afterthoughts, this mask was the perfect size for my husband, but I added another KAM Plastic Snap an inch in for me on the scrunchy earpiece. This also worked for my teens, but I will need to adjust for my smaller kiddos. This mask seems best sized for teens to adults.
I Like Big Buttons! Fun Facts: How We Prepare Our Plastic Snaps And Why October 28 2019
For all our new friends and followers of I Like Big Buttons!, it seemed like a great time to introduce you to our amazing Plastic Snaps!!! For those of you who have been with us for a long time, here is a refresher.
We carry a variety of package deals for our snaps from 10 sets, 25 sets, 100 sets up to thousands of KAM snaps with and without pliers or professional press all at a great price. We have a listing for just about everyone at the price range and quantity you desire.
Our 25 packs sets came to be largely for cloth diapers, but over the last decade, they have become our most popular quantity for both our cloth diaper makers and our embroidery, snap tab making, and general sewing customers.
We provide the best of both worlds, smaller packs to those that want greater variety and larger packs for those looking to use snaps in bulk.

Some of the other these reasons we offer these great options include:
* An equally large demand for “just a sampling of every color”, which gave birth to our sets of 10 and Starter Packs.
* We also offer individual parts in quantities of 100 and 1000 in all of KAM Plastic Snaps 130+ colors.
If you aren't sure how to jump into plastic snaps, we also carry starter packs including multi-packs of 10 or 25 sets of snaps. If you are new to snapping, we have starter packs with plastic snap pliers, awl, and an instructional DVD. These Starter Packs are a great way to get addicted :). We have 18 preset themes including Rainbow Spectrum, Pastel Spectrum, Vibrant Boy, Vibrant Girl, Patriotic, Military, and many others.
Check out our convenient Starter Packs:
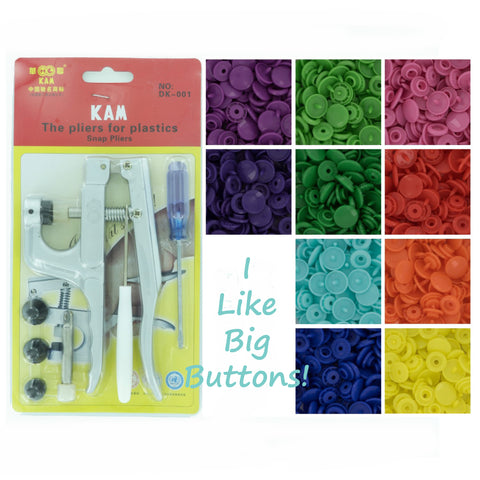
We also offer an option to choose your own colors. You can pick from any of KAM Plastic Snaps 130+ fun colors. Have you taken a moment to check out our easy to navigate KAM Snap Visual Ordering Chart!?!

Here is our chart of available colors, we carry over 130+ great KAM Plastic Snap colors.

Other KAM Plastic Snap Deals going on right now:
Rainbow GRAB BAG: Random 1000* Kam Plastic Snaps for $21.95 (Regularly $35.95)

1000* Kam Snaps/Plastic Snaps for $18.95 (Regularly $35.95)

See our Clearance and Sales Section for other great deals!
How To Make A KAM Plastic Snap Cord Keeper/Organizer by ILikeBigButtons.com February 05 2019
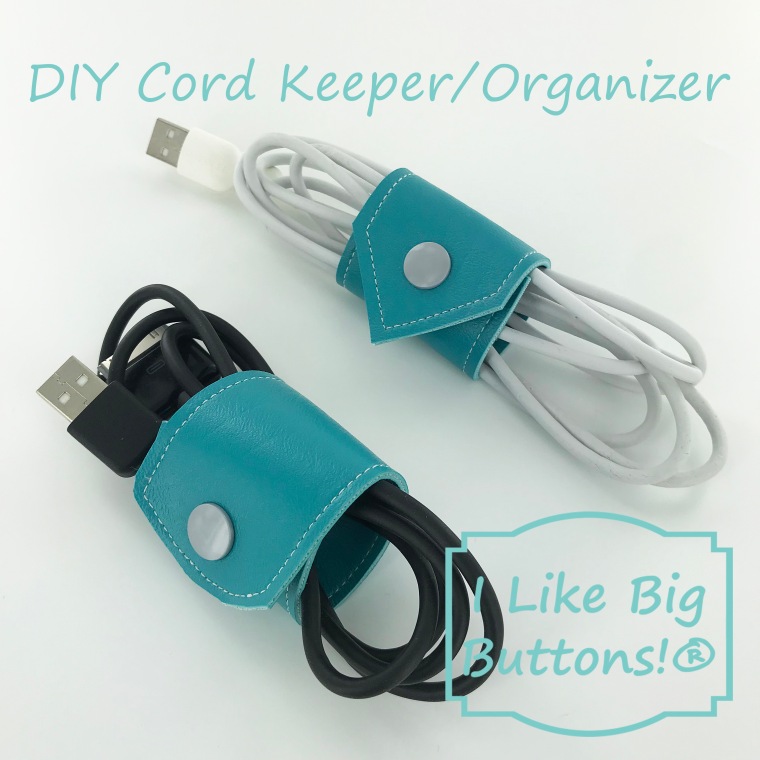
Cords, cords, cords!!! Despite my husband's best efforts to make our house wireless, there are cords everywhere. Part of the joy of being a mom of many, I suppose. 😜 Everyone has one or more somethings that need to be charged and my husband makes sure there are enough cords so that no one is left crying. Have I mentioned he is my resident computer wiz? A job he proudly takes on.
So with cords abounding in my life and house, I decided we needed a better way to manage them all. Here are the results of my efforts. Cord keepers/organizers to simplify my life and corral the cords we can't live without. 🤪
Supplies:
- Approximately 5.25" x 2" Marine Vinyl or material of your choice
- KAM Plastic Snaps (I used Long Prong KAM Plastic Snaps because I was working with 2 layers of Marine Vinyl)
- KAM Plastic Snap Pliers and Awl
- Sewing Clips
- Standard Sewing Machine
- Scissors
- Rotary Cutter

Instructions:
1. Cut out your material of choice, I used Marine Vinyl I had left over from a summer project. I cut each piece approximately 5.25" x 2" and gave them two different styles of finished ends. One is a pointed end, I used my quilting square to accomplish this, and the other has a rounded end, I used a small drinking cup to create the rounded tip. *The cords I was making these for were 6' cords, you may need to adjust the length of your cord keeper to accommodate a larger or smaller cord.


2. Place the two pieces of Marine Vinyl with wrong sides together and pin with Sewing Clips, if desired. Straight stitch with a 1/4" seam around the whole piece using a back stitch at the beginning and end to set the stitch.
3. Trim the edges down to 1/8" to remove the excess vinyl and any uneven edges. The Marine Vinyl can slip a little bit when you are sewing and I found this was the easiest way to get a clean edge.
4. Measure to the center at the top and bottom of each cord keeper/organizer and place a mark where you want your KAM Plastic Snap to sit. I don't like to eye it as I often find them off-center when I wing it.
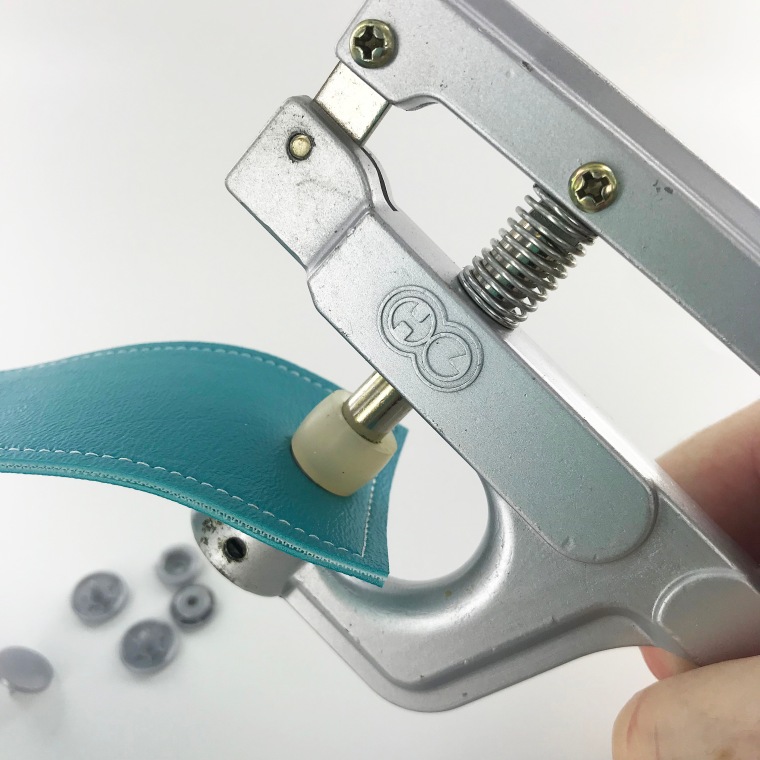
5. Poke a hole through the centered mark with your KAM Awl and insert the KAM Plastic Snap Cap prong through the hole. You will want the cap on the top side (the side that was up when sewing) of your cord keeper and the socket or stud on the bottom side.
6. Flip the cord keeper over and add the socket. Install the KAM Plastic Snap Cap and Socket on the edge that is rounded or pointed and a Cap and Stud on the square edge as pictured below.

7. Remember to install the snaps so that one half (Cap and Stud) are face up and one (Cap and Socket) are face down so that when you fold the cord keeper around the cord, the socket and stud meet.
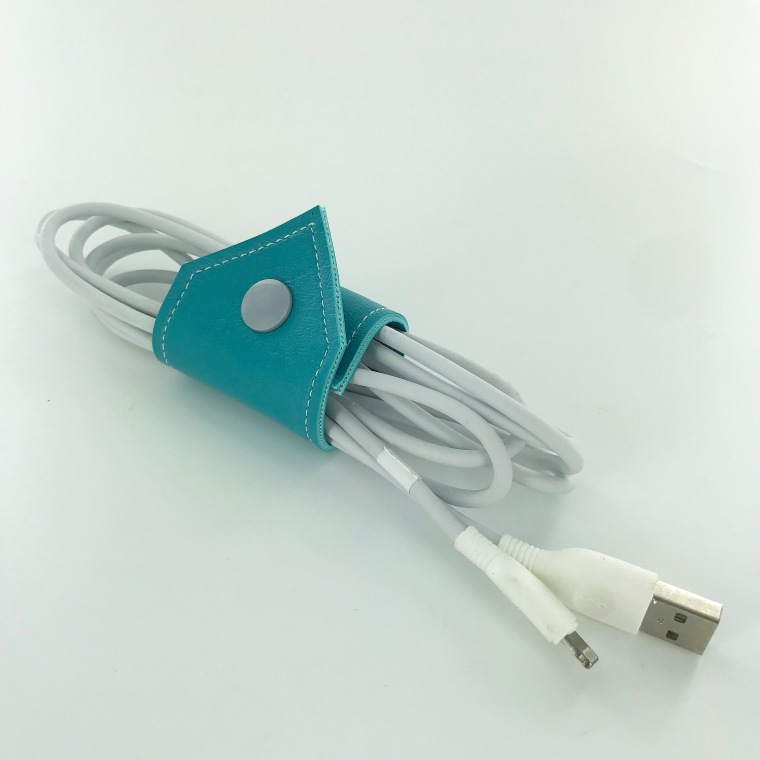

8. Tada! These cord keepers/organizers take only minutes to make with scraps of vinyl/fabric, a few KAM Plastic Snaps, and are already making my life feel less crazy. At least until they all get home from school. 😜
To see other great KAM Plastic Snap ideas, visit our DIY Project section here.
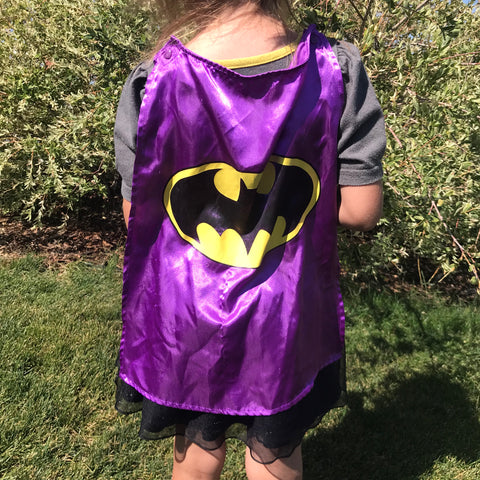
When Batgirl's Velcro Cape Won't Stay Put Anymore ... July 24 2018

An I Like Big Buttons Christmas! Idea #10: How to Make a Hanging Kitchen Towel with KAM Snaps December 08 2017

Gift Idea #10:
Hanging Kitchen Towels are easy to make, functional, and add a nice punch of color to any kitchen.
Supplies:
- 1 Tea or Kitchen Towel
- 4 KAM Snap Sets
- KAM Snap Pliers and Awl
Instructions:
1. My towel is 12" wide so I decided to do 4 sets of KAM Snaps to make sure the towel doesn't sag. With a ruler and a marker, I marked 1/4" down x 1" in on each corner and then 3" over from each corner mark. See More
Pin for Later: https://www.pinterest.com/pin/201184308328848275/
#ilikebigbuttons #shopilikebigbuttons #kamsnaps #plasticsnaps #kitchengear #kitchenideas #snapping #itsasnap #christmasidea #gift #christmasgift

An I Like Big Buttons Christmas! Idea #7: How to make a Bandana Bib with KAM Snaps and a PDF Pattern December 05 2017

Gift idea #7: One of our most popular tutorials, Bandana Bibs are a great gift for those little droolers and mess makers in your life or as an outfit accessory. So cute! I, also, used our Heart Shaped KAM Snaps for added pizazz, check it out!
Supplies:
- Fabrics of your choice
- 1 Heart Shaped KAM Snap Set
- KAM Snap Pliers and Awl
- Bandana Bib PDF Pattern (may need to adjust for your child's size or add more KAM Snaps settings)
- Standard Sewing Machine
Instructions:
- Download the Bandana Bib PDF Pattern. Print out the pattern making sure the 1″ square in the corner measures 1″ square when printed that will indicate the pattern is the right size. ... See More
Pin it for later: http://www.pinterest.com/pin/201184308328918372/
#ilikebigbuttons #kamsnaps #plasticsnaps #bandanabib #droolbib #tutorial #pdfpattern #shopilikebigbuttons
Snapping is so easy! You can do it!

I Like Big Buttons! How To Apply KAM Plastic Snaps With Hand Pliers August 28 2017

How To Apply KAM Plastic Snaps With Hand Pliers Slideshow:
OR
How To Apply KAM Plastic Snaps With Hand Pliers Video:
Today I spent the day laying out a photo slideshow of how to apply KAM plastic snaps with hand pliers. Installing snaps is, well, a SNAP to do! Check out how simple it is below.
Supplies:
- KAM Snap Pliers and Awl
- 1 Complete KAM Plastic Snap Set (2 Round Caps, 1 Studs, and 1 Socket)
- Scrap of Fabric or Sewing Project


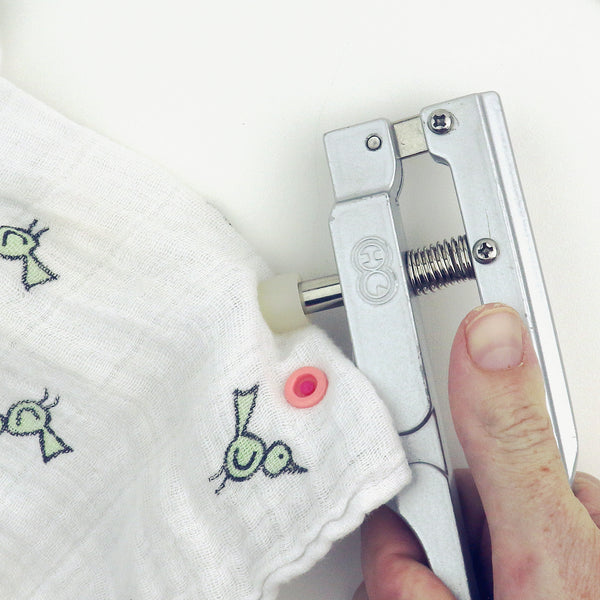
1. Use the Awl to poke a hole where you want to install the KAM plastic snap.

2. Press the plastic snap Cap through the hole created by the Awl. The prong of the Cap will be visible.

3. Settle the Socket over the prong shaft.

4. Use the Hand Pliers to install the Cap and Socket together.

5. The Cap should be securely nestled in the die before you apply pressure. I am using Size 20 snaps so the T5 die is installed. Each size of snap has a correlating die.

6. Apply firm hand pressure. The rubber head should bulge slightly as pictured.

7. The prong of the Cap is now flattened. When formed, the prong will compress and form a 'mushroom' shape to hold the Cap and Socket together.

8. Repeat steps to create the Stud side of the snap. Create a hole with the Awl and insert the Cap. The prong of the Cap will be visible.

9. Settle the Stud over the prong shaft.

9. Use the Hand Pliers to install the Cap and Stud together.
10. Apply firm hand pressure. The rubber stopper should bulge slightly.

11. The prong of the Cap is now flattened. When formed, the prong will compress and form a 'mushroom' shape to hold the Cap and Stud together.

12. Now simply press the snaps sides together.

13. You have created a plastic snap that is durable, functional, and adds a colorful finish to your project.


14. Both sides of your snap have a clean finished look.

15. Happy Snapping!!!