News
Face Mask with Ribbon Using Sewing Clips Tutorial by ILikeBigButton.com April 13 2020

As a precaution, I have been making our family some face masks. Nothing fancy, I was limited to what supplies I had on hand. I made a mask with Elastic earlier, this one will be with ribbon ties.
So with some fabric scraps, ribbon (they mentioned you could use shoelaces as an option), sewing clips, and my trusting sewing machine, I found a set of instructions and struck out.
Here is the first version I made:


Supplies:
- Face Mask Instructions (I used these as general guidelines)
- 2x 9.5" x 6.5" pieces of Fabric
- 4x 18" of Ribbon or brand new Shoelaces (this is a good average size, but may need to be adjusted if you are a smaller person)
- Sewing Clips
- Sewing Machine
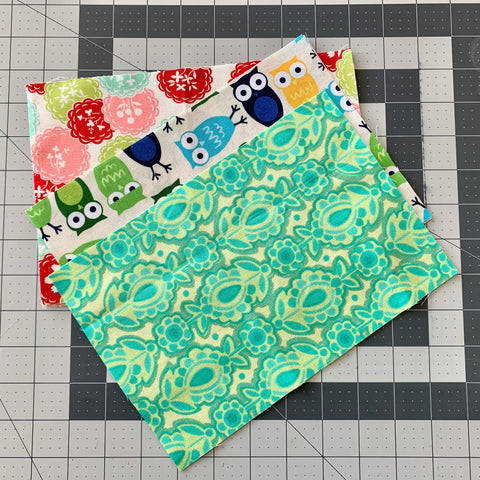
1. Cut out 2x 9.5" x 6.5" fabric rectangles.

2. With right side of 9.5" x 6.5" fabric facing up, pin a piece of 18" ribbon in each corner. Like so.
3. Pin the second piece of 9.5" x 6.5" fabric facing down to the fabric with the ribbon pinned to it. Make sure the tails of the ribbon don't get caught in the edges while sewing. I tied the ribbon into loose loops to keep them from finding their way into the edge seam.
4. Sew a 1/4" seam starting about 1/2 way on the long side. Go all the way around the perimeter, stopping when you have about 1.5" to 2" left. Make sure to go back and forth at each of the corners to anchor the ribbon. Leave that gap so that you can turn the face mask right side out.

5. Turn the mask right side out and iron it flat.


6. Make three pleats lengthwise, like you are folding a paper fan. I eyed it and used the sewing clip width as my pleat measurer, but if I was making more than a handful of these, I would make myself a template to make this part easier. The pleats help the mask form around the wearer’s face. Secure each pre-sewn pleat with a sewing clip as pictured above.
7. Now sew a 1/4" stitch around the outer perimeter of the mask face, going back and forward over the corners to add more stability to the ribbon.
8. Then, top stitch a second time around the outer edge about 1/4" in from the first round of stitching.
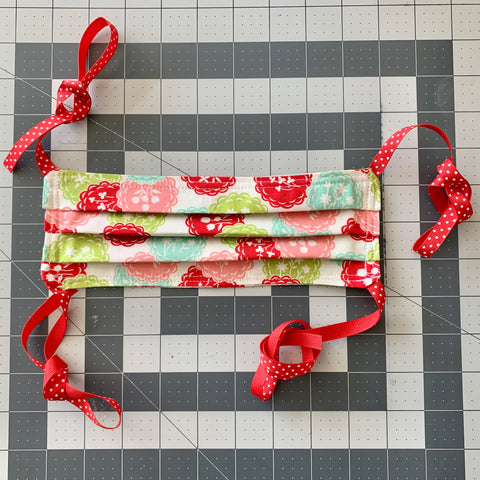
9. Tada! You have a finished face mask.
*Afterthoughts, my kiddos will need smaller masks, this one seems best sized for teens to adults.
Size 24 (5/8 inch / 15 mm) Self Cover Buttons by ILikeBigButtons.com February 26 2020

We love our Cover Buttons! Easy to make and versatile they are one of my favorite go-to craft supplies.
We carry them in 7 great sizes. The second smallest, Size 24 (5/8"), is just slightly larger in diameter than a Skittle or M&M and available in both Wire Back (sewable) and Flat Back (glueable).
Size 24 (5/8 inch / 15 mm)

Size Reference

I Like Big Buttons! 💘 Cover Button Love Sale 💘
Cover Button Sets and Cover Button DIY Kits are 10% OFF | No Coupon Necessary
Size 24 Cover Buttons are great for smaller projects:
Lace & Fabric Cover Button Earrings

Fabric Cover Button Mini Clothespins

Fabric Cover Button Bobby Pins

Fabric Cover Buttons for your favorite outfit


To see other great Fabric Cover Button ideas, visit our DIY Project section here.
How To Make A Self Fabric Cover Button: 7 Fabric Cover Button Sizes February 21 2020
Easy Peasy! So Much Fun!
Cover Button Tips:
- The size of the fabric circle for each Cover Button size should be approximately twice the diameter of your button blank. If you would like a matching sized reusable plastic circle template, simply choose "Add Template" from the drop-down menu and the correct sized tool will be added to your order.
- When the circle of fabric and Cover Button Cap are snugly situated in the clear base of the Cover Button tool, flip the tool over and double-check the positioning of your fabric. If it has a pattern, you will see a preview of how the button will form and can make adjustments to the fabric before you install the back.
- You may want to add a dab of E6000 or comparable adhesive before installing the Cover Button Back as a precaution to ensure a permanent hold.
- Save your fingers: Tip #1 - Use the backside of a permanent marker or comparable item on the smaller sized Cover Button Caps to press them into the clear base of the Cover Button tool.
- Save your fingers: Tip #2 - Take a flat piece of wood and use it to apply even downward pressure on the pink plunger of the Cover Button installation tool when installing the back. Not so much pressure that you flatten the button, just until it pops into place.
- To remove the Cover Button from the clear base once it has been formed, bend the mold slightly and push up from the bottom to pop out the button.
"No Sew" KAM Plastic Snaps Backpack Embellishments by ILikeBigButtons.com August 28 2019

My kiddos wanted a little embellishment on their backpacks this year so that they could tell theirs from the sea of backpacks at school. Simple, "No Sew", and I was able to customize each kiddo's backpack to match their personality. KAM plastic snaps to the rescue!

Mr. J wanted his backpack in his favorite color: Orange! He picked Size 20 KAM Plastic Snaps - B52 - Dark Orange.
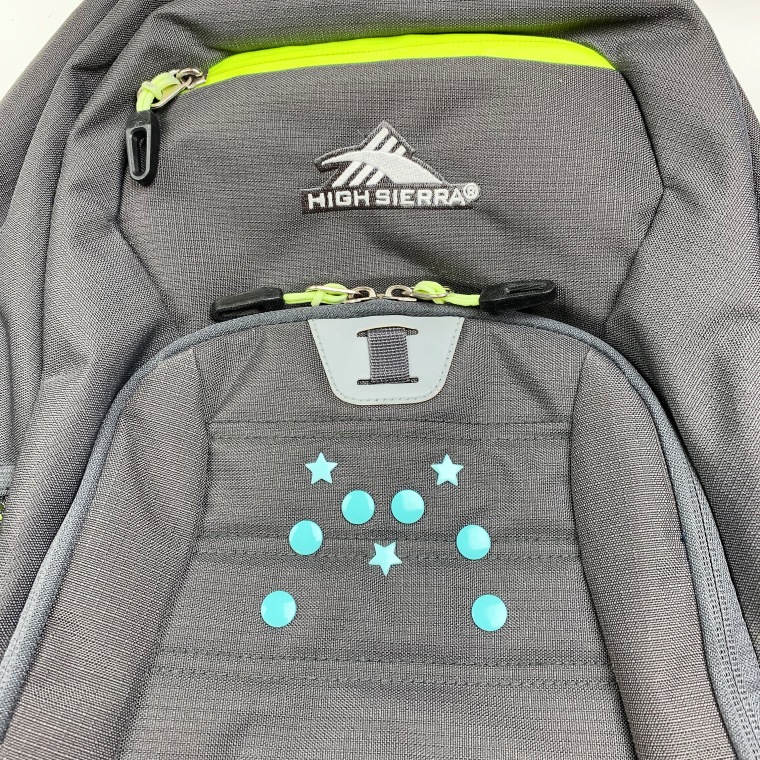

Mr. M likes a little pizzazz in his wardrobe and his backpack is no exception. He picked Size 20 KAM Plastic Snaps - G96 -Mirror (Round shaped) and Star-Shaped KAM Plastic Snaps - G124 - Robin's Egg Blue.

Miss E is all about love. She chose Heart-Shaped KAM Plastic Snaps in G99 - Lilac and G96 - Mirror.
To see other great KAM Plastic Snap ideas, visit our DIY Project section here.
Adding Button Enclosure to Sweatpants Pocket with KAM Plastic Snaps by ILikeBigButtons.com July 22 2019

I love my slouchy sweatpants for getting work done around the house, but their comfortable pockets are useless when for holding onto my phone when I am talking to my sister while we clean via wireless headsets. :) KAM plastic snaps to the rescue! I turned my useless slouch pocket into a secure button enclosed, phone holding pocket in just a few seconds with KAM plastic snaps.
Supplies:

I used some fun colored snaps from the KAM plastic snaps Grab Bag making bucket.

Easy Peasy, I wore my phone around all day while I cleaned and worked. It was secure the whole time and with a quick unsnapping on hand when I needed it. KAM plastic snaps are the BEST!

Tada! I can see tons of hand-free cleaning in my future without fear that my phone will fall out of my pocket while I am moving.
To see other great KAM Plastic Snap ideas, visit our DIY Project section here.
"No Sew" Valentine's Day Craft Ideas from ILikeBigButtons.com February 13 2019
 |
 |
 |
 |
 |
 |
I can't believe Valentine's Day snuck up on us so fast, let's look at some fun and easy "No Sew" Cover Button crafts we can make for those we love!
Don't forget our DIY Kits are on sale on our website through 2/15/19, no coupon necessary.
Valentine's Day Fabric Cover Button Barrettes
Wear these adorable Snap Barrettes to match or accent your favorite outfit for Valentine's Day or dress up your favorite t-shirt and jeans for an afternoon outing. Enjoy!
Supplies:
- 1-2 Completed Flat Back Fabric Cover Button (Choose your size, Size 20 through Size 36 all work great, size depends on the statement you want to make)
- 2 Snap Barrettes
- E6000 or comparable adhesive ... See More

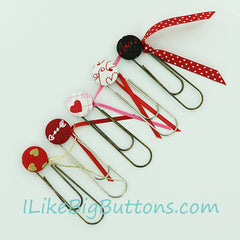
Valentine's Day Fabric Cover Button Jumbo Paper Clip Bookmarks
Use these adorable Paper Clip Bookmarks to accent a Valentine for your special loved one or hold your place in your favorite book or cookbook Enjoy!
Supplies:
- 1 Completed Flat Back Fabric Cover Button (Attach size 36 (7/8" - 23 mm), size 45 (1 1/8" - 28 mm), or size 60 (1 1/2" - 38 mm) flat back cover buttons.)
- 1 Jumbo Paper Clip
- 1 6" Piece of Ribbon
- E6000 or comparable adhesive
- Sand Paper ... See More

Valentine's Day Fabric Cover Button Badge Reels
Use these adorable Valentine's Day Badge Reels to hold your ID for work, school, or play. Enjoy!
Supplies:
- 1 Completed Flat Back Fabric Cover Button (Size 45 sits on top of Badge Reel, Size 60 rest over Badge Reel)
- 1 Badge Reel
- E6000 or comparable adhesive
- Sand Paper ... See More

Lace & Fabric Cover Button Earrings
Give these cute Lace & Fabric Cover Button Earrings as Valentine gift for your best friend or loved ones. Enjoy!
Supplies:
- Flat Back Cover Buttons (I used Size 24, Size 30, and Size 36 Cover Buttons)
- Cover Button Assembly Tools
- Cover Button Templates
- Fabric Scraps
- Lace Scraps
- E6000 Adhesive or Hot Glue
- Sharpie Permanent Marker
- Surgical Stainless Steel Earring Posts and Backs ... See More

Fabric Cover Button Bracelet Tutorial
Give this charming Cover Button Bracelet as Valentine gift for your best friend or loved ones. Enjoy!
Supplies:
- 11 to 13 - Completed Size 20 Flat Back Fabric Cover Buttons
- 1 Disk and Loop Bracelet (We have two sizes available 7.2" or 8.25")
- 11 to 13 - 1/2" x 1/2" Felt squares
- E6000 or comparable adhesive ... See More

Give these adorable Cover Button Bobby Pins as Valentine gifts for your best friend or loved ones. Enjoy!
Supplies:
- 1 Completed Flat Back Fabric Cover Button (Choose your size, Size 20 through Size 45 all work great, size depends on the statement you want to make)
- 1 Bobby Pin
- E6000 or comparable adhesive ... See More

How To Make A KAM Plastic Snap Cord Keeper/Organizer by ILikeBigButtons.com February 05 2019
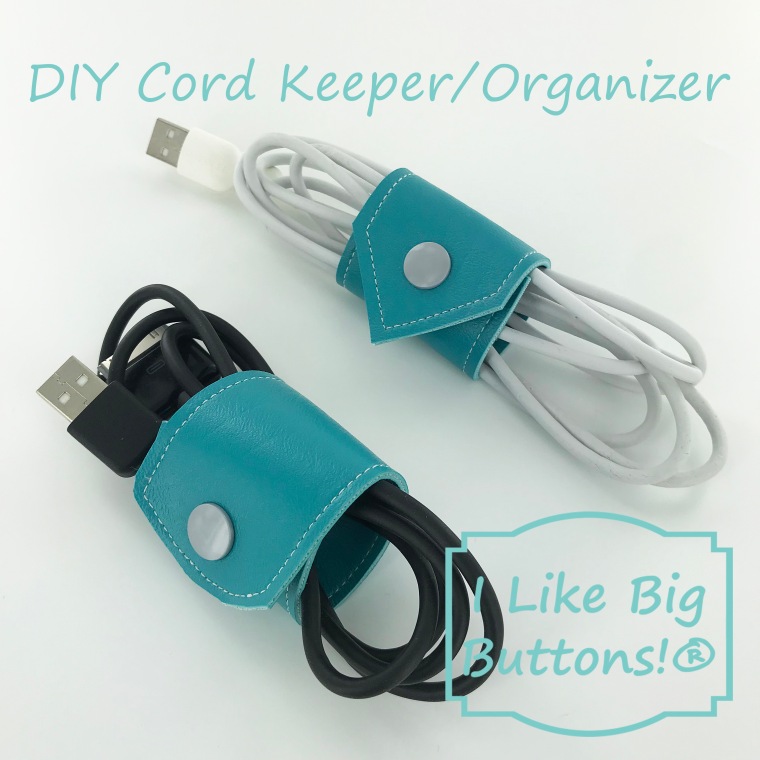
Cords, cords, cords!!! Despite my husband's best efforts to make our house wireless, there are cords everywhere. Part of the joy of being a mom of many, I suppose. 😜 Everyone has one or more somethings that need to be charged and my husband makes sure there are enough cords so that no one is left crying. Have I mentioned he is my resident computer wiz? A job he proudly takes on.
So with cords abounding in my life and house, I decided we needed a better way to manage them all. Here are the results of my efforts. Cord keepers/organizers to simplify my life and corral the cords we can't live without. 🤪
Supplies:
- Approximately 5.25" x 2" Marine Vinyl or material of your choice
- KAM Plastic Snaps (I used Long Prong KAM Plastic Snaps because I was working with 2 layers of Marine Vinyl)
- KAM Plastic Snap Pliers and Awl
- Sewing Clips
- Standard Sewing Machine
- Scissors
- Rotary Cutter

Instructions:
1. Cut out your material of choice, I used Marine Vinyl I had left over from a summer project. I cut each piece approximately 5.25" x 2" and gave them two different styles of finished ends. One is a pointed end, I used my quilting square to accomplish this, and the other has a rounded end, I used a small drinking cup to create the rounded tip. *The cords I was making these for were 6' cords, you may need to adjust the length of your cord keeper to accommodate a larger or smaller cord.


2. Place the two pieces of Marine Vinyl with wrong sides together and pin with Sewing Clips, if desired. Straight stitch with a 1/4" seam around the whole piece using a back stitch at the beginning and end to set the stitch.
3. Trim the edges down to 1/8" to remove the excess vinyl and any uneven edges. The Marine Vinyl can slip a little bit when you are sewing and I found this was the easiest way to get a clean edge.
4. Measure to the center at the top and bottom of each cord keeper/organizer and place a mark where you want your KAM Plastic Snap to sit. I don't like to eye it as I often find them off-center when I wing it.
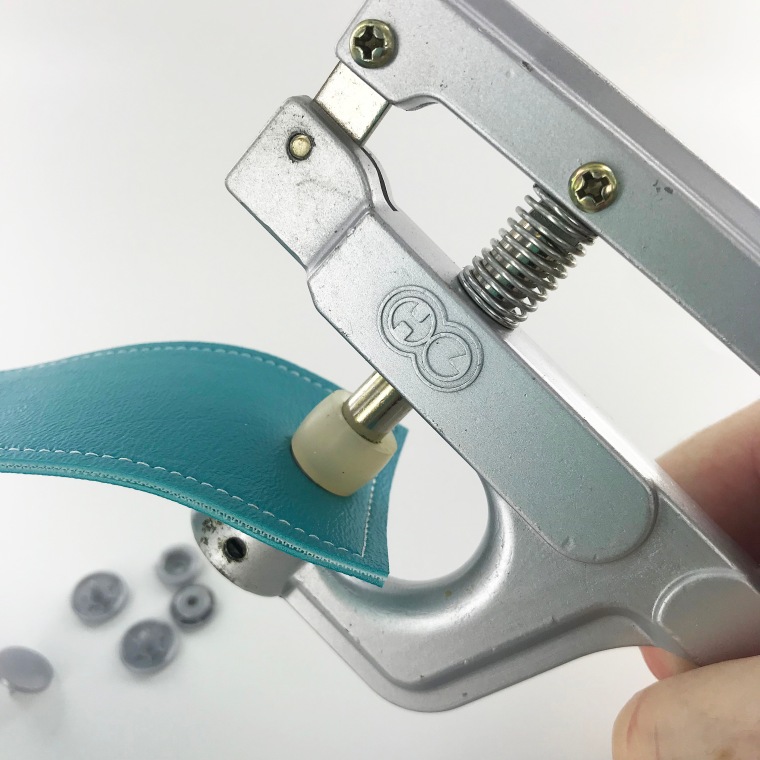
5. Poke a hole through the centered mark with your KAM Awl and insert the KAM Plastic Snap Cap prong through the hole. You will want the cap on the top side (the side that was up when sewing) of your cord keeper and the socket or stud on the bottom side.
6. Flip the cord keeper over and add the socket. Install the KAM Plastic Snap Cap and Socket on the edge that is rounded or pointed and a Cap and Stud on the square edge as pictured below.

7. Remember to install the snaps so that one half (Cap and Stud) are face up and one (Cap and Socket) are face down so that when you fold the cord keeper around the cord, the socket and stud meet.
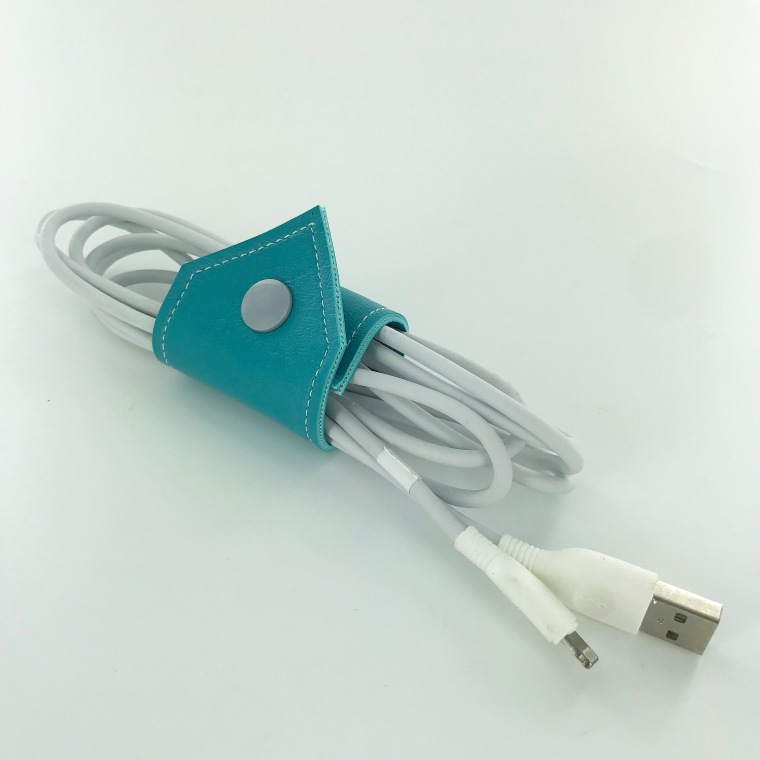

8. Tada! These cord keepers/organizers take only minutes to make with scraps of vinyl/fabric, a few KAM Plastic Snaps, and are already making my life feel less crazy. At least until they all get home from school. 😜
To see other great KAM Plastic Snap ideas, visit our DIY Project section here.
- Previous
- Page 2 of 2