30 Days of KAM Snaps and Beyond!!! How to make a Reversible Finished Edge Coffee Cozy with KAM Snaps and Free PDF Pattern October 16 2014
Day #37
How to make a Reversible Coffee Cozy with KAM Snaps and Free PDF Pattern
A couple days ago, I made a couple cute Coffee Cozys for my cousin's birthday. Here is the second promised tutorial showing how to make the Reversible Finished Edge Coffee Cozy. KAM Snaps to the rescue again!
Supplies:
- Fabric of your choosing
- Insulation/batting layer
- 2 KAM Snap Sets
- KAM Snap Pliers and Awl
- Standard Sewing Machine


Instructions:
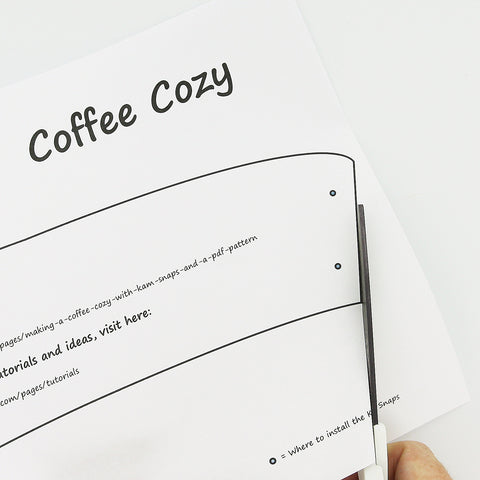
1. Download the Reversible Finished Edge Coffee Cozy PDF Pattern. Print out the pattern making sure the 1″ square in the corner measures 1″ square when printed that will indicate the pattern is the right size. This pattern works on standard sized 12 ounce and 16 ounce cups. My models were Dixie and Chinet brands.
2. Cut out each Pattern piece as many times as instructed. The first time I made this the pattern, though it fitted the cup as a paper template, did not fit when fully finished. I have added an additional 2" to the pattern to adjust for the loss in length as fabric sewn and fitted (the pattern has been adjusted and 1/4" seam allowance tabs were added). Make sure to wash and dry your fabrics before making this pattern if you plan to wash them later to avoid shrinkage.

3. Original picture of pattern on fabric (pattern has been adjusted).

4. Cut out 3 pieces, front and back fabric and interlining because this is going to be an exposed layer I used Felt. You can use whichever material you like, this layer is for protection from the heat of the cup of coffee, tea, or hot chocolate.

5. Pin the 3 layers of fabric together. Bottom fabric right side up, batting, and top fabric right side down.

6. Starting just off center on the bottom, stitch all a 1/4" seam allowance all the way around the Cozy stopping 2-3" from finishing. Leaving an opening to turn the piece right side out.

7. Turn the Cozy right side out, I used a small butter/frosting knife to get the corners as square as possible.

8. Carefully fold and pin the opening closed.

9. Top stitch a 1/4" seam allowance all the way around the Cozy making sure to back stitch at the beginning and end of your work.

10. Install 2 KAM Snap Caps and 2 Studs on the left side and install 2 KAM Snap Caps and 2 Sockets on the other side. I have included "blue dots" on the template to approximate where to place them but it is best to wrap the snap-free Coffee Cozy around a Coffee Cup to see how it fits and where you would like to place the snaps. I placed the top and bottom KAM Snaps about 1/2" down from the finished seam edge of the Cozy.

11. Here is the finished product both front and back. You will note that it is reversible and that I coordinated the snaps so that it has different color snaps parts on each side. Just seemed extra fun :)!


12. Tada! I think they turned out great! I did another tutorial to show the Reversible Frayed Edge Coffee Cozy too. Check it out here!!!